> ## Documentation Index
> Fetch the complete documentation index at: https://docs.aftersell.com/llms.txt
> Use this file to discover all available pages before exploring further.

# 初めてのチェックアウトウィジェットの作成

> Aftersellでチェックアウトウィジェットを設定する手順を、ウィジェットの選択と作成からスタイルと動作のカスタマイズまで解説します。

この記事では、Aftersellでチェックアウトウィジェットを設定する手順を順を追って説明します。利用可能なウィジェットの種類については、[こちらをクリック](/ja/aftersell/checkout_widget_types)してください。

さっそく始めましょう。

***

<div id="step-1-selecting-your-widget">
  ## ステップ1：ウィジェットを選択する
</div>

まずは、ニーズに合ったウィジェットを選択します。アップセルウィジェットでもテスティモニアルウィジェットでも、Aftersellはお好みに応じたさまざまな選択肢を提供しています。

このチュートリアルでは、アップセルウィジェットを選択します。
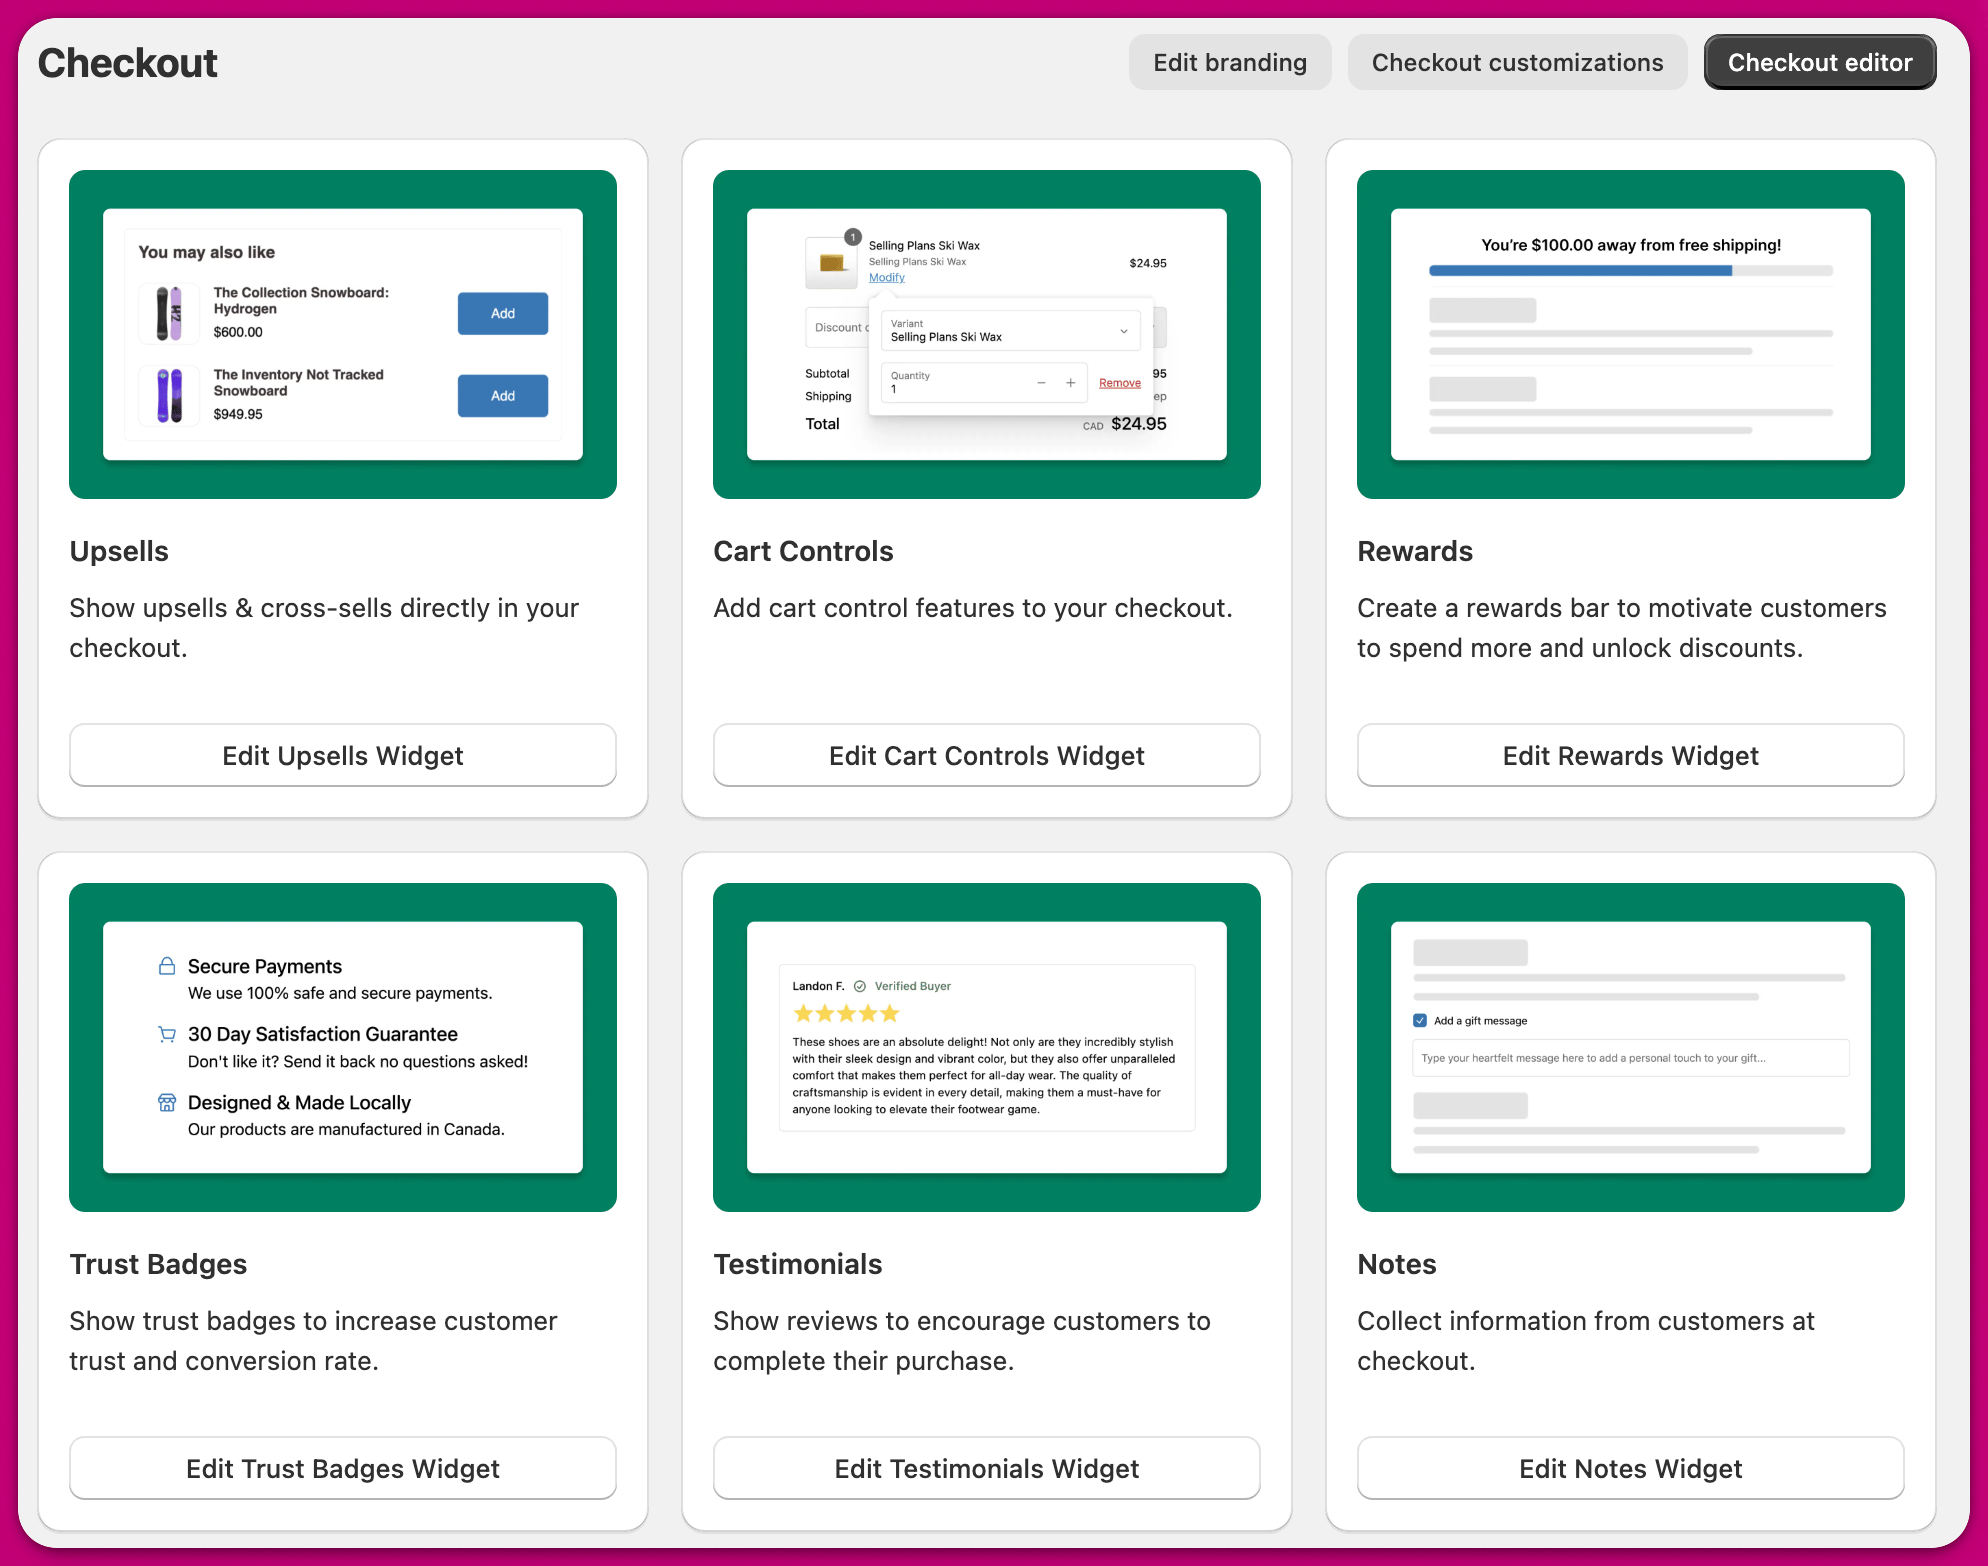
<img src="https://mintcdn.com/aftersell/1Y3gBpUfxv16VGSW/images/aftersell/checkout-widget-create-cards-upsells-cart-controls.png?fit=max&auto=format&n=1Y3gBpUfxv16VGSW&q=85&s=3302868c50e12461761e6a1300820bd7" alt="Upsells、Cart Controls、Rewards、Testimonialsのウィジェットカードが表示されたAftersellのCheckoutページ" width="1988" height="1566" data-path="images/aftersell/checkout-widget-create-cards-upsells-cart-controls.png" />

***

<div id="step-2-creating-your-widget">
  ## ステップ2：ウィジェットを作成する
</div>

「Create Upsell」をクリックして、アップセルウィジェットの作成を開始します。
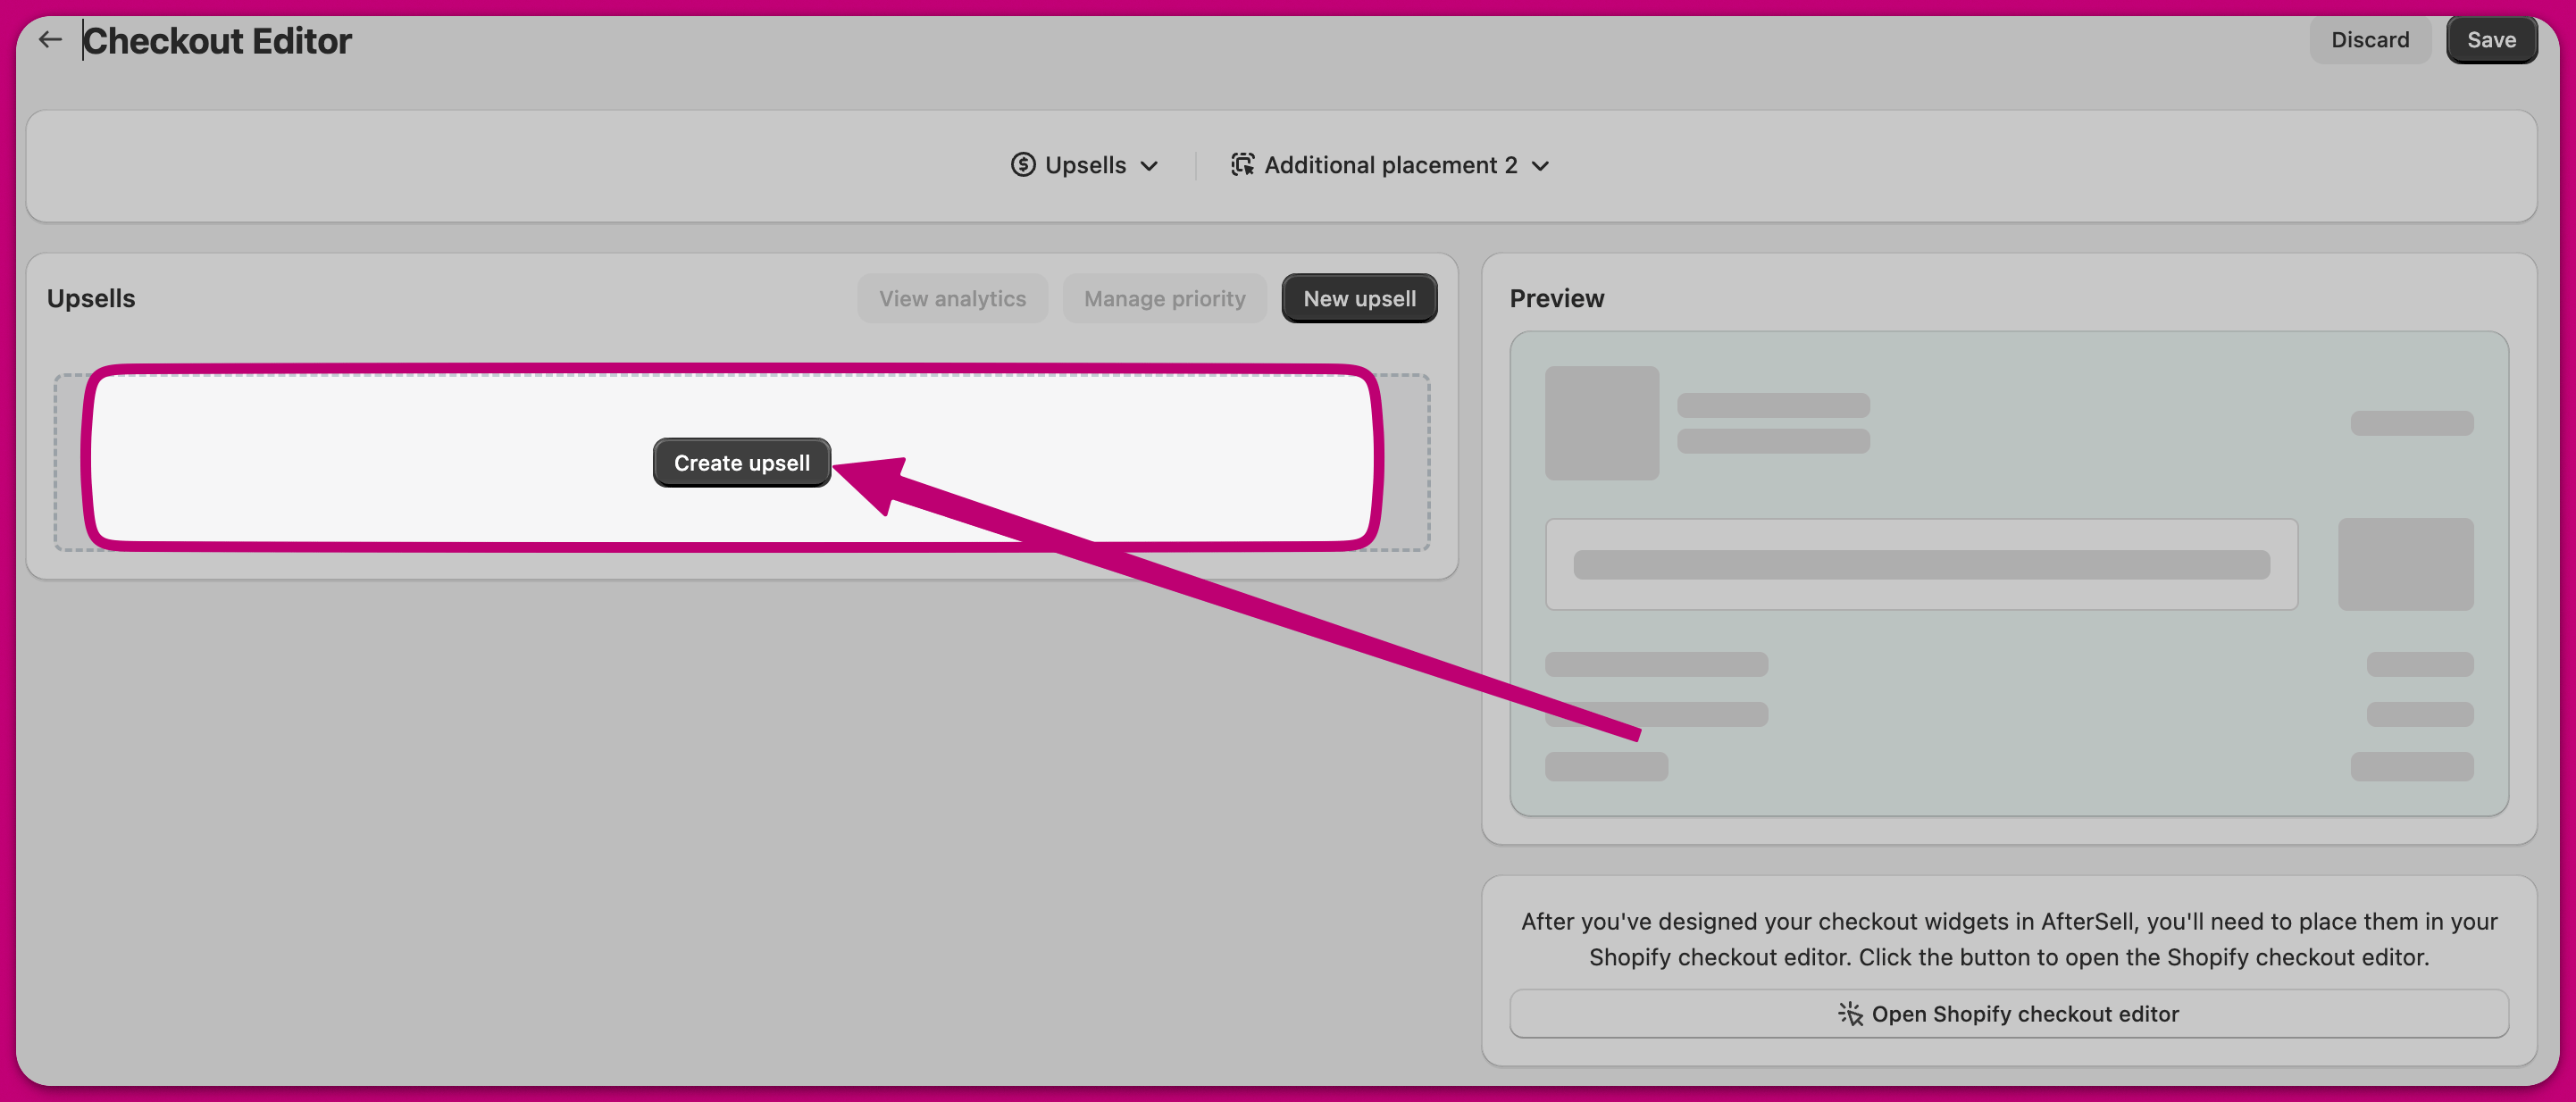
<img src="https://mintcdn.com/aftersell/1Y3gBpUfxv16VGSW/images/aftersell/checkout-widget-create-editor-upsells-panel-arrow.png?fit=max&auto=format&n=1Y3gBpUfxv16VGSW&q=85&s=e89c35b59c09c6fd858e910f46d9fcc0" alt="Create upsellボタンを指す矢印が表示されたCheckout EditorのUpsellsパネル" width="2884" height="1234" data-path="images/aftersell/checkout-widget-create-editor-upsells-panel-arrow.png" />

***

<div id="step-3-selecting-a-preset">
  ## ステップ3：プリセットを選択する
</div>

最適化されたウィジェットプリセットの一覧から選ぶか、ゼロから作成することもできます。
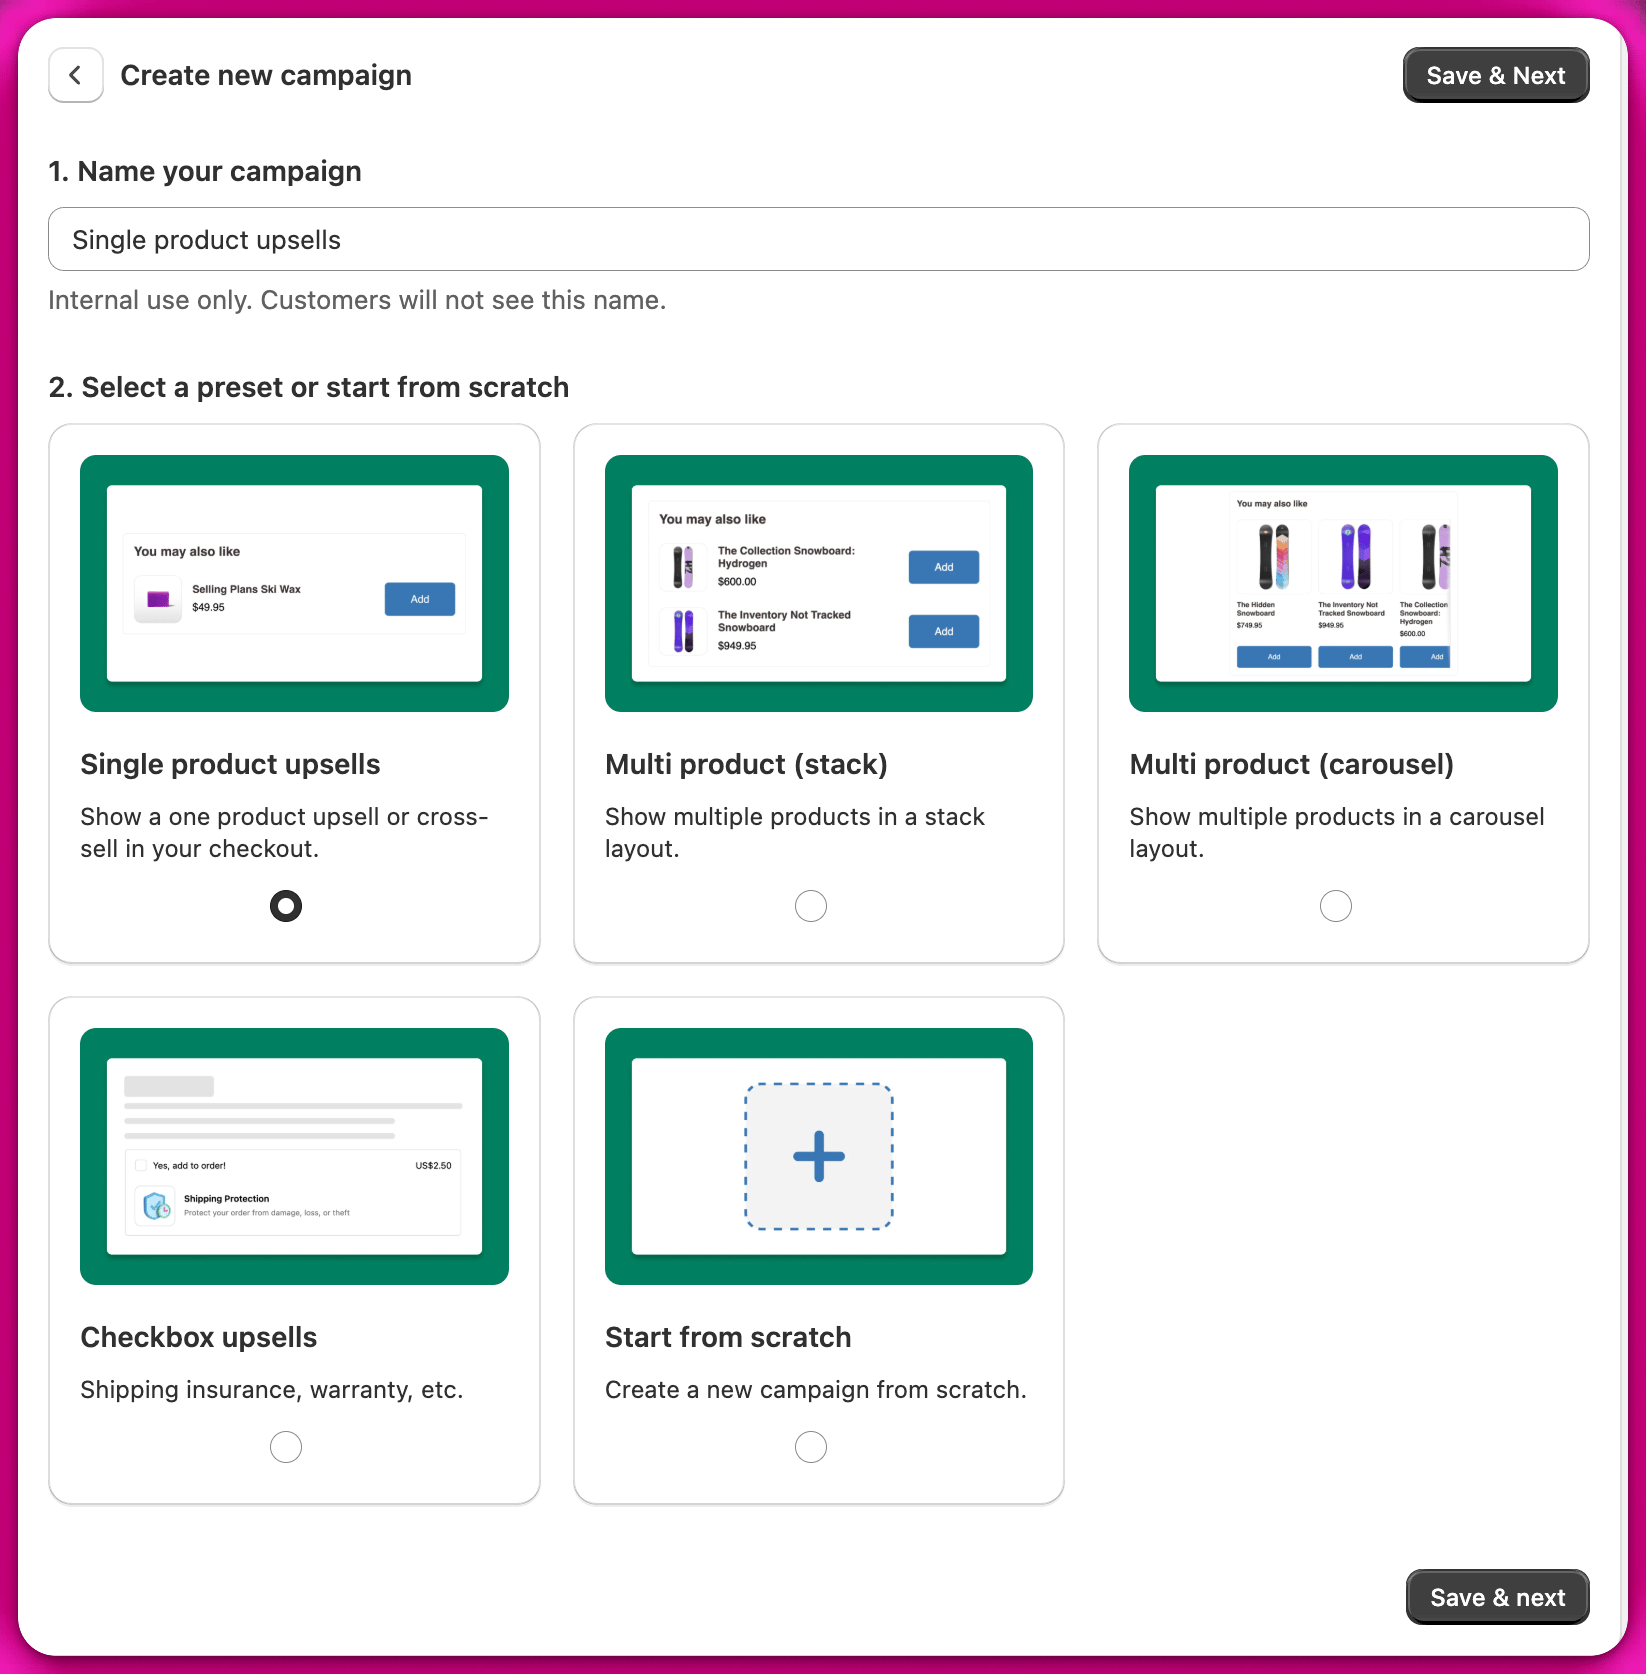
<img src="https://mintcdn.com/aftersell/1Y3gBpUfxv16VGSW/images/aftersell/checkout-widget-create-new-campaign-preset-options.png?fit=max&auto=format&n=1Y3gBpUfxv16VGSW&q=85&s=d64607da81a3a4b43e9d5c7c9a7420c2" alt="単一商品アップセルや複数商品アップセルなどのプリセットオプションが表示されたCreate new campaign画面" width="1646" height="1674" data-path="images/aftersell/checkout-widget-create-new-campaign-preset-options.png" />

***

<div id="step-4-edit-styling-and-behaviour">
  ## ステップ4：スタイルと動作を編集する
</div>

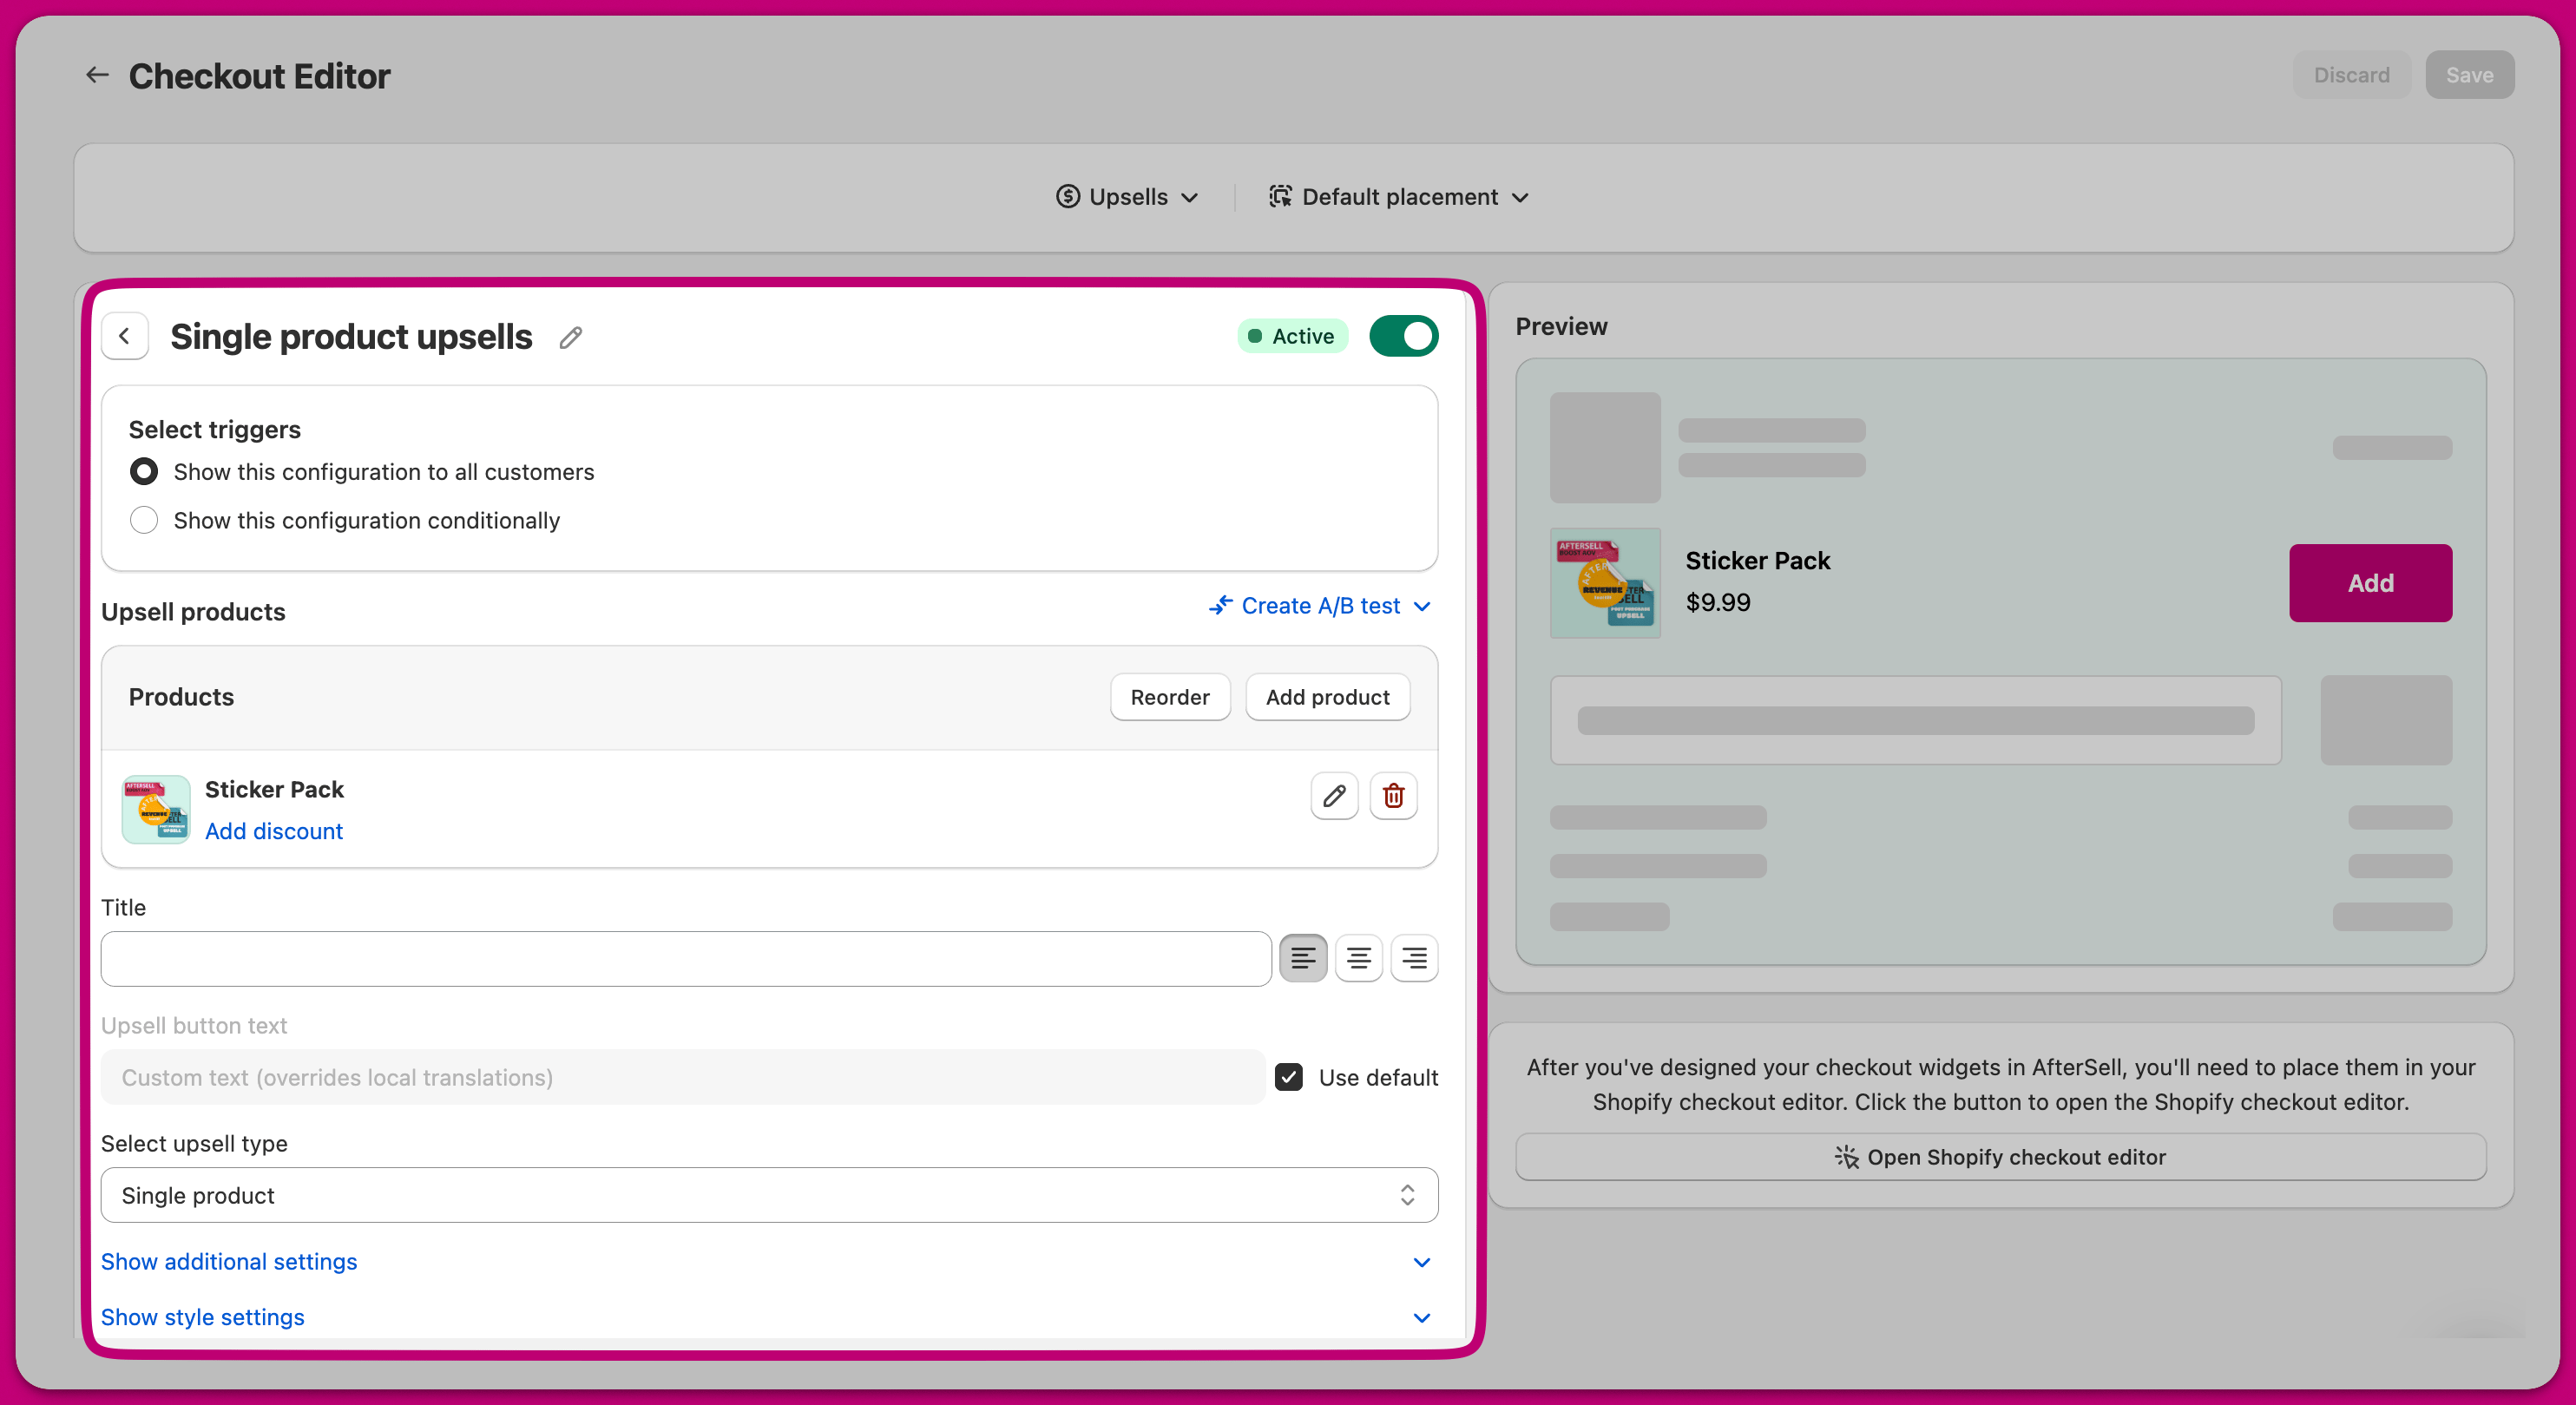
細部を調整する時間です。ウィジェットのスタイルと動作を思いどおりに仕上げましょう。トリガーロジックを調整したり、商品の選択を見直したり、デザインに最後の磨きをかけたりできます。
<img src="https://mintcdn.com/aftersell/1Y3gBpUfxv16VGSW/images/aftersell/checkout-widget-create-single-product-upsell-editor.png?fit=max&auto=format&n=1Y3gBpUfxv16VGSW&q=85&s=e9560a037ceb877ea2d47d261278934b" alt="トリガー、商品、スタイル設定とライブプレビューが表示された単一商品アップセルのエディター" width="2968" height="1619" data-path="images/aftersell/checkout-widget-create-single-product-upsell-editor.png" />

***

<div id="step-5-enable-widget-status">
  ## ステップ5：ウィジェットのステータスを有効にする
</div>

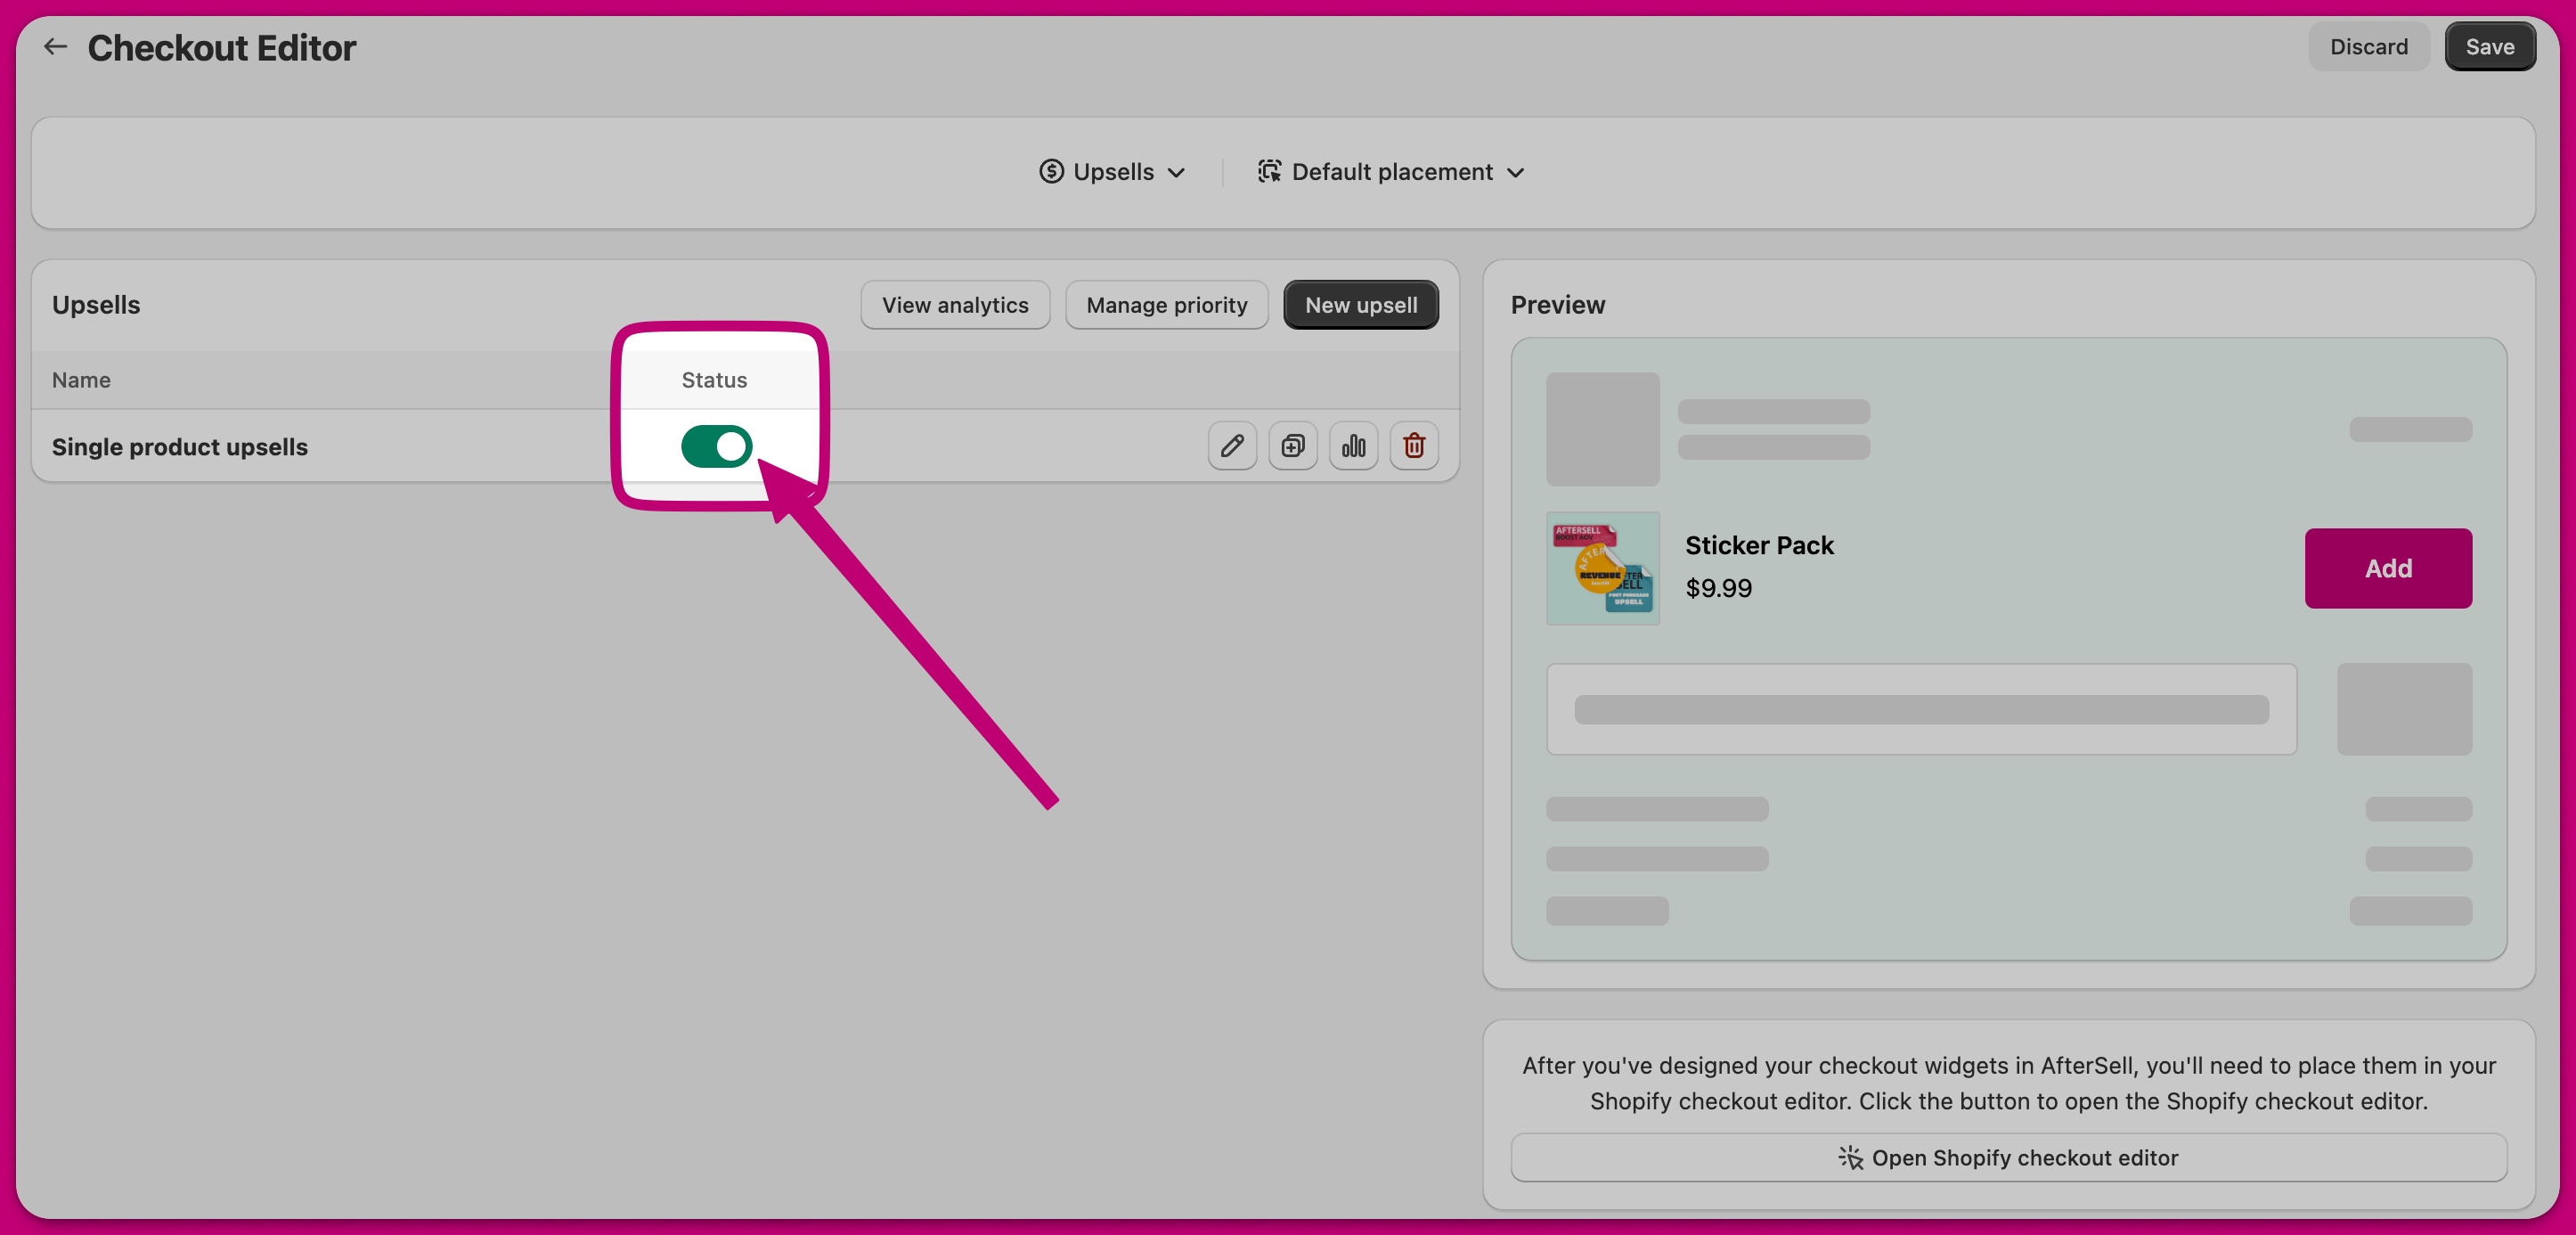
ウィジェットのステータスが有効になっていることを確認します。

<img src="https://mintcdn.com/aftersell/1Y3gBpUfxv16VGSW/images/aftersell/checkout-widget-create-editor-upsell-status-toggle.png?fit=max&auto=format&n=1Y3gBpUfxv16VGSW&q=85&s=7f9cedd5ace808ad47a077090be3e29d" alt="ウィジェットを有効化するためにアップセルのStatusトグルがオンになっているCheckout Editor" width="2892" height="1386" data-path="images/aftersell/checkout-widget-create-editor-upsell-status-toggle.png" />

チェックアウトウィジェットがAftersellで有効になったら、最後のステップとして、ウィジェットをShopifyチェックアウトに配置します。方法を知りたいですか？以下をクリックして、手順を詳しく確認してください。

[詳しく見る](/ja/aftersell/adding_a_checkout_widget_to_your_shopify_checkout)