> ## Documentation Index
> Fetch the complete documentation index at: https://docs.aftersell.com/llms.txt
> Use this file to discover all available pages before exploring further.
# Pages vs standalone widgets
In Checkout , there are two ways to add widgets to your Checkout: **Pages** and **Standalone widgets**. This article explains how each works, when to use them, and how to get them placed in your Shopify Checkout.
### **Which should I use?**
| | **Pages** | **Standalone widgets** |
| :------------------ | :--------------------------------------- | :--------------------------- |
| **Best for** | Displaying multiple widgets together | Displaying a single widget |
| **Triggers** | Shared across all widgets in the page | Set individually per variant |
| **Block limit** | Max 5 blocks per widget type | Max 3 blocks per widget type |
| **Block placement** | One app block per widget inside the page | One app block per widget |
***
## **Pages**
A Page is a group of widgets that share a single group of triggers. When the trigger conditions are met, all widgets within the page are displayed together. Pages are ideal when you want to show multiple widgets to the same audience at the same time.
### [****](/aftersell/pages-vs-standalone-widgets#creating-a-page)
**Creating a Page**
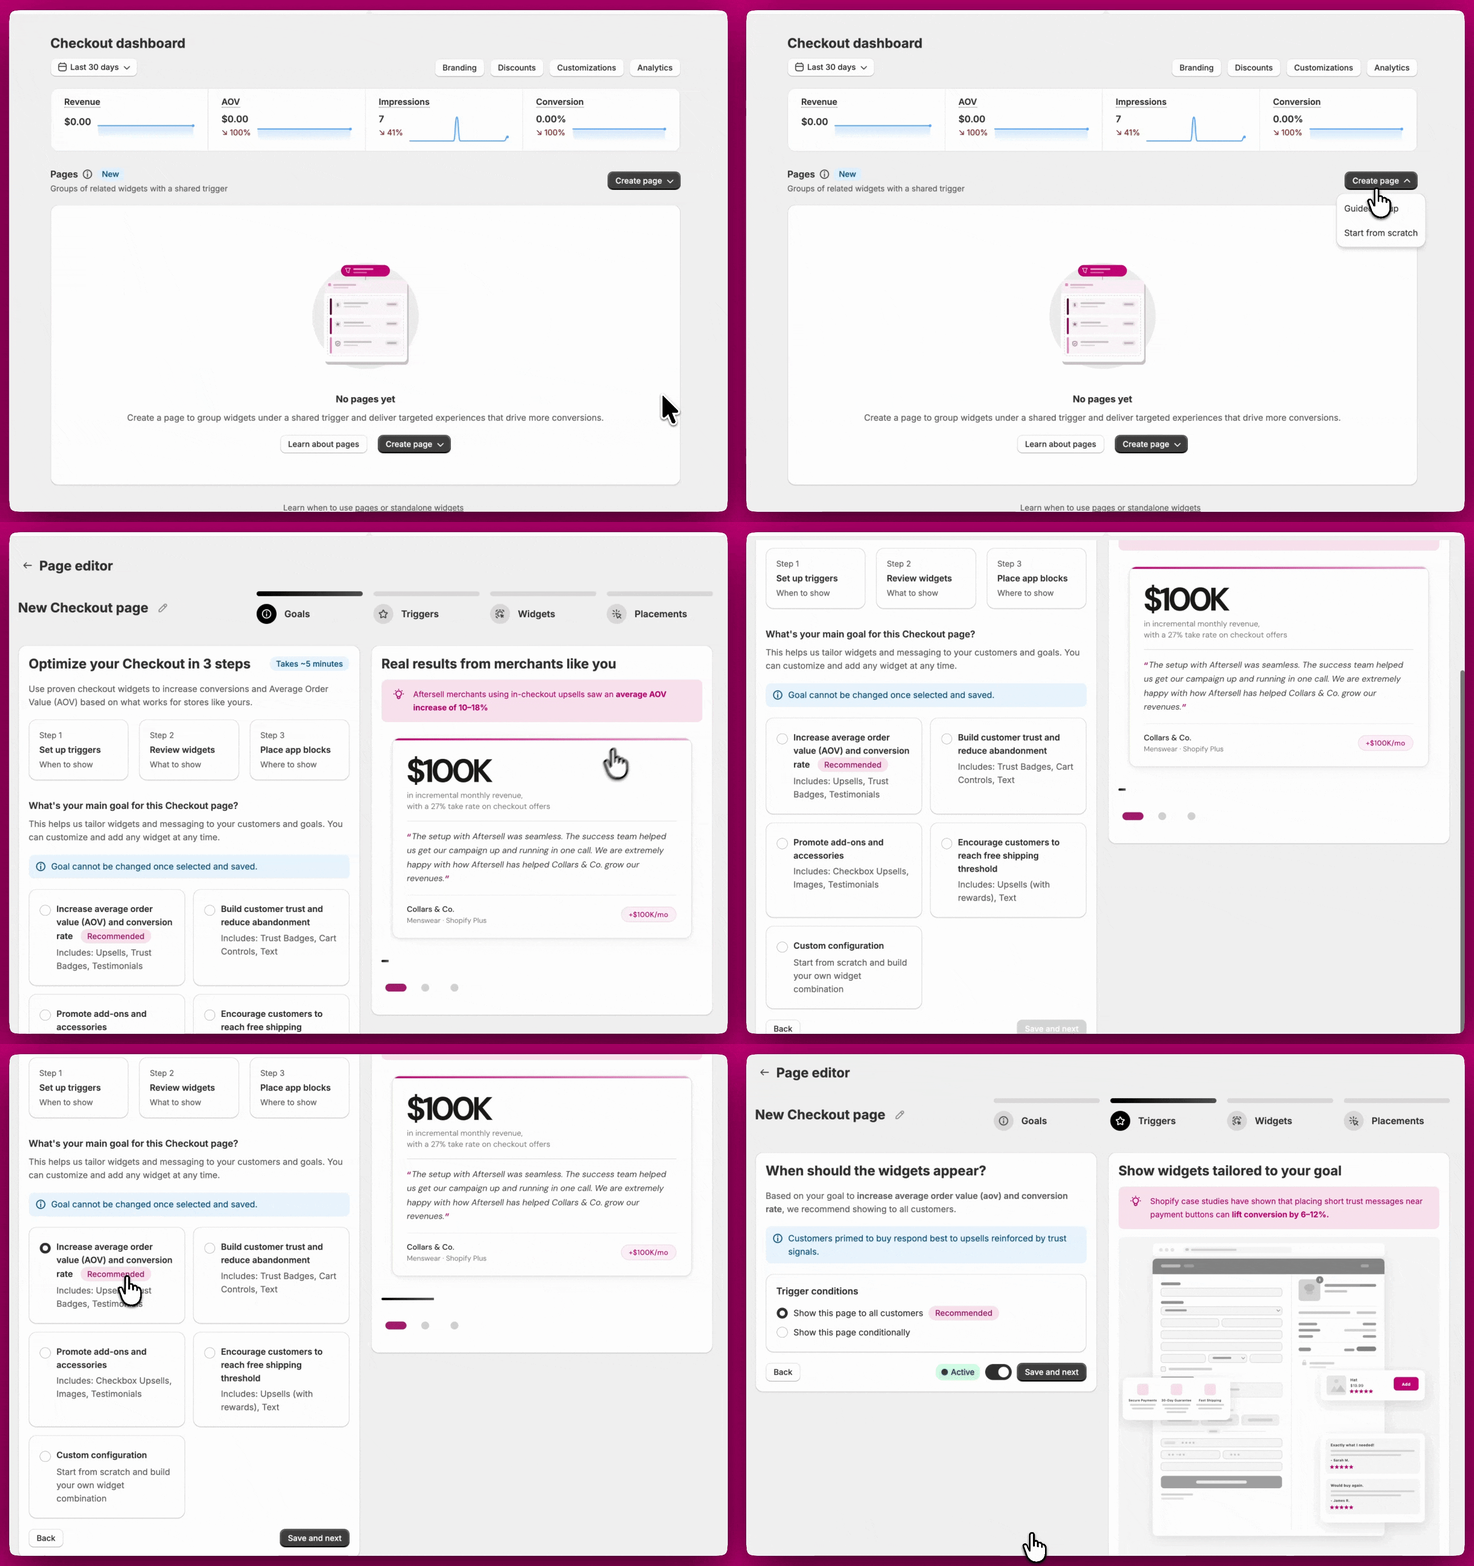
When creating a page, you have two options: **Guided setup** or **Start from scratch**.
**Guided setup**
The Guided setup walks you through a recommended configuration based on a goal you choose. The setup follows four steps: **Goal, Triggers, Widgets, and Placement.**
**Step 1: Goal**
Choose the goal that best fits what you want to achieve. Each goal comes with a recommended set of widgets pre-configured for you.
| **Goal** | **Recommended widgets** |
| :----------------------------------------------------- | :------------------------------------- |
| Increase Average Order Value (AOV) and conversion rate | Upsells, Trust Badges, Testimonials |
| Build customer trust and reduce abandonment | Trust Badges, Cart Controls, Text |
| Promote add-ons and accessories | Checkbox Upsells, Images, Testimonials |
| Encourage customers to reach free shipping threshold | Upsells (with Rewards), Text |
**Important:** Your goal cannot be changed after saving. If you need a different goal, you will need to delete the page and create a new one. However, widgets can be added to or removed from a page at any time. Take a moment to choose the goal that best fits your strategy before proceeding.
Once you’ve selected your goal, click **Save and next** to continue.
 **Step 2: Triggers**
Set the conditions under which your page will be shown, or choose to show the page to all customers with no conditions. For a full list of available triggers, see[ Checkout Triggers](/aftersell/checkout_triggers).
**Step 3: Widgets**
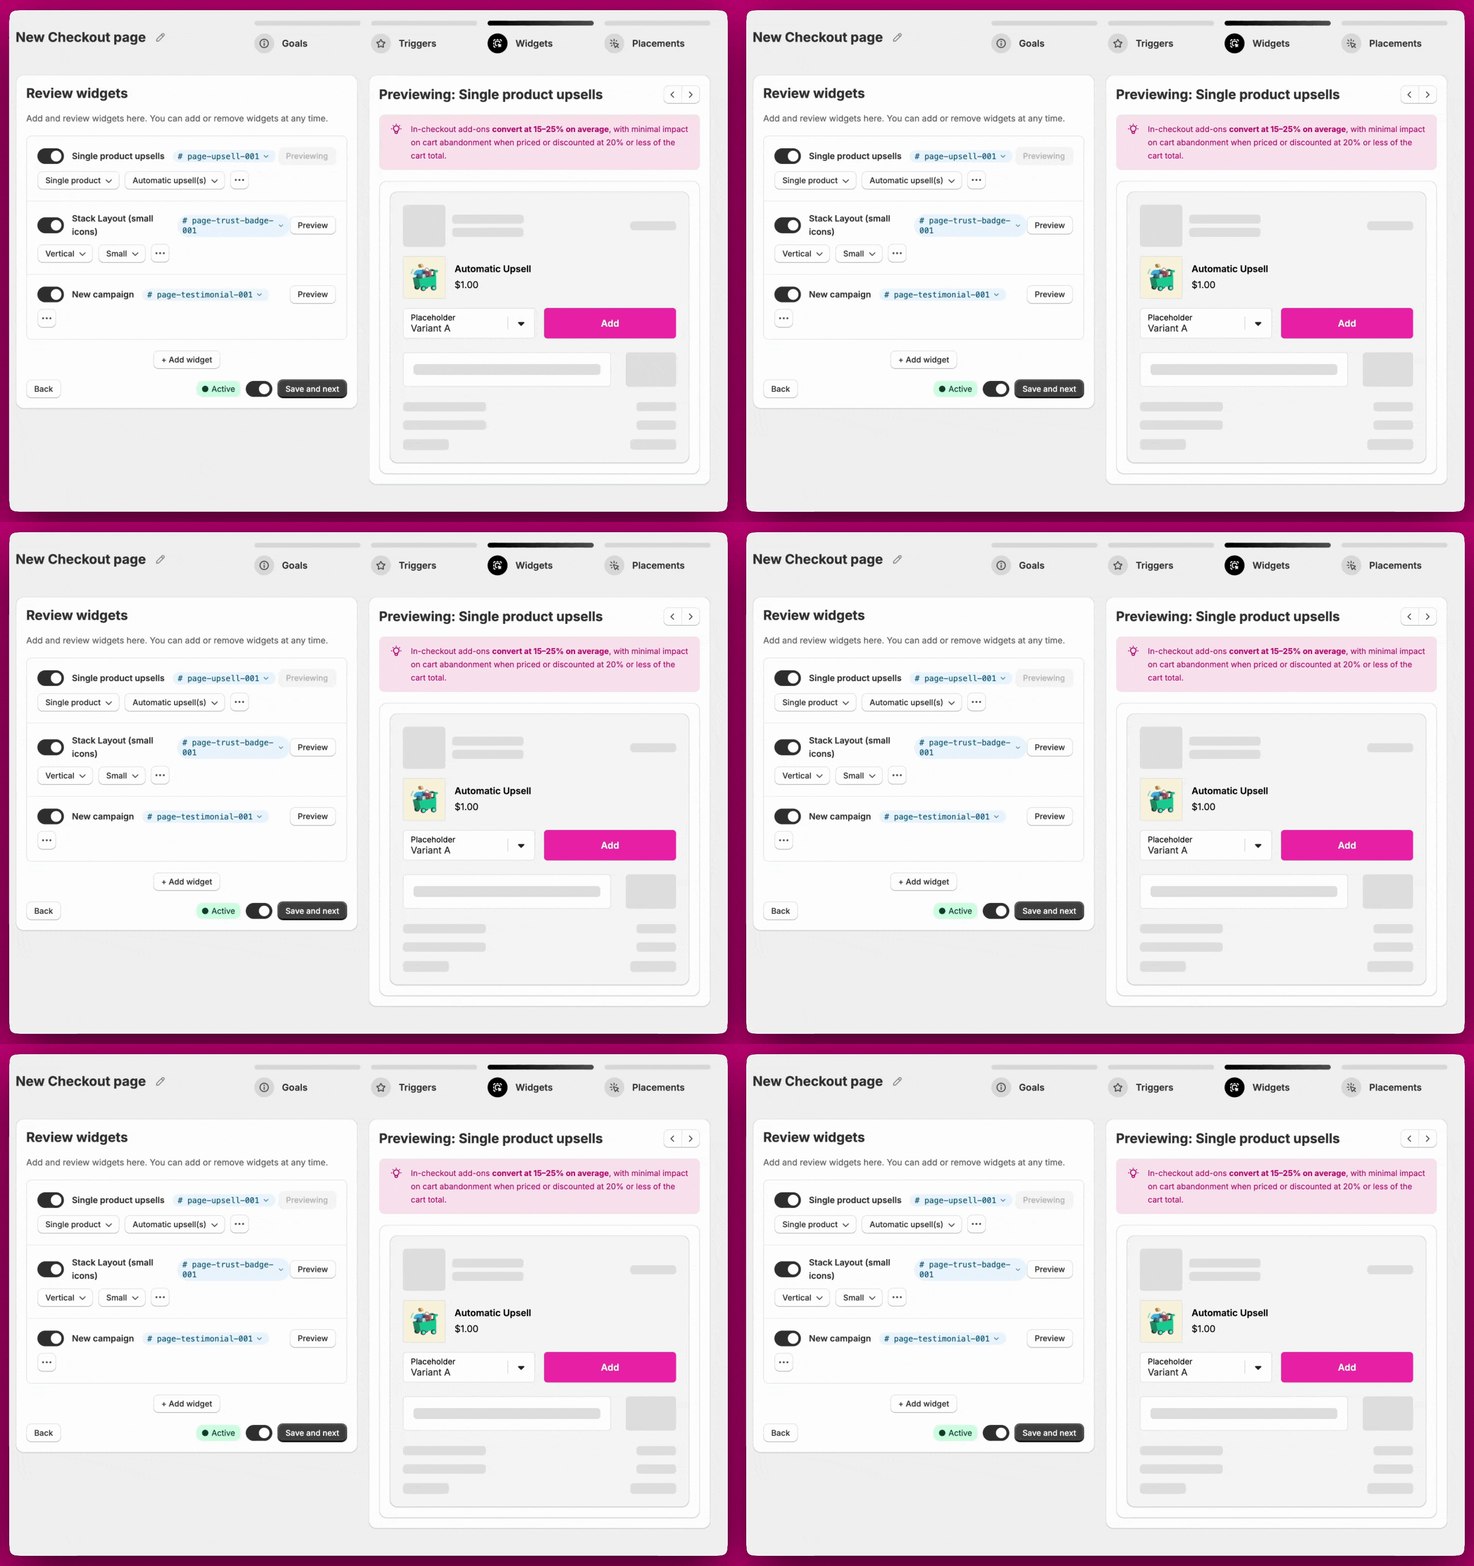
Review the widgets that have been recommended for your goal. You can add or remove widgets at this stage, and access advanced settings for each widget. For a full list of available widget types and their settings, see[ Checkout Widget Types](/aftersell/checkout_widget_types).
**Step 2: Triggers**
Set the conditions under which your page will be shown, or choose to show the page to all customers with no conditions. For a full list of available triggers, see[ Checkout Triggers](/aftersell/checkout_triggers).
**Step 3: Widgets**
Review the widgets that have been recommended for your goal. You can add or remove widgets at this stage, and access advanced settings for each widget. For a full list of available widget types and their settings, see[ Checkout Widget Types](/aftersell/checkout_widget_types).
 **Step 4: Placement**
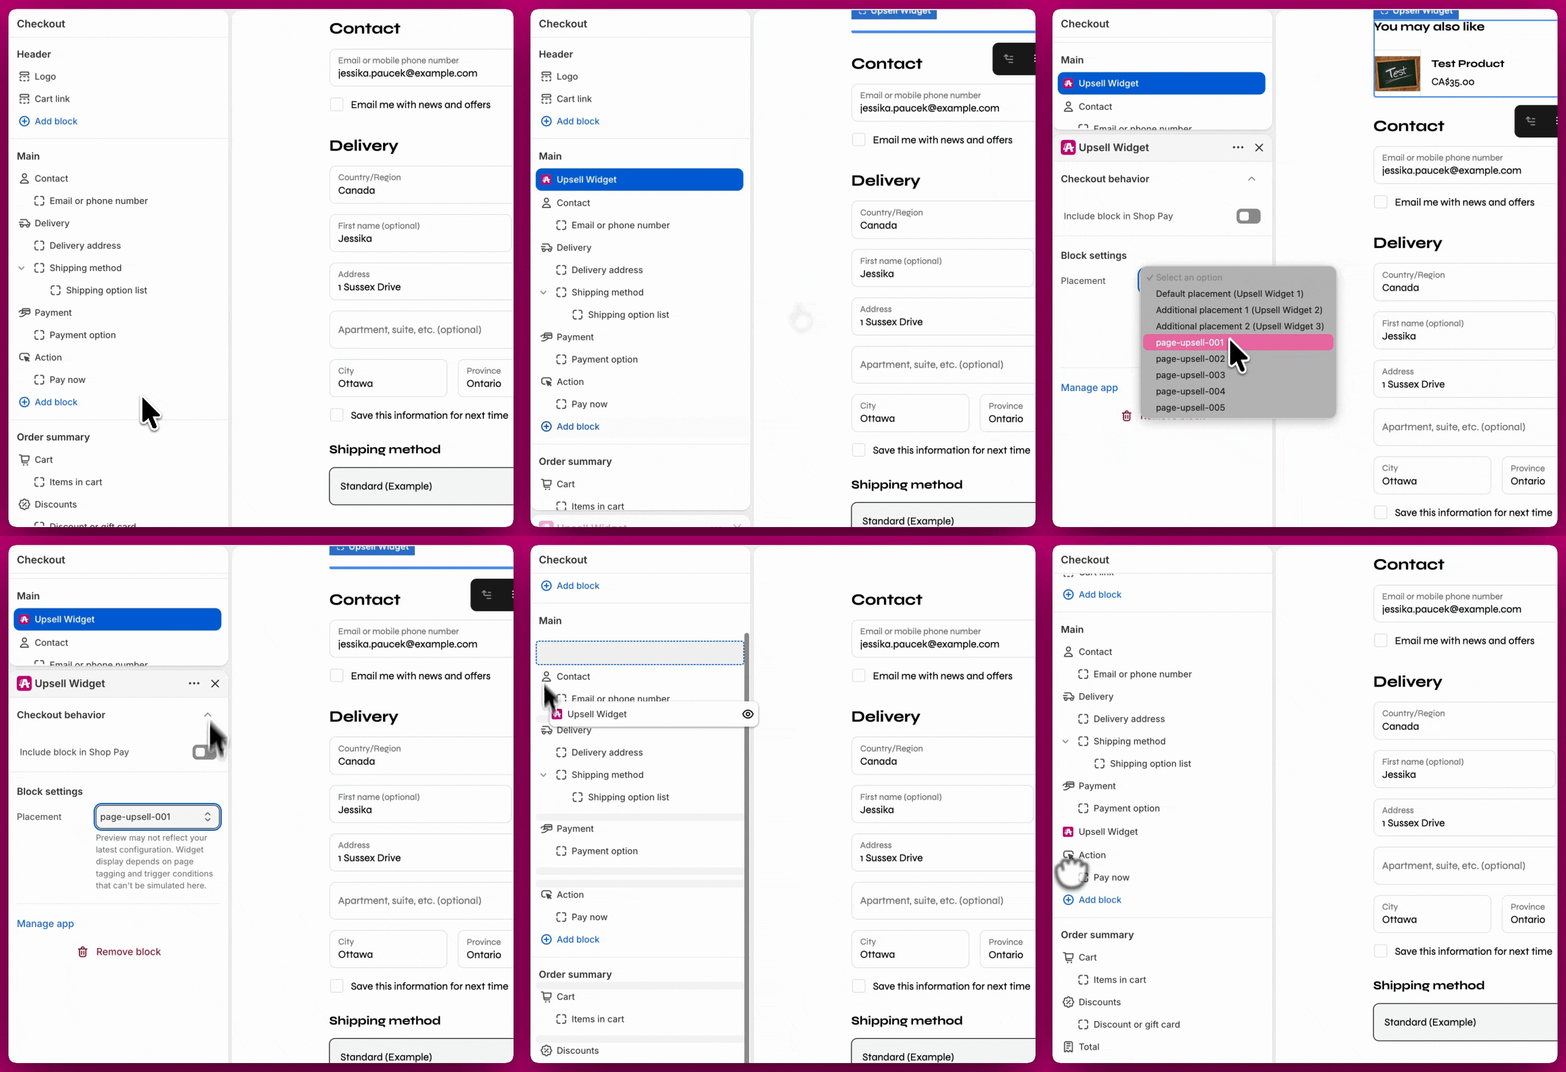
Each widget in your page needs to be placed individually in your Shopify Checkout editor. Each widget is assigned a **BlockID** (e.g., page-upsell-001, page-upsell-002) which is used to identify it when adding the app block in Shopify.
Location recommendations are provided to help you decide where to place each widget on the Checkout Page to place a widget:
1. Note the **BlockID** assigned to your widget in the Aftersell dashboard.
2. Open the **Shopify Checkout editor**.
3. Add the **Aftersell app block**.
4. From the dropdown, select the BlockID that matches your widget (e.g., page-upsell-003).
**Note:** Each widget within a page **has its own BlockID and must be added as a separate app block in the Shopify Checkout editor.** A widget will not display until it has been placed.
**Step 4: Placement**
Each widget in your page needs to be placed individually in your Shopify Checkout editor. Each widget is assigned a **BlockID** (e.g., page-upsell-001, page-upsell-002) which is used to identify it when adding the app block in Shopify.
Location recommendations are provided to help you decide where to place each widget on the Checkout Page to place a widget:
1. Note the **BlockID** assigned to your widget in the Aftersell dashboard.
2. Open the **Shopify Checkout editor**.
3. Add the **Aftersell app block**.
4. From the dropdown, select the BlockID that matches your widget (e.g., page-upsell-003).
**Note:** Each widget within a page **has its own BlockID and must be added as a separate app block in the Shopify Checkout editor.** A widget will not display until it has been placed.
 ***
**Start from scratch**
Start from scratch follows the same process as Guided setup, but skips the Goal step. You configure your triggers, add your widgets manually, and then place them in your Shopify Checkout editor using their BlockIDs.
**Editing a Page**
You can edit a page at any time after creation, including adding or removing widgets and updating triggers. The only thing that cannot be changed is the goal. If you need to change the goal, delete the page and create a new one.
**Duplicating a Page**
To create a copy of an existing page, click the **Duplicate** icon on the page row in the dashboard. The duplicated page is created in an inactive state with the name prefixed by "(Duplicated)" and includes all the same widgets and trigger configuration as the original. You can rename and activate it when ready.
***
## **Standalone widgets**
Standalone widgets are individual widgets, each with their own triggers and priority and are best suited for when you only need to display a single widget all the time or to a targeted group of customers.
### [****](/aftersell/pages-vs-standalone-widgets#creating-a-standalone-widget)
**Creating a Standalone widget**
Click **Create widget** from the dashboard. You will be prompted to select two things:
* **Widget type**: The type of widget you want to create (Upsells, Rewards, Trust Badges, Testimonials, Cart Controls, Notes, Text, or Images). For a full breakdown of each widget type and its settings, see[ Checkout Widget Types](#checkout_widget_types).
* **Block**: Which block to add the widget to. There are three blocks available, and the naming follows the widget type you selected. For example:
* Upsells: Default upsell, Additional upsell 1, Additional upsell 2
* Trust Badges: Default trust badge, Additional trust badge 1, Additional trust badge 2
* And so on for each widget type
Each block can hold multiple variants, The block counter in the top-right of the selector shows how many of the 3 available blocks you have created (e.g., 2/3 means 2 blocks created, 1 remaining).
### [****](/aftersell/pages-vs-standalone-widgets#block-limit)
**Block limit**
A maximum of **3 blocks** can be used for Standalone widgets. Once all 3 blocks are in use, the **Add new block** option will be unavailable and no additional widgets of the same type can be created until an existing block is removed.
### [****](/aftersell/pages-vs-standalone-widgets#placement)
**Placement**
Each Standalone widget must be placed in your Shopify Checkout editor as its own app block. When adding an app block in Shopify, you will see BlockID options for your standalone widgets listed as:
* Default placement
* Additional placement 1
* Additional placement 2
These placement options determine the order in which widgets appear in your checkout experience.
**Note:** For upsell widgets, placement also corresponds to the sequence in which upsell offers are shown (e.g., first, second, third upsell displayed).
To place a widget:
1. Open the **Shopify Checkout editor**.
2. Add the **Aftersell app block** in your desired location.
3. From the dropdown, select the BlockID that corresponds to your widget.
***
## **Analytics**
Analytics are available for both Pages and Standalone widgets. You can view performance data for any individual page or widget by clicking the **bar chart icon** next to it on the dashboard, from within the editor itself or from the Analytics tab in the side navigation
***
**Start from scratch**
Start from scratch follows the same process as Guided setup, but skips the Goal step. You configure your triggers, add your widgets manually, and then place them in your Shopify Checkout editor using their BlockIDs.
**Editing a Page**
You can edit a page at any time after creation, including adding or removing widgets and updating triggers. The only thing that cannot be changed is the goal. If you need to change the goal, delete the page and create a new one.
**Duplicating a Page**
To create a copy of an existing page, click the **Duplicate** icon on the page row in the dashboard. The duplicated page is created in an inactive state with the name prefixed by "(Duplicated)" and includes all the same widgets and trigger configuration as the original. You can rename and activate it when ready.
***
## **Standalone widgets**
Standalone widgets are individual widgets, each with their own triggers and priority and are best suited for when you only need to display a single widget all the time or to a targeted group of customers.
### [****](/aftersell/pages-vs-standalone-widgets#creating-a-standalone-widget)
**Creating a Standalone widget**
Click **Create widget** from the dashboard. You will be prompted to select two things:
* **Widget type**: The type of widget you want to create (Upsells, Rewards, Trust Badges, Testimonials, Cart Controls, Notes, Text, or Images). For a full breakdown of each widget type and its settings, see[ Checkout Widget Types](#checkout_widget_types).
* **Block**: Which block to add the widget to. There are three blocks available, and the naming follows the widget type you selected. For example:
* Upsells: Default upsell, Additional upsell 1, Additional upsell 2
* Trust Badges: Default trust badge, Additional trust badge 1, Additional trust badge 2
* And so on for each widget type
Each block can hold multiple variants, The block counter in the top-right of the selector shows how many of the 3 available blocks you have created (e.g., 2/3 means 2 blocks created, 1 remaining).
### [****](/aftersell/pages-vs-standalone-widgets#block-limit)
**Block limit**
A maximum of **3 blocks** can be used for Standalone widgets. Once all 3 blocks are in use, the **Add new block** option will be unavailable and no additional widgets of the same type can be created until an existing block is removed.
### [****](/aftersell/pages-vs-standalone-widgets#placement)
**Placement**
Each Standalone widget must be placed in your Shopify Checkout editor as its own app block. When adding an app block in Shopify, you will see BlockID options for your standalone widgets listed as:
* Default placement
* Additional placement 1
* Additional placement 2
These placement options determine the order in which widgets appear in your checkout experience.
**Note:** For upsell widgets, placement also corresponds to the sequence in which upsell offers are shown (e.g., first, second, third upsell displayed).
To place a widget:
1. Open the **Shopify Checkout editor**.
2. Add the **Aftersell app block** in your desired location.
3. From the dropdown, select the BlockID that corresponds to your widget.
***
## **Analytics**
Analytics are available for both Pages and Standalone widgets. You can view performance data for any individual page or widget by clicking the **bar chart icon** next to it on the dashboard, from within the editor itself or from the Analytics tab in the side navigation