> ## Documentation Index
> Fetch the complete documentation index at: https://docs.aftersell.com/llms.txt
> Use this file to discover all available pages before exploring further.
# How to configure post-purchase triggers
> Step-by-step guide to setting up and configuring post-purchase funnel triggers in Aftersell
Triggers control when and to whom your post-purchase funnels display. This guide walks you through configuring the most common trigger types and managing funnel priority.
For detailed information about what each trigger does, see the [Post-purchase Triggers reference](/aftersell/post_purchase_triggers).
***
## Getting started with triggers
When you create a new funnel, you'll need to configure at least one trigger to control when it displays. You can combine multiple triggers to create precise targeting rules.
### Where to find triggers
Triggers are configured inside each funnel, not from a global menu. To open them:
1. In the Aftersell admin, go to **Post-purchase Funnels**.
2. Click the funnel you want to edit (or click **Create Funnel** to start a new one).
3. In the funnel editor, open the **Triggers** section.
4. Click **Add Trigger** to add a new trigger, or click an existing trigger to edit it.
5. After making changes, click **Save Triggers**.
Each funnel has its own set of triggers — there are no shared or store-wide triggers.
### Where to find triggers
Triggers are configured inside each funnel, not from a global menu. To open them:
1. In the Aftersell admin, go to **Post-purchase Funnels**.
2. Click the funnel you want to edit (or click **Create Funnel** to start a new one).
3. In the funnel editor, open the **Triggers** section.
4. Click **Add Trigger** to add a new trigger, or click an existing trigger to edit it.
5. After making changes, click **Save Triggers**.
Each funnel has its own set of triggers — there are no shared or store-wide triggers.
### How triggers work together
Post-purchase triggers use two levels of logic: **AND between triggers** and **OR within triggers**.
**AND logic (between triggers)**
All enabled triggers must be met for the funnel to display. If you add multiple triggers, every one must return a match.
Example:
* Customer Location = US
* Order Value > \$50
The customer must be in the US **and** the order must exceed \$50.
**OR logic (within a trigger)**
Within a single trigger, only one selected option needs to match.
Example: Product Category = Shoes, Socks, or Pants. If the order contains any one of these, the trigger passes.
Some triggers (like Product Quantity) allow you to switch this to AND logic.
For a detailed explanation of trigger logic, see [Understanding Conditional Logic](/aftersell/understanding_conditional_logic_for_post_purchase_triggers).
***
## Show for all customers trigger
A "Catch-All" funnel uses the **Show for All Customers** trigger. This funnel activates when an order does not meet the criteria for any other funnel. It serves as a safety net, ensuring no orders slip through without an upsell or Thank You page offer.
To use it effectively, set this funnel to the lowest priority so it only appears if no other funnel triggers.
**Example use cases:**
* You have three funnels: one for orders over \$100, one for specific products, and one with the Show for All Customers trigger. If a customer places an order that doesn't meet the first two funnels' criteria, the Show for All Customers funnel will activate as a fallback.
* You want to ensure every customer sees at least one offer. Create a funnel with the Show for All Customers trigger and set it to the lowest priority.
***
## Product-based triggers
These triggers activate based on the products, collections, or variants in a customer's cart.
Ensure proper configuration to prevent hidden or wholesale-only products from appearing unexpectedly in recommendations. This includes reviewing Shopify's Product Recommendation logic and restricting such products at the add-to-cart stage.
Use the **Product/Collection** trigger to display your funnel when specific products or collections are purchased.
**To configure:**
1. In your funnel settings, click **Add Trigger**.
2. Select **Product/Collection** from the trigger type dropdown.
3. Choose **Contains** or **Does not contain**.
4. Search for and select the products or collections you want to target.
5. Click **Save**.
**Example use cases:**
* Show a protein powder upsell when customers purchase any product from your "Supplements" collection.
* You have a funnel set to products X, Y, and Z. If a customer buys products A, B, and Y, this funnel will activate. If they buy A, B, and C, it will not.
Use the **Product Quantity** trigger to display an offer based on how many of a specific product are in the cart.
**To configure:**
1. Click **Add Trigger**.
2. Select **Product Quantity** from the trigger type dropdown.
3. Choose **Less than** or **More than**.
4. Enter the quantity threshold and select the product.
5. Click **Save**.
**Example use cases:**
* Set to "less than 3" for Product X. If a customer buys 2 units, the funnel activates. If they buy 3 or more, it does not.
* Set to "more than 1" for Product Y. If a customer buys 2 or more units, the funnel activates. If they buy only 1, it does not.
Use the **Product Tag** trigger to display an offer when products with certain Shopify tags are included in the order.
**To configure:**
1. Click **Add Trigger**.
2. Select **Product Tag** from the trigger type dropdown.
3. Choose **Include** or **Exclude**.
4. Enter the product tag(s) you want to target.
5. Click **Save**.
**Example use cases:**
* Exclude discontinued products from receiving upsell offers by setting the trigger to exclude products tagged "discontinued."
* Show a special offer only for products tagged "summer-collection."
Use the **Product Type** trigger to display an offer when purchased products belong to a defined Shopify product type.
**To configure:**
1. Click **Add Trigger**.
2. Select **Product Type** from the trigger type dropdown.
3. Choose **Include** or **Exclude**.
4. Enter the product type(s) you want to target.
5. Click **Save**.
**Example use case:** If you set the trigger to "Shoes," any time a customer purchases a product of type Shoes, the funnel will display. If they purchase a t-shirt (type: Apparel), the funnel will not display.
Use the **Metafields** trigger to display funnels based on custom metafield data associated with products or variants. You can choose between product metafields or variant metafields, but only one type can be matched at a time.
**To configure:**
1. Click **Add Trigger**.
2. Select **Metafields** from the trigger type dropdown.
3. Choose **Include** or **Exclude**.
4. Enter the metafield **name** and **value** exactly as they appear on the product page (both are case-sensitive).
5. Click **Save**.
**How it works:**
* **Include** means there's an overlap between the metafields in the order and those in the trigger list. For example, if the order metafields are `["color: red", "size: m"]` and the trigger list is `["color: red", "ship: warehouse"]`, the condition is satisfied because `color: red` matches.
* **Exclude** means there's no overlap between the metafields in the order and the trigger list. For example, if order metafields are `["color: red", "size: M"]` and the trigger list is `["color: blue", "size: L"]`, the condition is satisfied because there are no matching name:value pairs.
This trigger is especially useful if you use metafields to store detailed product information like materials, sizing, or special attributes.
Use the **Product/Collection Exclusion** trigger to prevent a funnel from displaying when excluded products or collections are present in the cart.
**To configure:**
1. Click **Add Trigger**.
2. Select **Product/Collection Exclusion** from the trigger type dropdown.
3. Search for and select the products or collections to exclude.
4. Click **Save**.
**Example use case:** If a customer has purchased from a heavily discounted product or collection, you may prefer not to show further offers. You can also combine this trigger with the Product/Collection trigger to ensure only selected products activate the funnel while others are excluded.
Use the **Subscription** trigger to display an offer based on whether a subscription product is included in the order.
**To configure:**
1. Click **Add Trigger**.
2. Select **Subscription** from the trigger type dropdown.
3. Choose **Contains** or **Does not contain** subscription products.
4. Click **Save**.
**Example use cases:**
* Set to "Does not contain" subscription products to target one-time purchasers and offer them a subscription upsell.
* Set to "Contains" subscription products to show complementary one-time products to subscribers.
Shopify only supports one subscription product per order, so you cannot upsell a subscription if the original order already includes one.
Use the **Variant on subscription** trigger to display a funnel when the order includes any of the selected products purchased as a subscription. Unlike the Subscription trigger, this trigger matches on a specific product being purchased on a subscription line item — a one-time purchase of the same product does not activate the funnel.
**Managed by the subscription upgrade wizard**
When a funnel has a subscription upgrade offer configured, this trigger is managed automatically by the wizard and kept in sync with the upgrade's source product. The trigger is read-only while the upgrade offer is present. It unlocks if the upgrade offer is removed.
**Manual configuration (funnels without a subscription upgrade offer)**
1. Click **Add Trigger**.
2. Select **Variant on subscription** from the trigger type dropdown.
3. Click **Select** to open the product picker (filtered to subscription products only).
4. Choose the subscription product(s) you want to target.
5. Click **Save**.
**Example use cases:**
* Show a subscription upgrade offer only to customers who subscribe to a specific product, without triggering for one-time purchases of the same product.
* Target customers subscribing to any of several products by selecting multiple products in the trigger.
If a funnel has a subscription upgrade offer, the Variant on subscription trigger is read-only and managed by the wizard. To edit it manually, remove the subscription upgrade offer first.
Use the **Variant Name** trigger to display specific funnels based on the product variant selected by the customer at checkout (e.g., size, color, style).
**To configure:**
1. Click **Add Trigger**.
2. Select **Variant Name** from the trigger type dropdown.
3. Choose **Include** or **Exclude**.
4. Enter the variant name(s) you want to target.
5. Click **Save**.
**Example use cases:**
* Set to include "Large." If a customer purchases a t-shirt in size Large, the funnel activates. Size Small or Medium will not trigger it.
* Set to include "Red" and "Blue." Either color variant will activate the funnel; Green will not.
***
## Cart & discount triggers
These triggers activate based on cart value, contents, or discounts applied.
Use the **Order Value** trigger to target customers based on their cart total.
**To configure:**
1. Click **Add Trigger**.
2. Select **Order Value** from the trigger type dropdown.
3. Choose **Greater than** or **Less than**.
4. Enter the dollar amount threshold.
5. Click **Save**.
**Example use cases:**
* Show premium upsells to customers with orders over \$100.
* Offer free shipping upgrades to customers with orders under \$50.
* A funnel set to "less than \$50.00" will activate for a \$30.00 order but not a \$60.00 order.
Use the **Quantity** trigger to show an upsell offer based on the total item count in a customer's order. This trigger counts all items across every product in the cart, regardless of which specific products they are.
**To configure:**
1. Click **Add Trigger**.
2. Select **Quantity** from the trigger type dropdown.
3. Choose **More than**, **Less than**, or **Exactly**.
4. Enter the item count threshold.
5. Click **Save**.
**Example use cases:**
* Set to "less than 3" - the upsell appears only when there are 1 or 2 total items in the cart.
* Set to "more than 1" - the funnel triggers for orders with 2 or more total items.
* Set to "exactly 3" - the funnel triggers only when there are exactly 3 total items in the cart.
If you need to trigger based on the quantity of a specific product rather than total cart item count, use the Product Quantity trigger instead.
Use the **Discount Code** trigger to include or exclude customers from seeing a funnel based on a discount code they applied. You can also exclude all orders that used any manually-entered discount code, without specifying individual codes.
**To configure:**
1. Click **Add Trigger**.
2. Select **Discount Code** from the trigger type dropdown.
3. Choose one of the three options:
* **Includes** — the funnel shows only when the order includes one of the specified codes.
* **Excludes** — the funnel shows only when none of the specified codes were applied.
* **Excludes any manual discount code** — the funnel shows only when no manually-entered discount code was used at checkout. Automatic and script discounts are ignored, so a site-wide automatic discount will not suppress the funnel.
4. For **Includes** or **Excludes**, enter the discount code(s), pressing **Enter** after each one to save it. No codes are needed for **Excludes any manual discount code**.
5. Click **Save**.
**Example use cases:**
* Show a funnel only to email subscribers by including their specific discount code.
* Exclude all orders that used any manually-entered discount code to prevent upsell offers from showing to customers who already received a discount.
Be sure to press **Enter** after entering a discount code to save it in the funnel.
Use the **Discount Percent** trigger to include or exclude customers from viewing a funnel based on the discount percentage applied to their order.
**To configure:**
1. Click **Add Trigger**.
2. Select **Discount Percent (%)** from the trigger type dropdown.
3. Choose **Include** or **Exclude**, then choose **Greater than** or **Less than**.
4. Enter the discount percentage threshold.
5. Click **Save**.
**Example use cases:**
* Set to exclude discounts "greater than 20%." A customer with a 25% discount won't see the funnel; one with 15% or no discount will.
* Set to include discounts "less than 10%." A customer with a 5% discount will see the funnel; one with 15% will not.
***
## Customer attribute triggers
These triggers use customer data to control funnel visibility.
Use the **Customer Tag** trigger to include or exclude customers from seeing a funnel based on their associated Shopify customer tags.
**To configure:**
1. Click **Add Trigger**.
2. Select **Customer Tag** from the trigger type dropdown.
3. Choose **Include** or **Exclude**.
4. Enter the customer tag(s) you want to target.
5. Click **Save**.
**Example use cases:**
* Set to include "VIP." Only customers with the VIP tag will see the funnel.
* Set to exclude "Wholesale." Wholesale customers won't see retail upsells.
Use the **Customer Order History** trigger to create offers based on a customer's past purchases of specific products.
**To configure:**
1. Click **Add Trigger**.
2. Select **Customer Order History** from the trigger type dropdown.
3. Search for and select the specific products to check for in past orders.
4. Click **Save**.
You must select specific products when using this trigger. If you don't, it will only display "Customer previously ordered \_\_\_\_" without applying any action. If your goal is simply to check whether a customer has ordered before, use the Customer Order Count trigger instead.
This trigger reviews only past orders, not the current order.
Use the **Customer Order Count** trigger to display a funnel specifically for new or returning customers based on how many orders they've previously placed.
**To configure:**
1. Click **Add Trigger**.
2. Select **Customer Order Count** from the trigger type dropdown.
3. Choose **Equal to**, **Greater than**, or **Less than**.
4. Enter the order count threshold.
5. Click **Save**.
**Example use cases:**
* Set to "equal to 0" to target first-time customers only.
* Set to "greater than 3" to target loyal customers who have placed 4 or more previous orders.
* More than 0 orders = returning customer; 0 orders = new customer.
This trigger is based on past purchases, not the current order.
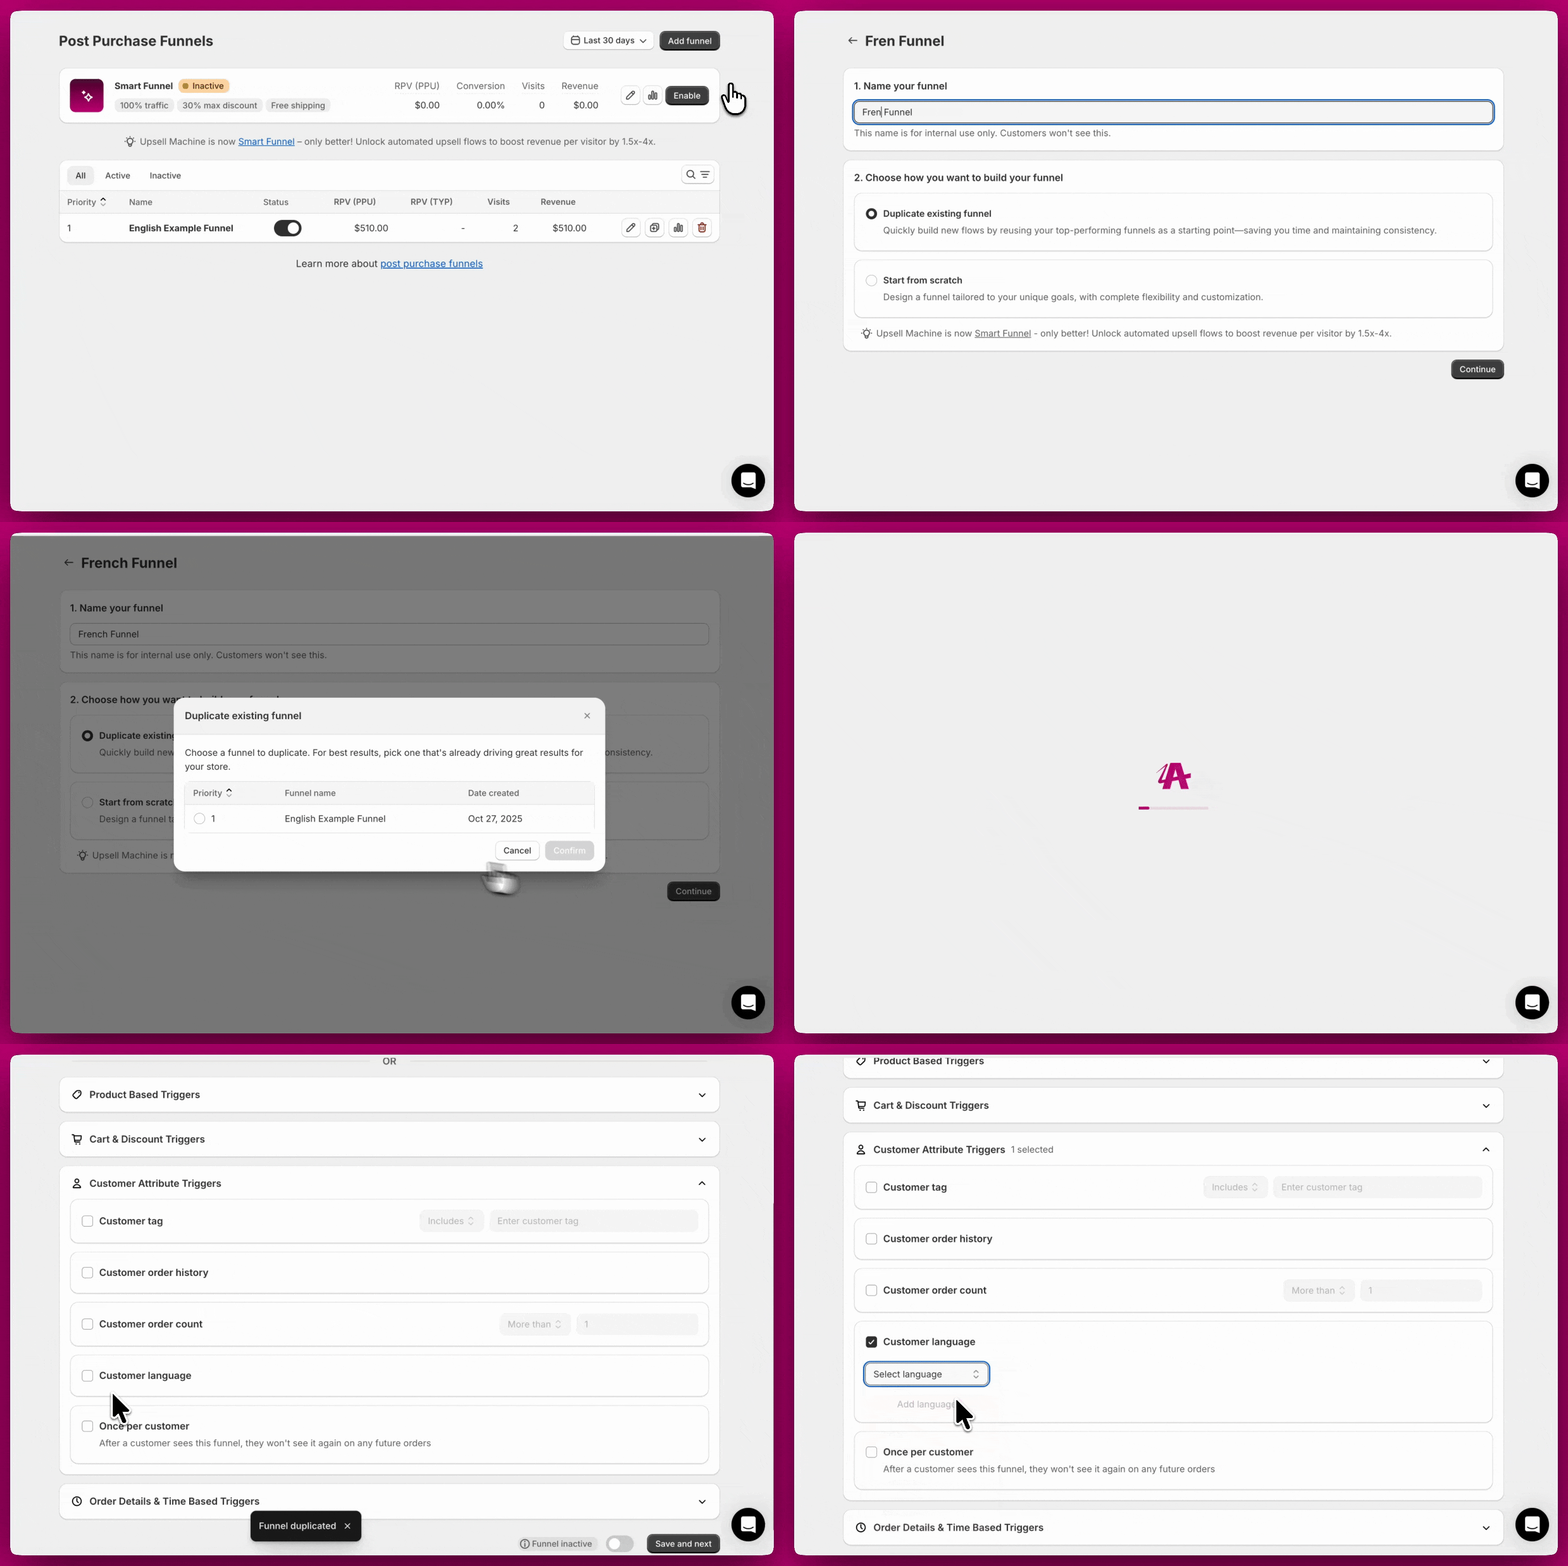
Use the **Customer Language** trigger to tailor offers based on the customer's preferred language. If your store serves customers in more than one language, you can create a separate funnel for each one and display the right offer based on the language the customer checked out in.
**To configure:**
1. Click **Add Trigger**.
2. Select **Customer Language** from the trigger type dropdown.
3. Select the language you want to target.
4. Click **Save**.
 **Setting up a multi-language funnel**
Start by creating a funnel for your first language, then duplicate it for each additional language. Rename each funnel so it's easy to identify, update its Customer Language trigger to match, and manually translate all available text fields, including the product title, description, timer, and any custom text widgets.
**Current limitations**
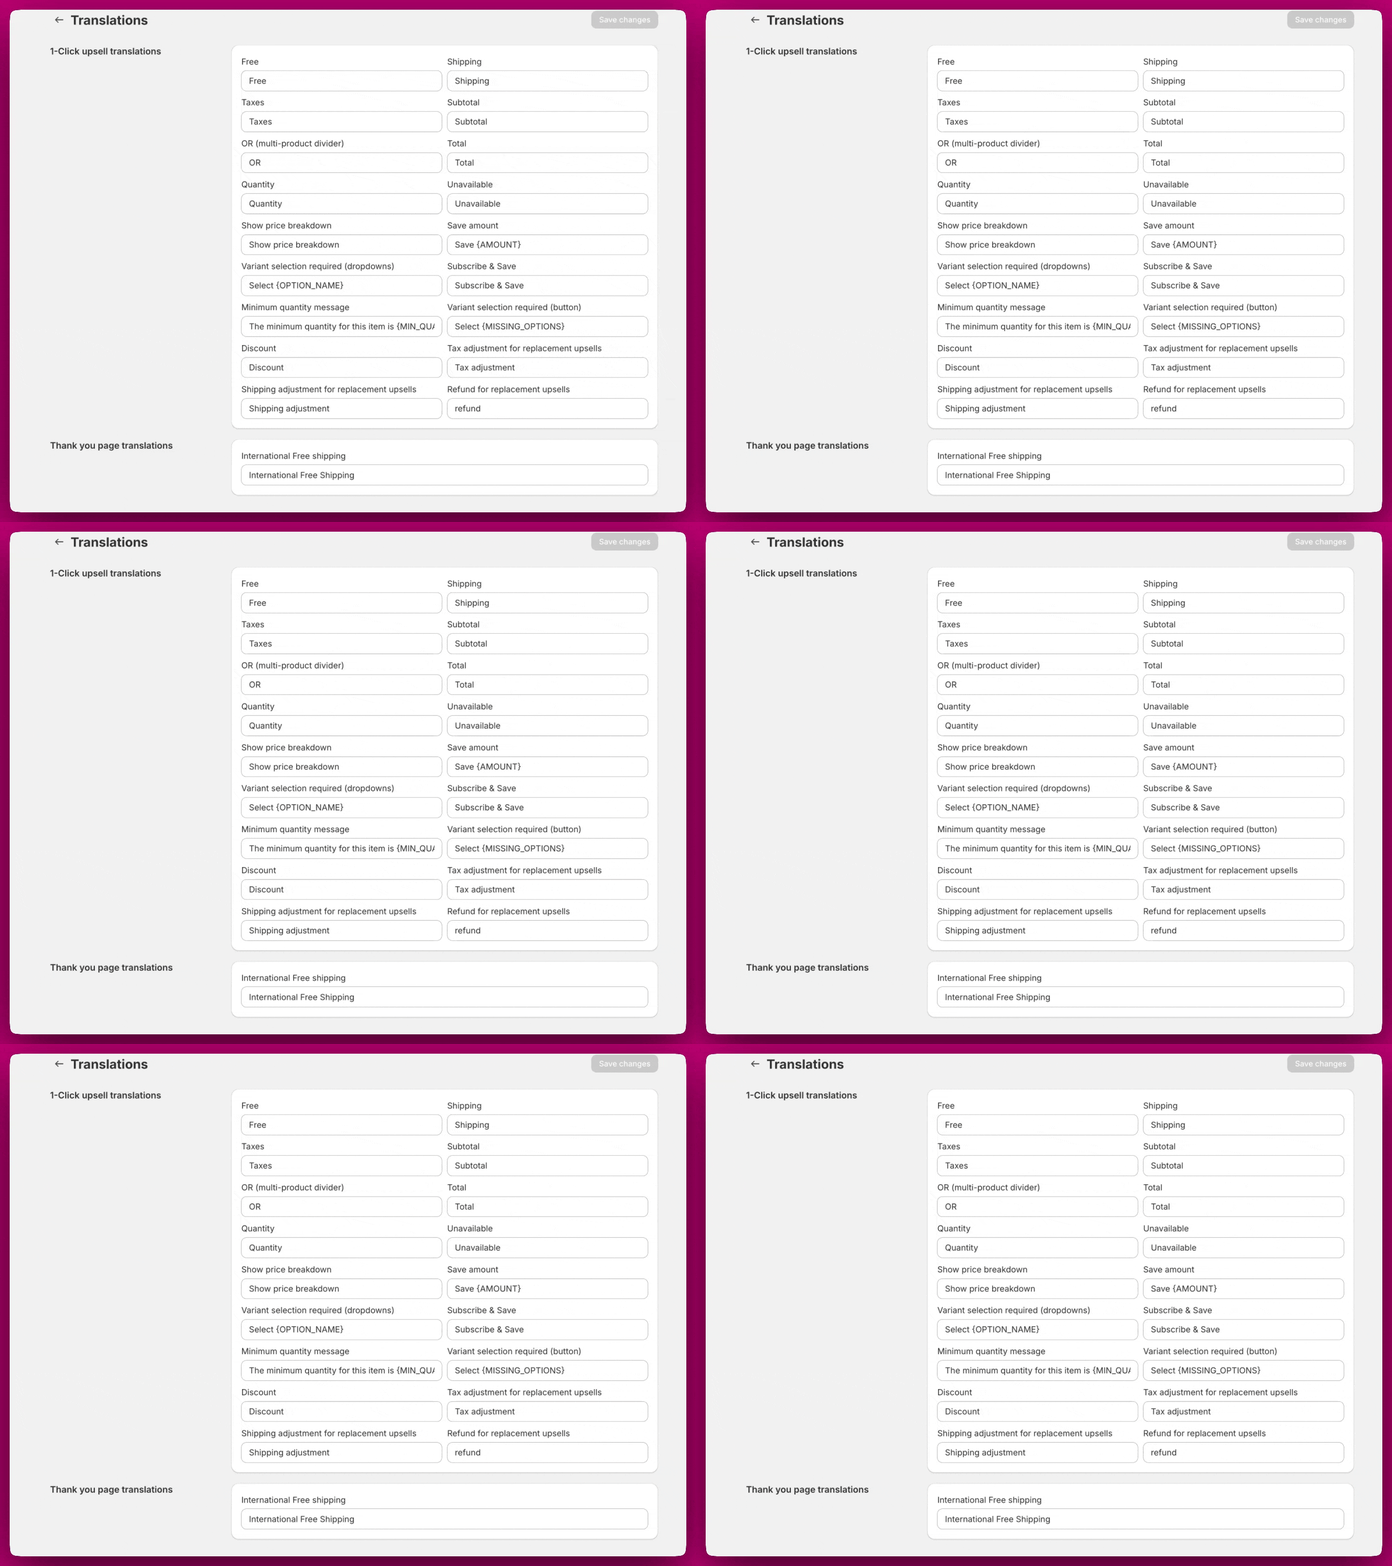
Some elements are controlled globally through the **Translations** section in Aftersell's **Settings**, meaning they can only be set to one language at a time. Changing these will affect all funnels regardless of language.
**Setting up a multi-language funnel**
Start by creating a funnel for your first language, then duplicate it for each additional language. Rename each funnel so it's easy to identify, update its Customer Language trigger to match, and manually translate all available text fields, including the product title, description, timer, and any custom text widgets.
**Current limitations**
Some elements are controlled globally through the **Translations** section in Aftersell's **Settings**, meaning they can only be set to one language at a time. Changing these will affect all funnels regardless of language.
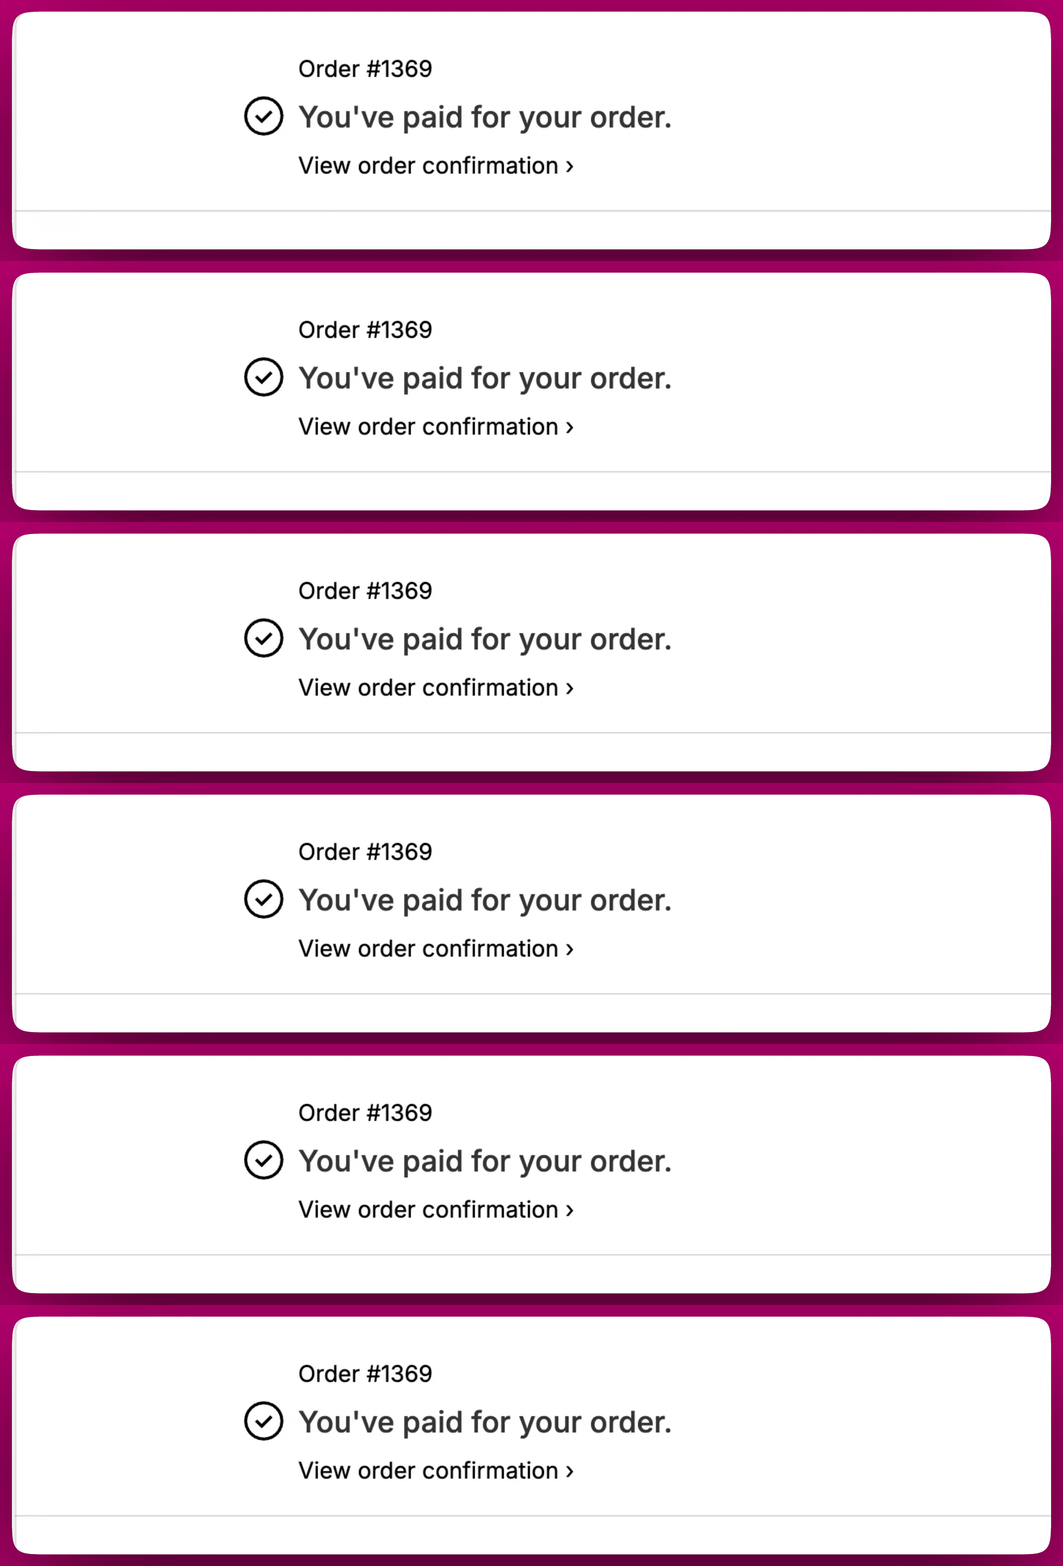
 The Shopify controlled header at the top of the post-purchase page will automatically display in the customer's checkout language. This includes text like "You've paid for your order." and cannot be customized through Aftersell.
 Use the **Once per Customer** trigger to ensure a funnel only shows once per customer across all of their orders.
**To configure:**
1. Click **Add Trigger**.
2. Select **Once per Customer** from the trigger type dropdown.
3. Click **Save**.
**Example use cases:**
* A customer who sees this funnel after their first purchase will not see it again on any future purchases, even if all other trigger conditions are met.
* Use it to show a special "welcome offer" exclusively on a customer's first purchase.
***
## Order details & time-based triggers
These triggers depend on checkout details, marketing data, or timing.
Use **UTM Parameter** triggers to display specific funnels based on marketing campaign parameters in the URL.
**To configure:**
1. Click **Add Trigger**.
2. Select **UTM Parameter** from the trigger type dropdown.
3. Choose the UTM parameter type (source, medium, campaign, term, content, or id).
4. Enter the exact value to match.
5. Click **Save**.
**Example use cases:**
* Set to "utm\_source = facebook." Customers arriving via a Facebook link will see the funnel; others will not.
* Set to "utm\_campaign = summer\_sale" to show campaign-specific offers to customers from that campaign.
* Show exclusive offers to customers arriving from your email campaign by targeting `utm_source=email`.
For advanced UTM tracking setup, see [How to use Direct-to-Checkout UTM Links](/aftersell/how_to_use_direct_to_checkout_utm_links).
UTM triggers do not fire when customers use express checkout methods (Shop Pay, Apple Pay, Google Pay, PayPal, etc.) because express checkout bypasses the standard cart flow where UTM parameters are captured. If you're using UTM triggers for campaign tracking, consider using other trigger types (product, collection, order value) as alternatives, or creating separate funnels for general traffic that don't rely on UTM parameters.
Use the **Currency** trigger to control whether customers see a funnel based on the currency they use at checkout.
**To configure:**
1. Click **Add Trigger**.
2. Select **Currency** from the trigger type dropdown.
3. Choose **Include** or **Exclude**.
4. Select the currency or currencies you want to target.
5. Click **Save**.
**Example use cases:**
* Set to "USD." Customers checking out in US Dollars will see the funnel; those in EUR, GBP, or others will not.
* Set to "CAD" and "USD." Customers in either currency will see the funnel.
**Important notes:**
* Thank You Page offers automatically adjust to the customer's checkout currency, making a single funnel viable across markets.
* Post-purchase upsells do not support multi-currency. Customers will not see upsell offers unless your store currency matches their checkout currency. Use Thank You Page offers for universal visibility.
* If your store uses **Shopify Markets**, Aftersell integrates seamlessly to display products in the correct local currency.
Use the **Device Type** trigger to scope a funnel to customers on a specific device — Desktop only or Mobile only.
**To configure:**
1. Click **Add Trigger**.
2. Select **Device Type** from the trigger type dropdown.
3. Choose **Desktop only** or **Mobile only**.
4. Click **Save**.
**Example use cases:**
* Set to **Desktop only** to show an offer that works best on larger screens, such as a detailed product comparison or multi-image layout.
* Set to **Mobile only** to target customers browsing on their phone with a mobile-optimized offer.
* Combine with other triggers (e.g., Order Value) to show a desktop-only offer to high-value customers.
If a customer's device type cannot be detected, the trigger fails closed and the funnel will not display. This matches the behavior of other triggers when required data is unavailable.
Use the **Shipping Country** trigger to include or exclude customers based on their shipping destination.
**To configure:**
1. Click **Add Trigger**.
2. Select **Shipping Country** from the trigger type dropdown.
3. Choose **Include** or **Exclude**.
4. Select the countries you want to target.
5. Click **Save**.
**Example use cases:**
* Exclude international shipping for products only available domestically.
* Show region-specific products to customers in certain countries.
* Create country-specific Thank You Page offers (since Post-purchase upsells don't display for non-default currencies).
Use the **Random Sample** trigger to control funnel visibility for a random subset of customers. This is ideal for A/B testing new funnels or surprising a select group with special offers.
**To configure:**
1. Click **Add Trigger**.
2. Select **Random Sample** from the trigger type dropdown.
3. Enter the percentage of customers who should see the funnel.
4. Click **Save**.
**Example use cases:**
* Set to "25%." The funnel randomly activates for approximately 25% of qualifying customers.
* For A/B testing, create two funnels each with a Random Sample trigger set to "50%." Each funnel will show to roughly half your customers.
Use the **Date/Time** trigger to schedule funnel visibility based on specific dates and times, ideal for time-sensitive promotions, seasonal campaigns, or limited-time deals.
**To configure:**
1. Click **Add Trigger**.
2. Select **Date/Time** from the trigger type dropdown.
3. Use the date picker to select your start date, end date, or both.
4. Use the timezone dropdown to select the timezone your schedule should follow (for example, "GMT-07:00 - (MST) America/Phoenix").
5. Click **Save**.
**Example use cases:**
* Set to activate "between December 1 and December 25" for a holiday promotion.
* Set to activate "after January 1, 2026" to launch a new year promotion.
* Set a start and end date in your store's local timezone to run a weekend flash sale from Friday 12:00 AM to Sunday 11:59 PM.
The timezone you select determines when the trigger starts and stops. Choose the timezone that matches your store's primary market or promotion schedule.
Use the **Shipping Method** trigger to control funnel visibility based on the customer's chosen shipping option at checkout (e.g., standard, expedited, international, pickup).
**To configure:**
1. Click **Add Trigger**.
2. Select **Shipping Method** from the trigger type dropdown.
3. Choose **Include** or **Exclude**.
4. Select the shipping method(s) you want to target.
5. Click **Save**.
**Example use cases:**
* Show an expedited delivery upgrade upsell only to customers who selected standard shipping.
* Exclude "Local Pickup" customers from seeing shipping protection or delivery-related upsells.
* Target customers who chose international shipping with a customs-friendly product bundle.
The shipping method names in Aftersell match the shipping rate names configured in your Shopify admin. Make sure the names in your trigger exactly match your Shopify shipping rate names.
***
## Managing funnel priority
When you have multiple funnels, priority determines which funnel displays when multiple funnels' triggers are met.
**How funnel priority works:**
* Funnels are evaluated in priority order: Priority 1 → Priority 2 → Priority 3, etc.
* The first funnel whose triggers are all met will display.
* Lower priority funnels are only checked if higher priority funnels don't match.
* Smart Funnel (if enabled) is evaluated at Priority 0, before all manual funnels.
### Viewing funnel priority
You can see each funnel's current priority number on the left side of the funnel table in the **Post-purchase Funnels** section.
### Reordering funnels
1. Go to **Post-purchase Funnels** in the Aftersell admin.
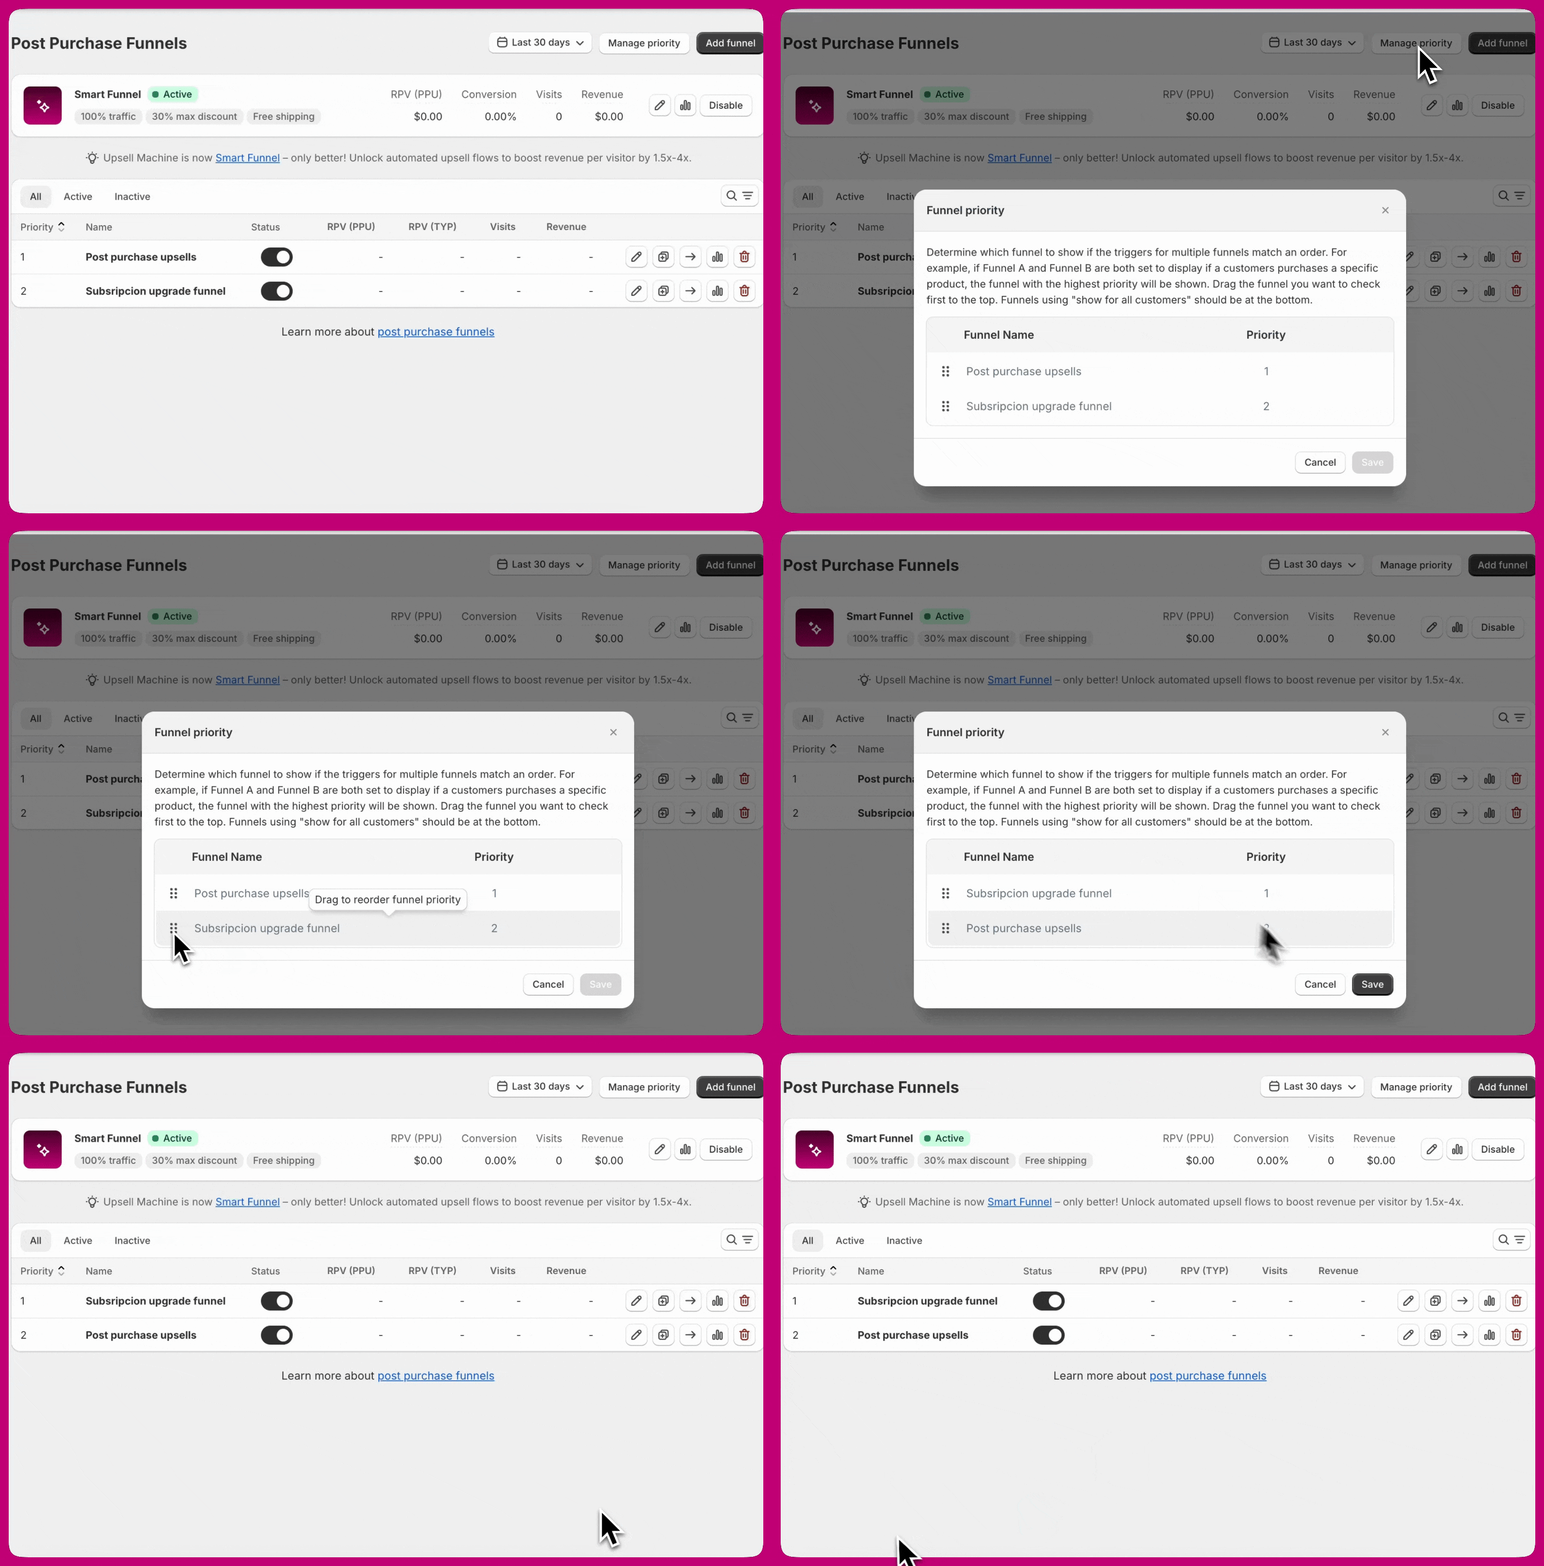
2. Click the **Manage Priority** button at the top right of the funnel table.
3. Drag and drop funnels to reorder them.
4. Click **Save** to apply the new priority order.
Use the **Once per Customer** trigger to ensure a funnel only shows once per customer across all of their orders.
**To configure:**
1. Click **Add Trigger**.
2. Select **Once per Customer** from the trigger type dropdown.
3. Click **Save**.
**Example use cases:**
* A customer who sees this funnel after their first purchase will not see it again on any future purchases, even if all other trigger conditions are met.
* Use it to show a special "welcome offer" exclusively on a customer's first purchase.
***
## Order details & time-based triggers
These triggers depend on checkout details, marketing data, or timing.
Use **UTM Parameter** triggers to display specific funnels based on marketing campaign parameters in the URL.
**To configure:**
1. Click **Add Trigger**.
2. Select **UTM Parameter** from the trigger type dropdown.
3. Choose the UTM parameter type (source, medium, campaign, term, content, or id).
4. Enter the exact value to match.
5. Click **Save**.
**Example use cases:**
* Set to "utm\_source = facebook." Customers arriving via a Facebook link will see the funnel; others will not.
* Set to "utm\_campaign = summer\_sale" to show campaign-specific offers to customers from that campaign.
* Show exclusive offers to customers arriving from your email campaign by targeting `utm_source=email`.
For advanced UTM tracking setup, see [How to use Direct-to-Checkout UTM Links](/aftersell/how_to_use_direct_to_checkout_utm_links).
UTM triggers do not fire when customers use express checkout methods (Shop Pay, Apple Pay, Google Pay, PayPal, etc.) because express checkout bypasses the standard cart flow where UTM parameters are captured. If you're using UTM triggers for campaign tracking, consider using other trigger types (product, collection, order value) as alternatives, or creating separate funnels for general traffic that don't rely on UTM parameters.
Use the **Currency** trigger to control whether customers see a funnel based on the currency they use at checkout.
**To configure:**
1. Click **Add Trigger**.
2. Select **Currency** from the trigger type dropdown.
3. Choose **Include** or **Exclude**.
4. Select the currency or currencies you want to target.
5. Click **Save**.
**Example use cases:**
* Set to "USD." Customers checking out in US Dollars will see the funnel; those in EUR, GBP, or others will not.
* Set to "CAD" and "USD." Customers in either currency will see the funnel.
**Important notes:**
* Thank You Page offers automatically adjust to the customer's checkout currency, making a single funnel viable across markets.
* Post-purchase upsells do not support multi-currency. Customers will not see upsell offers unless your store currency matches their checkout currency. Use Thank You Page offers for universal visibility.
* If your store uses **Shopify Markets**, Aftersell integrates seamlessly to display products in the correct local currency.
Use the **Device Type** trigger to scope a funnel to customers on a specific device — Desktop only or Mobile only.
**To configure:**
1. Click **Add Trigger**.
2. Select **Device Type** from the trigger type dropdown.
3. Choose **Desktop only** or **Mobile only**.
4. Click **Save**.
**Example use cases:**
* Set to **Desktop only** to show an offer that works best on larger screens, such as a detailed product comparison or multi-image layout.
* Set to **Mobile only** to target customers browsing on their phone with a mobile-optimized offer.
* Combine with other triggers (e.g., Order Value) to show a desktop-only offer to high-value customers.
If a customer's device type cannot be detected, the trigger fails closed and the funnel will not display. This matches the behavior of other triggers when required data is unavailable.
Use the **Shipping Country** trigger to include or exclude customers based on their shipping destination.
**To configure:**
1. Click **Add Trigger**.
2. Select **Shipping Country** from the trigger type dropdown.
3. Choose **Include** or **Exclude**.
4. Select the countries you want to target.
5. Click **Save**.
**Example use cases:**
* Exclude international shipping for products only available domestically.
* Show region-specific products to customers in certain countries.
* Create country-specific Thank You Page offers (since Post-purchase upsells don't display for non-default currencies).
Use the **Random Sample** trigger to control funnel visibility for a random subset of customers. This is ideal for A/B testing new funnels or surprising a select group with special offers.
**To configure:**
1. Click **Add Trigger**.
2. Select **Random Sample** from the trigger type dropdown.
3. Enter the percentage of customers who should see the funnel.
4. Click **Save**.
**Example use cases:**
* Set to "25%." The funnel randomly activates for approximately 25% of qualifying customers.
* For A/B testing, create two funnels each with a Random Sample trigger set to "50%." Each funnel will show to roughly half your customers.
Use the **Date/Time** trigger to schedule funnel visibility based on specific dates and times, ideal for time-sensitive promotions, seasonal campaigns, or limited-time deals.
**To configure:**
1. Click **Add Trigger**.
2. Select **Date/Time** from the trigger type dropdown.
3. Use the date picker to select your start date, end date, or both.
4. Use the timezone dropdown to select the timezone your schedule should follow (for example, "GMT-07:00 - (MST) America/Phoenix").
5. Click **Save**.
**Example use cases:**
* Set to activate "between December 1 and December 25" for a holiday promotion.
* Set to activate "after January 1, 2026" to launch a new year promotion.
* Set a start and end date in your store's local timezone to run a weekend flash sale from Friday 12:00 AM to Sunday 11:59 PM.
The timezone you select determines when the trigger starts and stops. Choose the timezone that matches your store's primary market or promotion schedule.
Use the **Shipping Method** trigger to control funnel visibility based on the customer's chosen shipping option at checkout (e.g., standard, expedited, international, pickup).
**To configure:**
1. Click **Add Trigger**.
2. Select **Shipping Method** from the trigger type dropdown.
3. Choose **Include** or **Exclude**.
4. Select the shipping method(s) you want to target.
5. Click **Save**.
**Example use cases:**
* Show an expedited delivery upgrade upsell only to customers who selected standard shipping.
* Exclude "Local Pickup" customers from seeing shipping protection or delivery-related upsells.
* Target customers who chose international shipping with a customs-friendly product bundle.
The shipping method names in Aftersell match the shipping rate names configured in your Shopify admin. Make sure the names in your trigger exactly match your Shopify shipping rate names.
***
## Managing funnel priority
When you have multiple funnels, priority determines which funnel displays when multiple funnels' triggers are met.
**How funnel priority works:**
* Funnels are evaluated in priority order: Priority 1 → Priority 2 → Priority 3, etc.
* The first funnel whose triggers are all met will display.
* Lower priority funnels are only checked if higher priority funnels don't match.
* Smart Funnel (if enabled) is evaluated at Priority 0, before all manual funnels.
### Viewing funnel priority
You can see each funnel's current priority number on the left side of the funnel table in the **Post-purchase Funnels** section.
### Reordering funnels
1. Go to **Post-purchase Funnels** in the Aftersell admin.
2. Click the **Manage Priority** button at the top right of the funnel table.
3. Drag and drop funnels to reorder them.
4. Click **Save** to apply the new priority order.
 **Best practices for funnel priority:**
* **Place specific funnels first** - Put funnels with narrow targeting (specific products, high-value orders) at higher priority.
* **Place broad funnels last** - Put funnels with general targeting (collections, low order values) at lower priority.
* **Set Catch-All funnel to lowest priority** - If you have a "Show for All Customers" funnel, make it the last priority so it only displays when no other funnel matches.
* **Test your priority order** - Place test orders to verify the correct funnel displays for different scenarios.
**Example priority structure:**
* Priority 1: High-value orders (\$200+) with specific product
* Priority 2: Orders containing products from premium collection
* Priority 3: Orders with any product from main category
* Priority 4: Catch-All funnel (Show for All Customers)
***
## Combining multiple triggers
You can add multiple triggers to a single funnel to create precise targeting rules. Remember: all triggers must be met for the funnel to display.
### Example: targeting high-value supplement customers
Add these triggers to the same funnel:
* **Product/Collection trigger:** Contains products from "Supplements" collection
* **Order Value trigger:** Greater than \$75
* **Customer Order Count trigger:** More than 0 orders (returning customers only)
This funnel will only display to returning customers who purchase supplements and have a cart value over \$75.
### Example: targeting customers who haven't purchased specific upgrades
This is useful when you sell products with optional upgrades and want to show different upsells depending on what the customer has and hasn't already purchased.
**Scenario:** You sell a base product with two optional upgrades - "Premium Rotor" and "Water Resistance."
**Funnel 1 - Customer bought neither upgrade (highest priority)**
* No product exclusions needed
* Set to **highest priority** so it is evaluated first
* This funnel shows both upgrades as upsell options
**Funnel 2 - Customer bought Premium Rotor but not Water Resistance**
* Add a **Product/Collection trigger** set to **Contains** "Premium Rotor"
* Add a **Product/Collection Exclusion trigger** set to exclude "Water Resistance"
* This funnel shows only the Water Resistance upsell
**Funnel 3 - Customer bought Water Resistance but not Premium Rotor**
* Add a **Product/Collection trigger** set to **Contains** "Water Resistance"
* Add a **Product/Collection Exclusion trigger** set to exclude "Premium Rotor"
* This funnel shows only the Premium Rotor upsell
Funnel priority is critical here. If Funnel 1 is not set to the highest priority, Aftersell may match a single-upgrade funnel first for customers who bought neither upgrade, resulting in only one upsell being shown instead of both.
***
## Next steps
* Learn about all available trigger types in the [Post-purchase Triggers reference](/aftersell/post_purchase_triggers)
* Understand how triggers work together with [Understanding Conditional Logic](/aftersell/understanding_conditional_logic_for_post_purchase_triggers)
* Set up your first funnel with the [Quickstart Guide](/aftersell/quickstart_guide_to_aftersell)
* Review [Best Practices](/aftersell/best_practices) for optimizing your funnel strategy
**Best practices for funnel priority:**
* **Place specific funnels first** - Put funnels with narrow targeting (specific products, high-value orders) at higher priority.
* **Place broad funnels last** - Put funnels with general targeting (collections, low order values) at lower priority.
* **Set Catch-All funnel to lowest priority** - If you have a "Show for All Customers" funnel, make it the last priority so it only displays when no other funnel matches.
* **Test your priority order** - Place test orders to verify the correct funnel displays for different scenarios.
**Example priority structure:**
* Priority 1: High-value orders (\$200+) with specific product
* Priority 2: Orders containing products from premium collection
* Priority 3: Orders with any product from main category
* Priority 4: Catch-All funnel (Show for All Customers)
***
## Combining multiple triggers
You can add multiple triggers to a single funnel to create precise targeting rules. Remember: all triggers must be met for the funnel to display.
### Example: targeting high-value supplement customers
Add these triggers to the same funnel:
* **Product/Collection trigger:** Contains products from "Supplements" collection
* **Order Value trigger:** Greater than \$75
* **Customer Order Count trigger:** More than 0 orders (returning customers only)
This funnel will only display to returning customers who purchase supplements and have a cart value over \$75.
### Example: targeting customers who haven't purchased specific upgrades
This is useful when you sell products with optional upgrades and want to show different upsells depending on what the customer has and hasn't already purchased.
**Scenario:** You sell a base product with two optional upgrades - "Premium Rotor" and "Water Resistance."
**Funnel 1 - Customer bought neither upgrade (highest priority)**
* No product exclusions needed
* Set to **highest priority** so it is evaluated first
* This funnel shows both upgrades as upsell options
**Funnel 2 - Customer bought Premium Rotor but not Water Resistance**
* Add a **Product/Collection trigger** set to **Contains** "Premium Rotor"
* Add a **Product/Collection Exclusion trigger** set to exclude "Water Resistance"
* This funnel shows only the Water Resistance upsell
**Funnel 3 - Customer bought Water Resistance but not Premium Rotor**
* Add a **Product/Collection trigger** set to **Contains** "Water Resistance"
* Add a **Product/Collection Exclusion trigger** set to exclude "Premium Rotor"
* This funnel shows only the Premium Rotor upsell
Funnel priority is critical here. If Funnel 1 is not set to the highest priority, Aftersell may match a single-upgrade funnel first for customers who bought neither upgrade, resulting in only one upsell being shown instead of both.
***
## Next steps
* Learn about all available trigger types in the [Post-purchase Triggers reference](/aftersell/post_purchase_triggers)
* Understand how triggers work together with [Understanding Conditional Logic](/aftersell/understanding_conditional_logic_for_post_purchase_triggers)
* Set up your first funnel with the [Quickstart Guide](/aftersell/quickstart_guide_to_aftersell)
* Review [Best Practices](/aftersell/best_practices) for optimizing your funnel strategy