> ## Documentation Index
> Fetch the complete documentation index at: https://docs.aftersell.com/llms.txt
> Use this file to discover all available pages before exploring further.
# How to configure checkout widgets
> Complete step-by-step guide to configuring checkout widgets in Aftersell, including all widget types, placement options, and conversion best practices for mobile and desktop
This guide walks you through how to configure and place checkout widgets in Aftersell, from enabling widgets to optimizing placement in Shopify Checkout for maximum conversion rates..
**Note:** Checkout widgets are only available to Shopify Plus merchants due to Shopify's Checkout Extensibility API restrictions.
***
## Step 1: Enable your widget in Aftersell
Before adding widgets to your checkout, you need to enable them in the Aftersell admin.
1. Navigate to the **Checkout** tab in your Aftersell admin
2. Select the widget type you want to configure ([Upsells](#upsells), [Cart Controls](#cart-controls), [Rewards,](#rewards) [Trust Badges,](#trust-badges) [Testimonials](#testimonials), [Notes](#notes), [Images](#images), or [Text](#text))
3. Click **Create** to build a new widget or select an existing widget to edit
4. Configure your widget settings (see [Widget types and configuration](#widget-types-and-configuration) below)
5. Click the **Enable** toggle in the top right corner of the widget settings
6. For restricted or advanced upsells, make sure you enable custom triggers before proceeding
***
## Step 2: Open the Shopify Checkout Editor
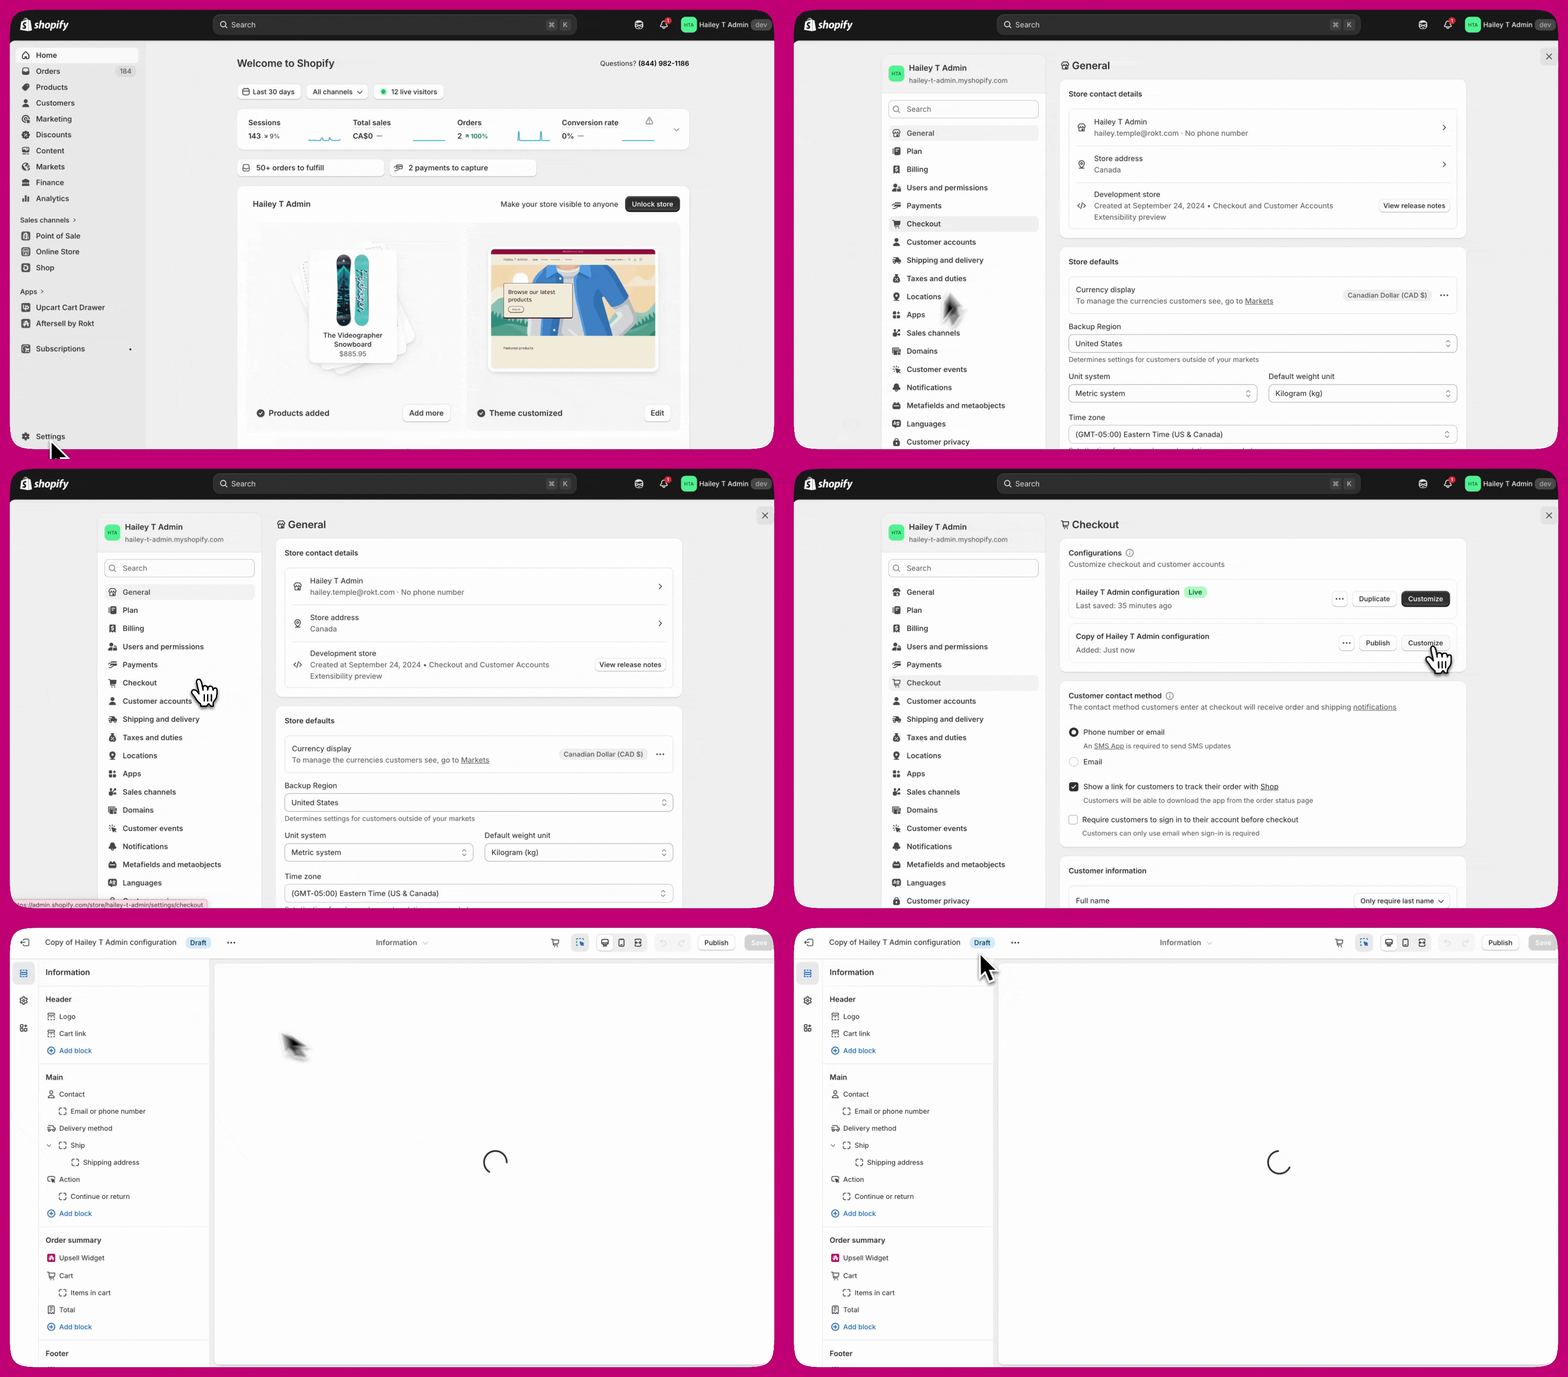
There are two ways to access the Shopify Checkout Editor:
**Option 1: From Shopify Admin**
1. Go to **Settings** in your Shopify Admin
2. Click **Checkout** in the left navigation
3. Click **Customize** next to your desired checkout profile
**Option 2: From Aftersell**
1. Click the **Open Shopify Checkout Editor** button in the bottom right of the Aftersell Checkout editor page
💡 **Tip:** Option 1 gives you more control over which checkout profile you're editing. We recommend testing on a draft version first before setting it live.
 ***
## Step 3: Add the app block to your checkout
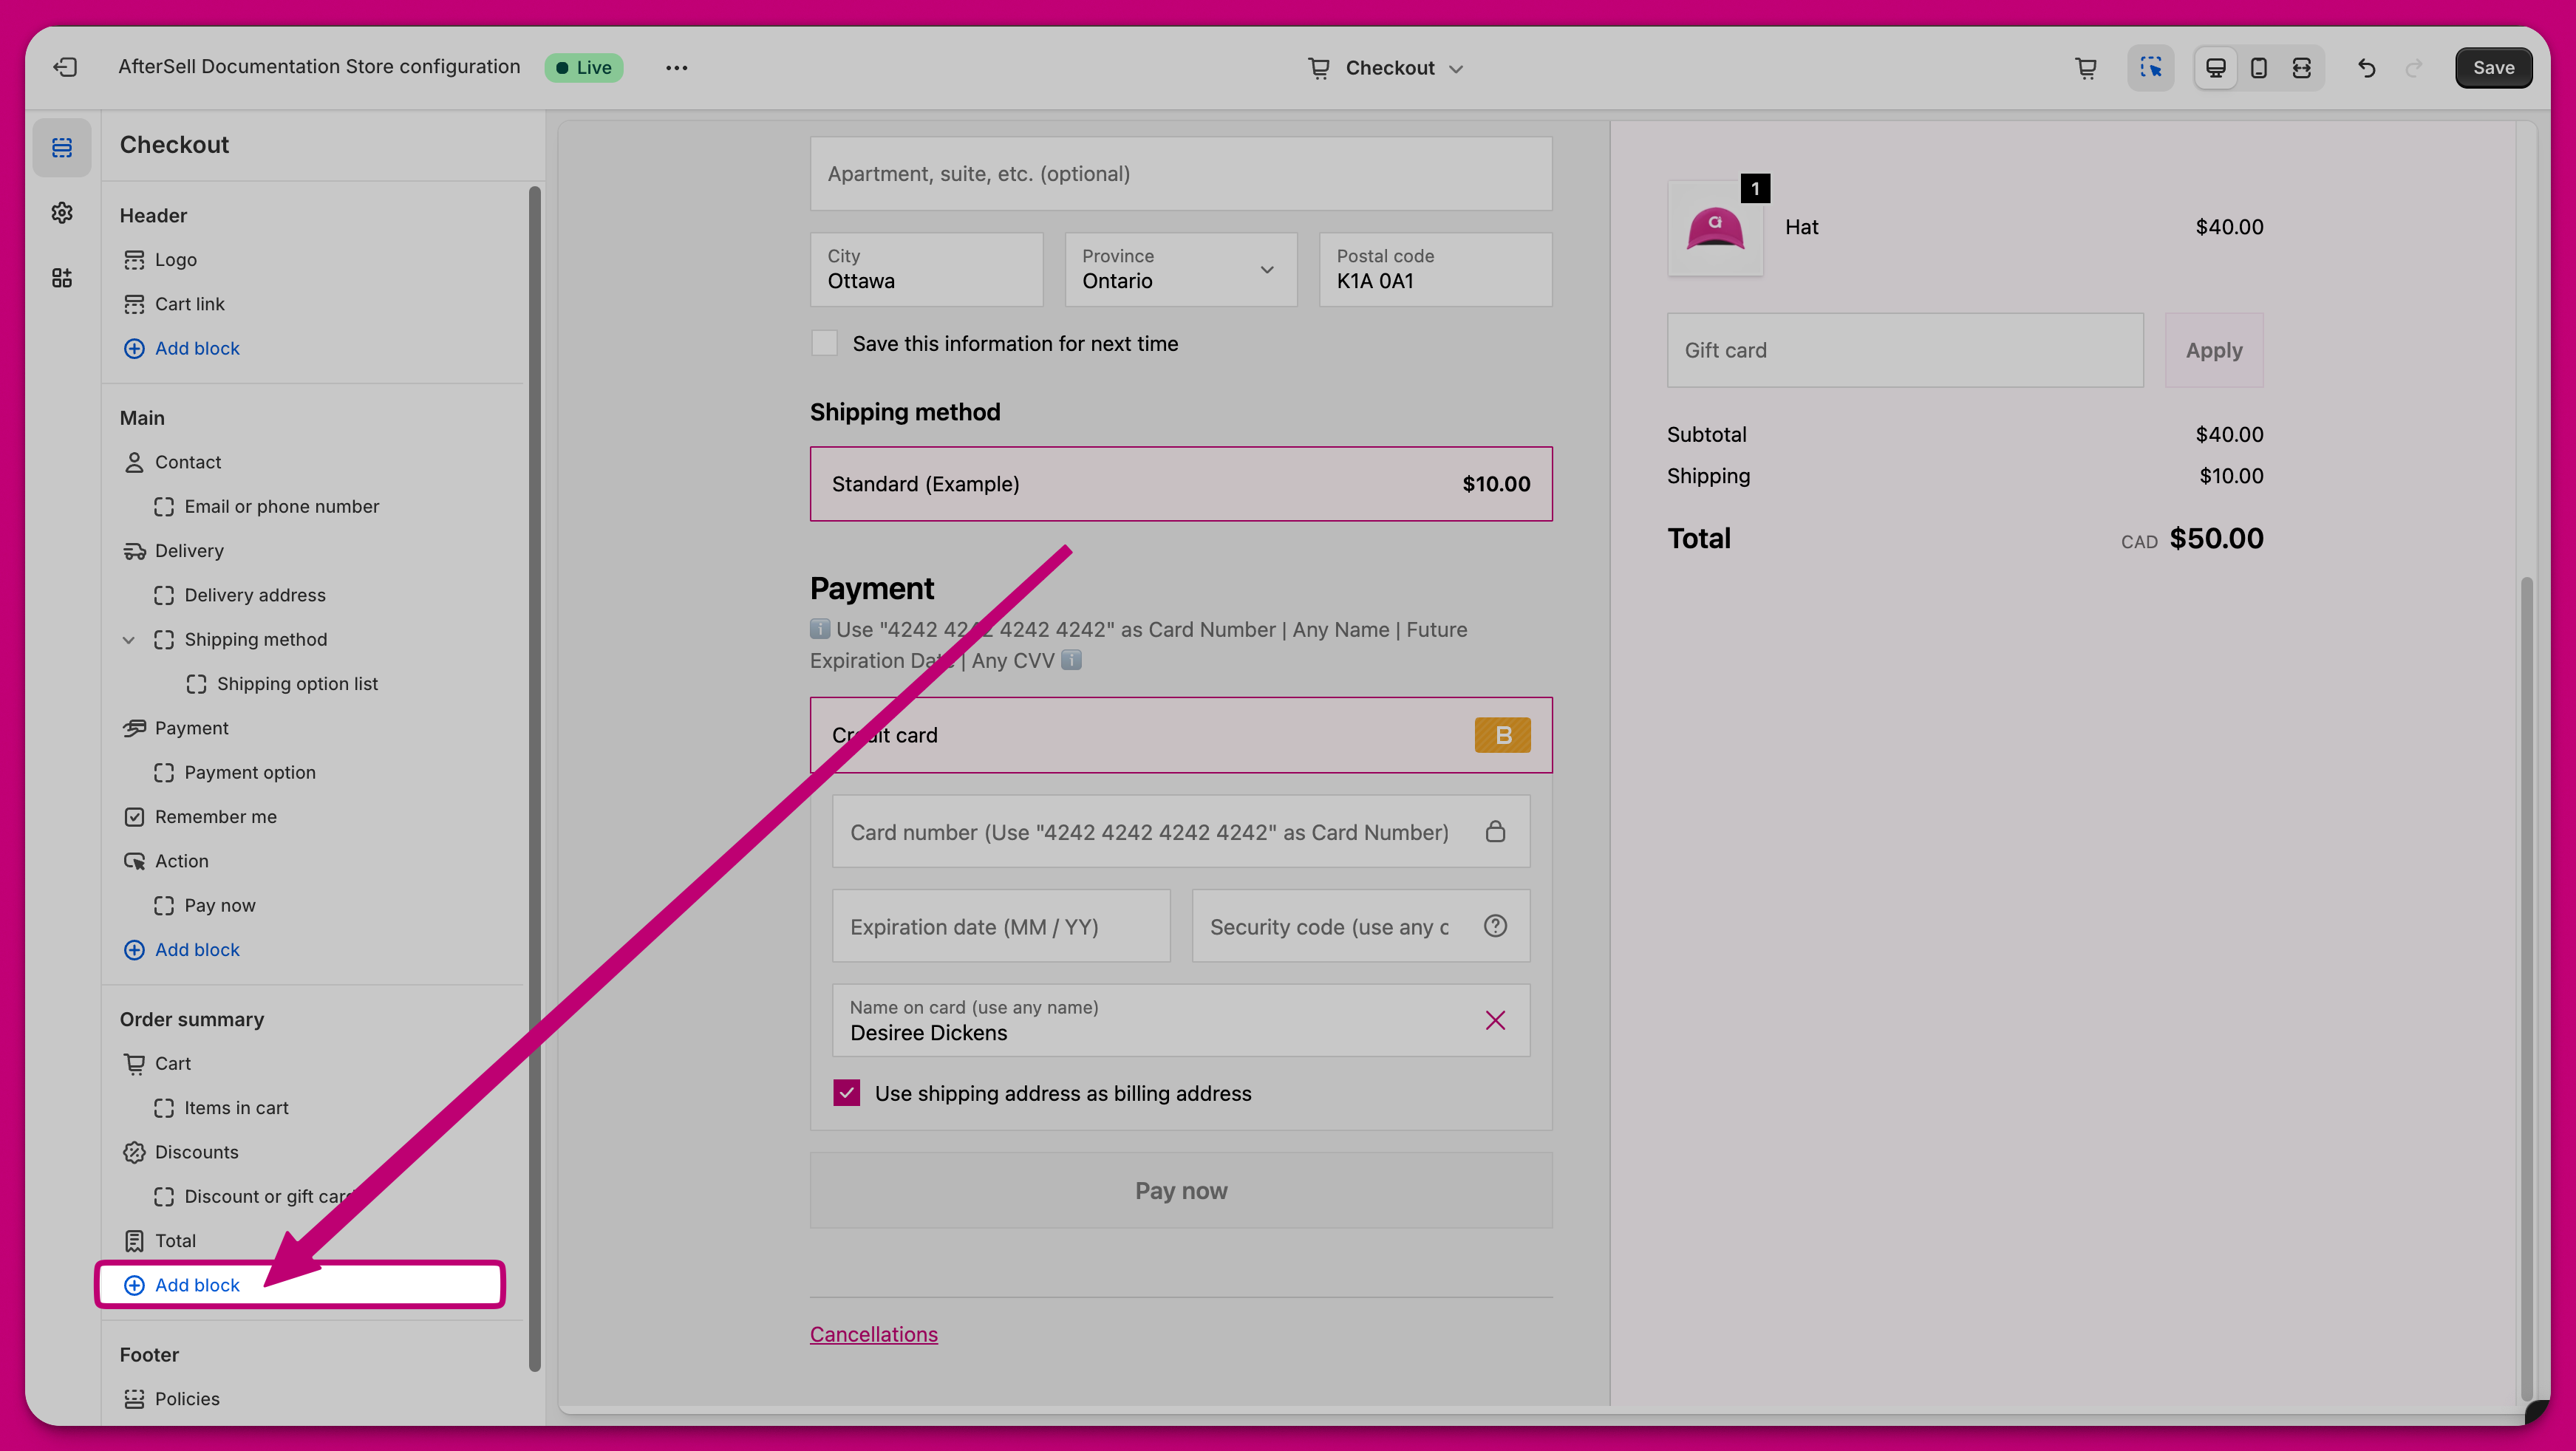
1. In the Shopify Checkout Editor, click **Add app block**
2. Select your desired Aftersell widget from the list of available widgets
3. Choose the correct placement for your widget (see [Placement options](#placement-options) below)
4. If you want your widgets to display in Shop Pay checkout, check the [**Include app block in Shop Pay**](/aftersell/show_checkout_widgets_in_shop_pay) option
5. Click **Save** in the top right corner
***
## Step 3: Add the app block to your checkout
1. In the Shopify Checkout Editor, click **Add app block**
2. Select your desired Aftersell widget from the list of available widgets
3. Choose the correct placement for your widget (see [Placement options](#placement-options) below)
4. If you want your widgets to display in Shop Pay checkout, check the [**Include app block in Shop Pay**](/aftersell/show_checkout_widgets_in_shop_pay) option
5. Click **Save** in the top right corner
 ***
## Step 4: Position your widget
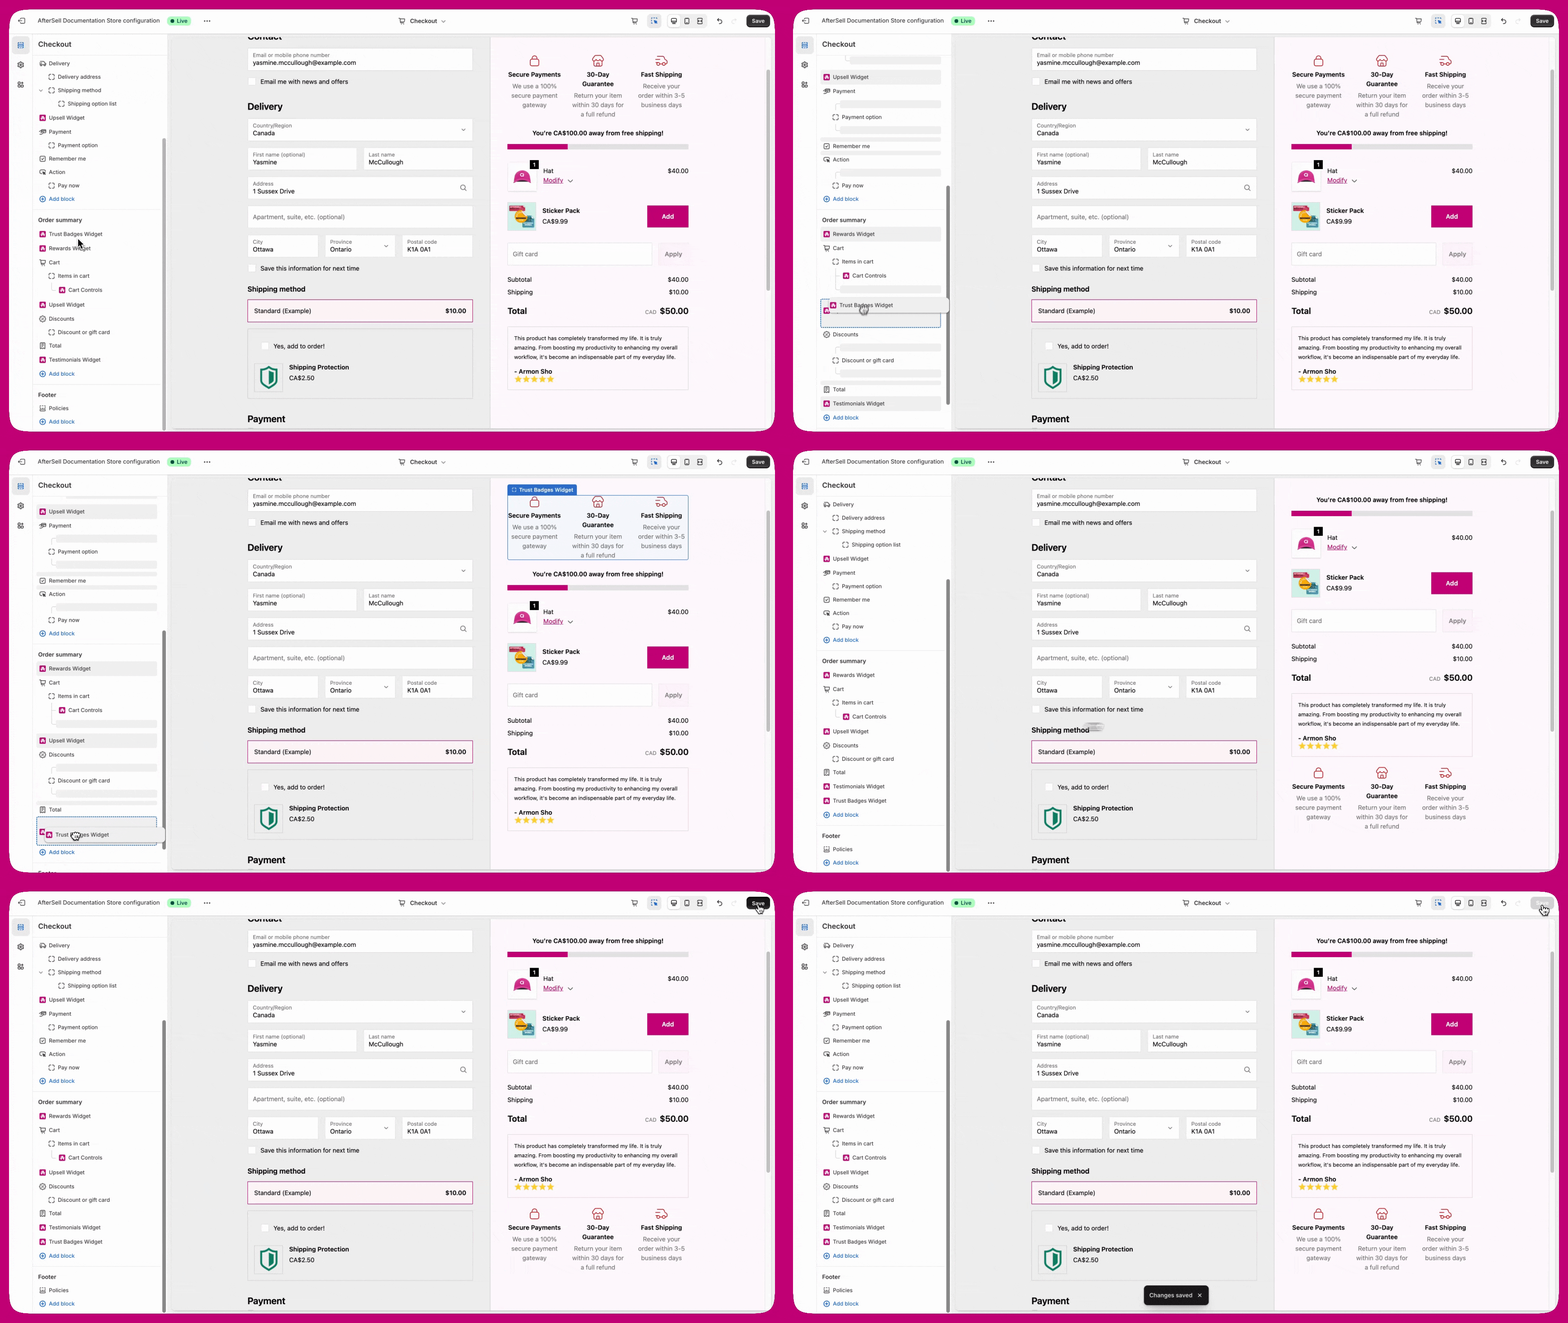
1. Drag and drop the app block to your desired location within the selected placement area
2. Click **Save** in the top right corner
***
## Step 4: Position your widget
1. Drag and drop the app block to your desired location within the selected placement area
2. Click **Save** in the top right corner
 ***
## Widget types and configuration
## Placements
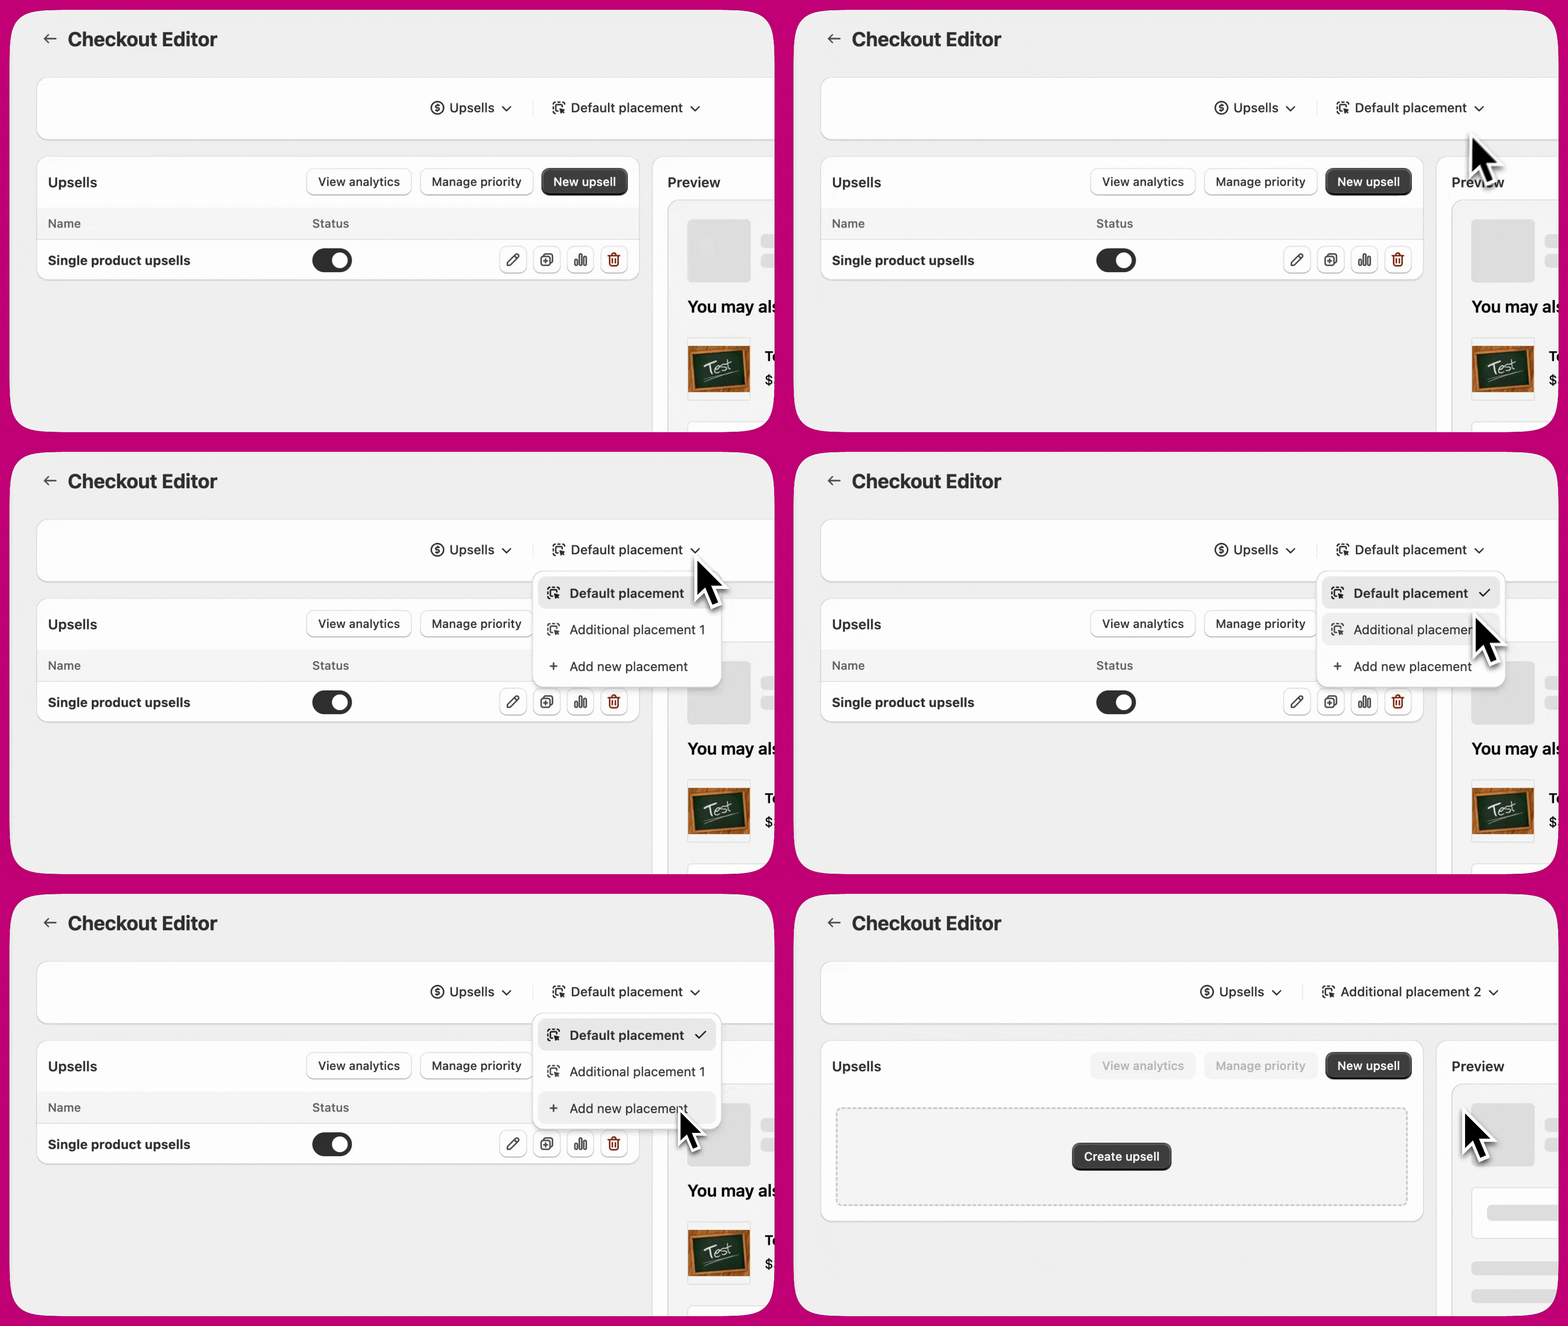
Placements are created in the Aftersell Checkout editor and allow you to run multiple widgets of the same type on the same checkout page.
For example, if you want to display two upsell offers on the same page, each must be assigned to a different placement.
### Available placements
* **Default placement**: The primary placement. Every widget type starts here.
* **Additional placement 1**: A second placement slot for displaying another widget of the same type on the same page.
* **Additional placement 2**: A third placement slot for further separation.
You can also create new placements directly from the placement dropdown in Aftersell by selecting **+ Add new placement**.
***
## Widget types and configuration
## Placements
Placements are created in the Aftersell Checkout editor and allow you to run multiple widgets of the same type on the same checkout page.
For example, if you want to display two upsell offers on the same page, each must be assigned to a different placement.
### Available placements
* **Default placement**: The primary placement. Every widget type starts here.
* **Additional placement 1**: A second placement slot for displaying another widget of the same type on the same page.
* **Additional placement 2**: A third placement slot for further separation.
You can also create new placements directly from the placement dropdown in Aftersell by selecting **+ Add new placement**.
 ***
### When to use multiple placements
Use multiple placements when you want to:
* Display more than one widget of the same type on a single checkout page
* Show widgets in different sections of the page
* Target different audiences with different offers
* Run widgets with similar or overlapping triggers
Aftersell uses a priority system. You cannot run multiple widgets with identical triggers within the same placement. If two widgets share the same trigger conditions in one placement, only one will display based on priority.
To use similar triggers, assign each widget to a different placement so they can run independently without conflict.
***
## Matching placements in the Shopify Checkout Editor
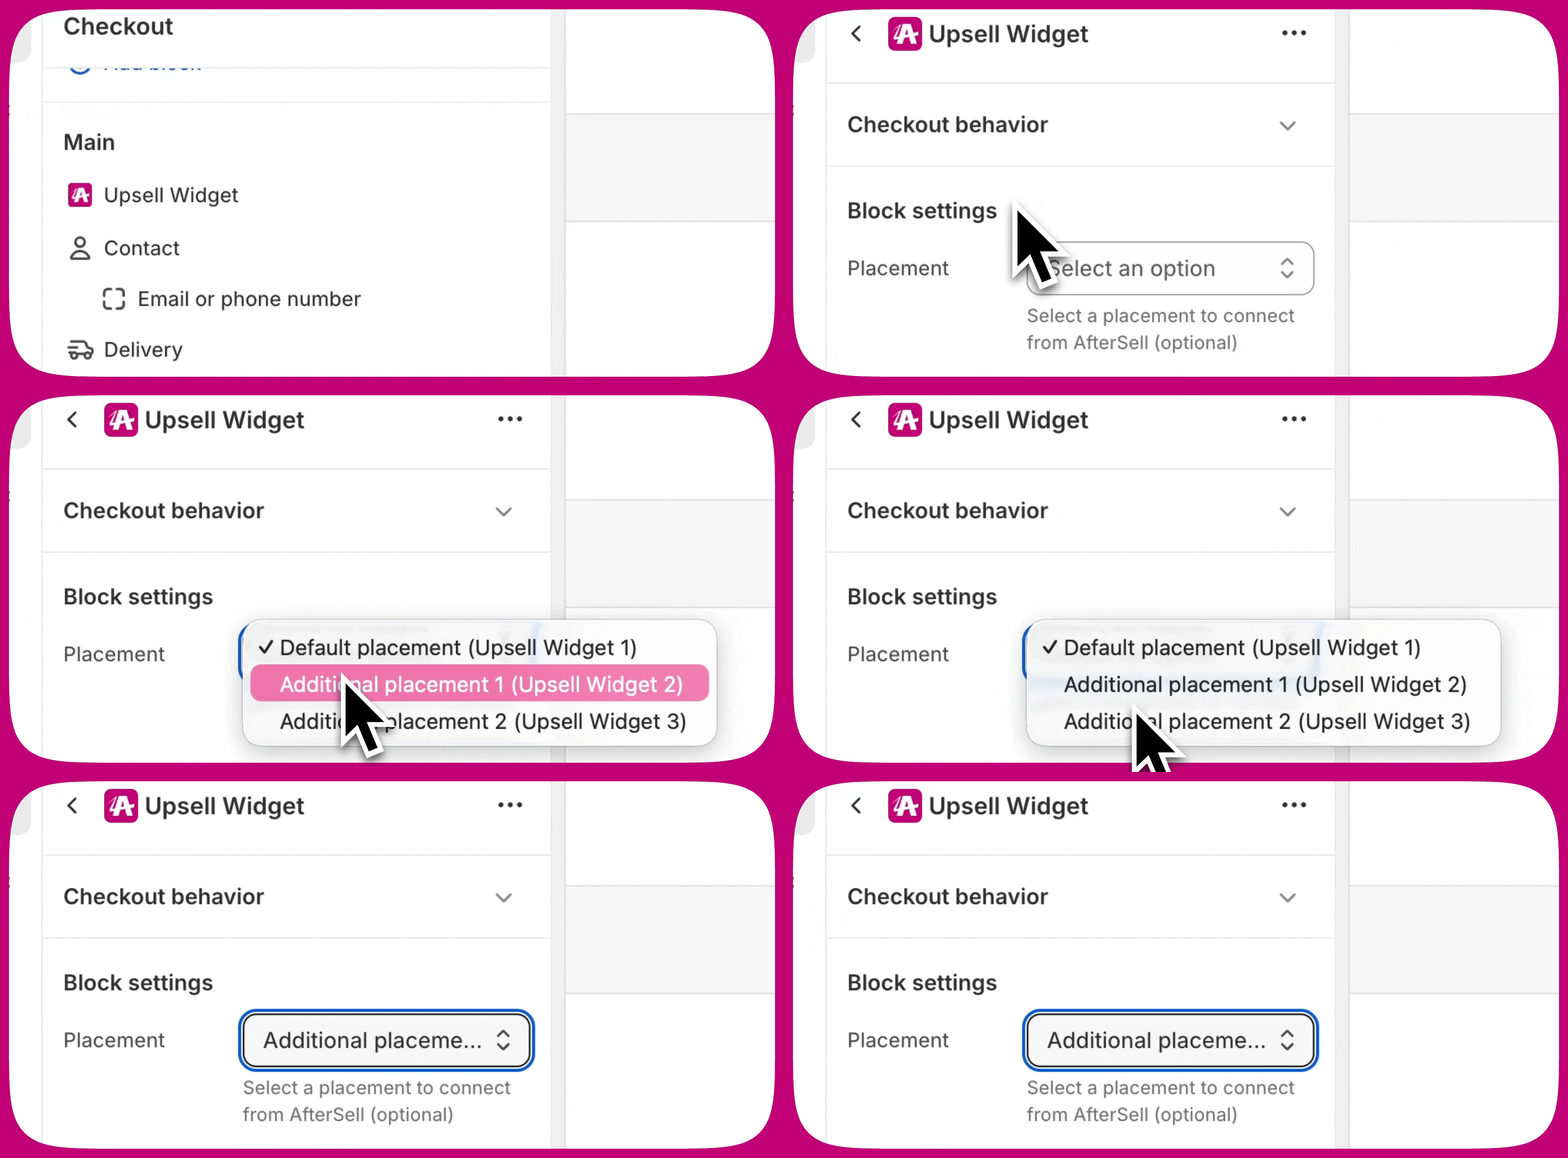
Each placement in Aftersell corresponds to a separate app block in the Shopify Checkout Editor. The placement selected in Shopify must match the placement set in Aftersell.
For example, if a widget is assigned to **Additional placement 1** in Aftersell, the app block in Shopify must also be set to **Additional placement 1**.
If placements do not match, the widget may not appear or may display in the wrong location.
**Important:** A placement mismatch is one of the most common reasons a widget fails to display. If a widget is not appearing, confirm the placement matches in both Aftersell and Shopify before troubleshooting further.
***
### When to use multiple placements
Use multiple placements when you want to:
* Display more than one widget of the same type on a single checkout page
* Show widgets in different sections of the page
* Target different audiences with different offers
* Run widgets with similar or overlapping triggers
Aftersell uses a priority system. You cannot run multiple widgets with identical triggers within the same placement. If two widgets share the same trigger conditions in one placement, only one will display based on priority.
To use similar triggers, assign each widget to a different placement so they can run independently without conflict.
***
## Matching placements in the Shopify Checkout Editor
Each placement in Aftersell corresponds to a separate app block in the Shopify Checkout Editor. The placement selected in Shopify must match the placement set in Aftersell.
For example, if a widget is assigned to **Additional placement 1** in Aftersell, the app block in Shopify must also be set to **Additional placement 1**.
If placements do not match, the widget may not appear or may display in the wrong location.
**Important:** A placement mismatch is one of the most common reasons a widget fails to display. If a widget is not appearing, confirm the placement matches in both Aftersell and Shopify before troubleshooting further.
 ***
### Upsells
Offer products to customers during checkout to increase your average order value (AOV).
**Configuration options:**
**Widget modes:**
* **Single Product Upsell:** Display one product with an Add to Cart button
* **Multi-Product Upsell:** Show multiple products in a stack or carousel layout, allowing customers to accept multiple offers
* **Checkmark Upsell:** Display a single product with a checkbox instead of an Add to Cart button (ideal for low-cost add-ons like shipping protection)
**Product selection methods:**
* **Specific Products:** Manually select individual products to upsell
* **Collection:** Select a collection and display up to 5 random products (products already in cart are automatically excluded)
* **AI Recommendations:** Automatically recommend products based on cart contents
* **Most Expensive Product:** Automatically upsell the most expensive product from the cart
* **Spend Threshold:** Recommend products that help customers reach reward thresholds (requires rewards bar)
**Additional features:**
* Add discounts directly within the widget
* Lock subscription plans to specific options
* Display product review stars (requires compatible review app)
* Set a maximum number of accepted offers per widget (Single and Multi upsell types only)
[Learn more about upsell widgets](/aftersell/checkout_widget_types#upsells)
***
### Cart Controls
Allow customers to modify their cart directly on the checkout page.
**Available controls:**
* **Variant selector:** Change to another in-stock variant
* **Quantity selector:** Adjust product quantities
* **Remove item:** Remove upsell products from cart
* **Subscription selector:** Change subscription frequency
* **Subscription upgrade:** Upgrade one-time purchases to subscriptions
* **Custom text:** Add custom text below line items
**Product targeting:**
* Apply to all products in cart
* Apply only to selected products
* Apply to all products except selected ones
**Additional features:**
* Display product review stars for in-cart products
[Learn more about cart controls](/aftersell/checkout_widget_types#cart-controls)
***
### Rewards
Display a progress bar showing customers how close they are to earning a reward.
**Configuration options:**
* Goal type: Order Value or Item Count
* Reward message and styling
* Progress bar colors and design
**Best practices:**
* Pair with upsell widgets to help customers reach reward thresholds
* Use spend threshold product type in upsells to automatically recommend products that close the gap
* Create rewards in Shopify using Automatic Discounts (for discount rewards) or Shipping Rules (for free shipping)
[Learn more about rewards](/aftersell/checkout_widget_types#rewards)
***
### Trust Badges
Build trust with custom icons and text to increase checkout conversion rates.
**Configuration options:**
* Badge layout: Vertical stack or horizontal display
* Custom icons and text for each badge
* Styling and spacing options
**Best practices:**
* Highlight security features (secure checkout, SSL encryption)
* Showcase guarantees (money-back guarantee, free returns)
* Display shipping benefits (free shipping, fast delivery)
[Learn more about trust badges](/aftersell/checkout_widget_types#trust-badges)
***
### Testimonials
Display customer reviews directly on checkout to build trust.
**Configuration options:**
* **Flex Testimonials (recommended):** Automatically pulls real reviews from your review app (Judge.me, Klaviyo, Okendo, or Yotpo)
* Selection mode: Manual (choose specific reviews) or Dynamic (automatically fetch reviews based on cart contents)
* Display type: Horizontal carousel or vertical stack
* Minimum rating filter
**Setup requirements:**
* Configure review app credentials in Settings > Product Reviews
* Reviews sync automatically within 24 hours, then weekly
[Learn more about testimonials](/aftersell/checkout_widget_types#testimonials)
***
### Notes
Allow customers to add notes to their order.
**Configuration options:**
* Manual notes: Free-text field for customer input
* Pre-written notes: Checkboxes for options like gift wrapping or eco-packaging
[Learn more about notes](/aftersell/checkout_widget_types#notes)
***
### Images
Upload and display custom images in your checkout.
**Configuration options:**
* Image upload
* Width adjustment slider
* No minimum size requirement
[Learn more about images](/aftersell/checkout_widget_types#images)
***
### Text
Insert a banner with custom text in your checkout.
**Configuration options:**
* Four banner styles:
* **Information:** Blue background with information icon
* **Success:** Green background with checkmark icon
* **Critical:** Red background with exclamation point icon
* **Warning:** Yellow background with warning triangle icon
* Header size, content size, and spacing adjustments
[Learn more about text](/aftersell/checkout_widget_types#text)
***
## Troubleshooting
### Widgets not displaying
If your widgets aren't showing after setup:
1. Verify widget is enabled in Aftersell admin
2. Check app block is added in Shopify Checkout Editor
3. Confirm app block is saved in Shopify Checkout Editor
4. Verify the correct placement is selected. When adding an app block in the Shopify Checkout Editor, you must choose the matching placement, such as Default placement, Additional placement 1, or Additional placement 2. If the wrong placement is selected, the widget may not appear or may display in the wrong location. Remove the app block and re-add it, ensuring the intended placement is selected.
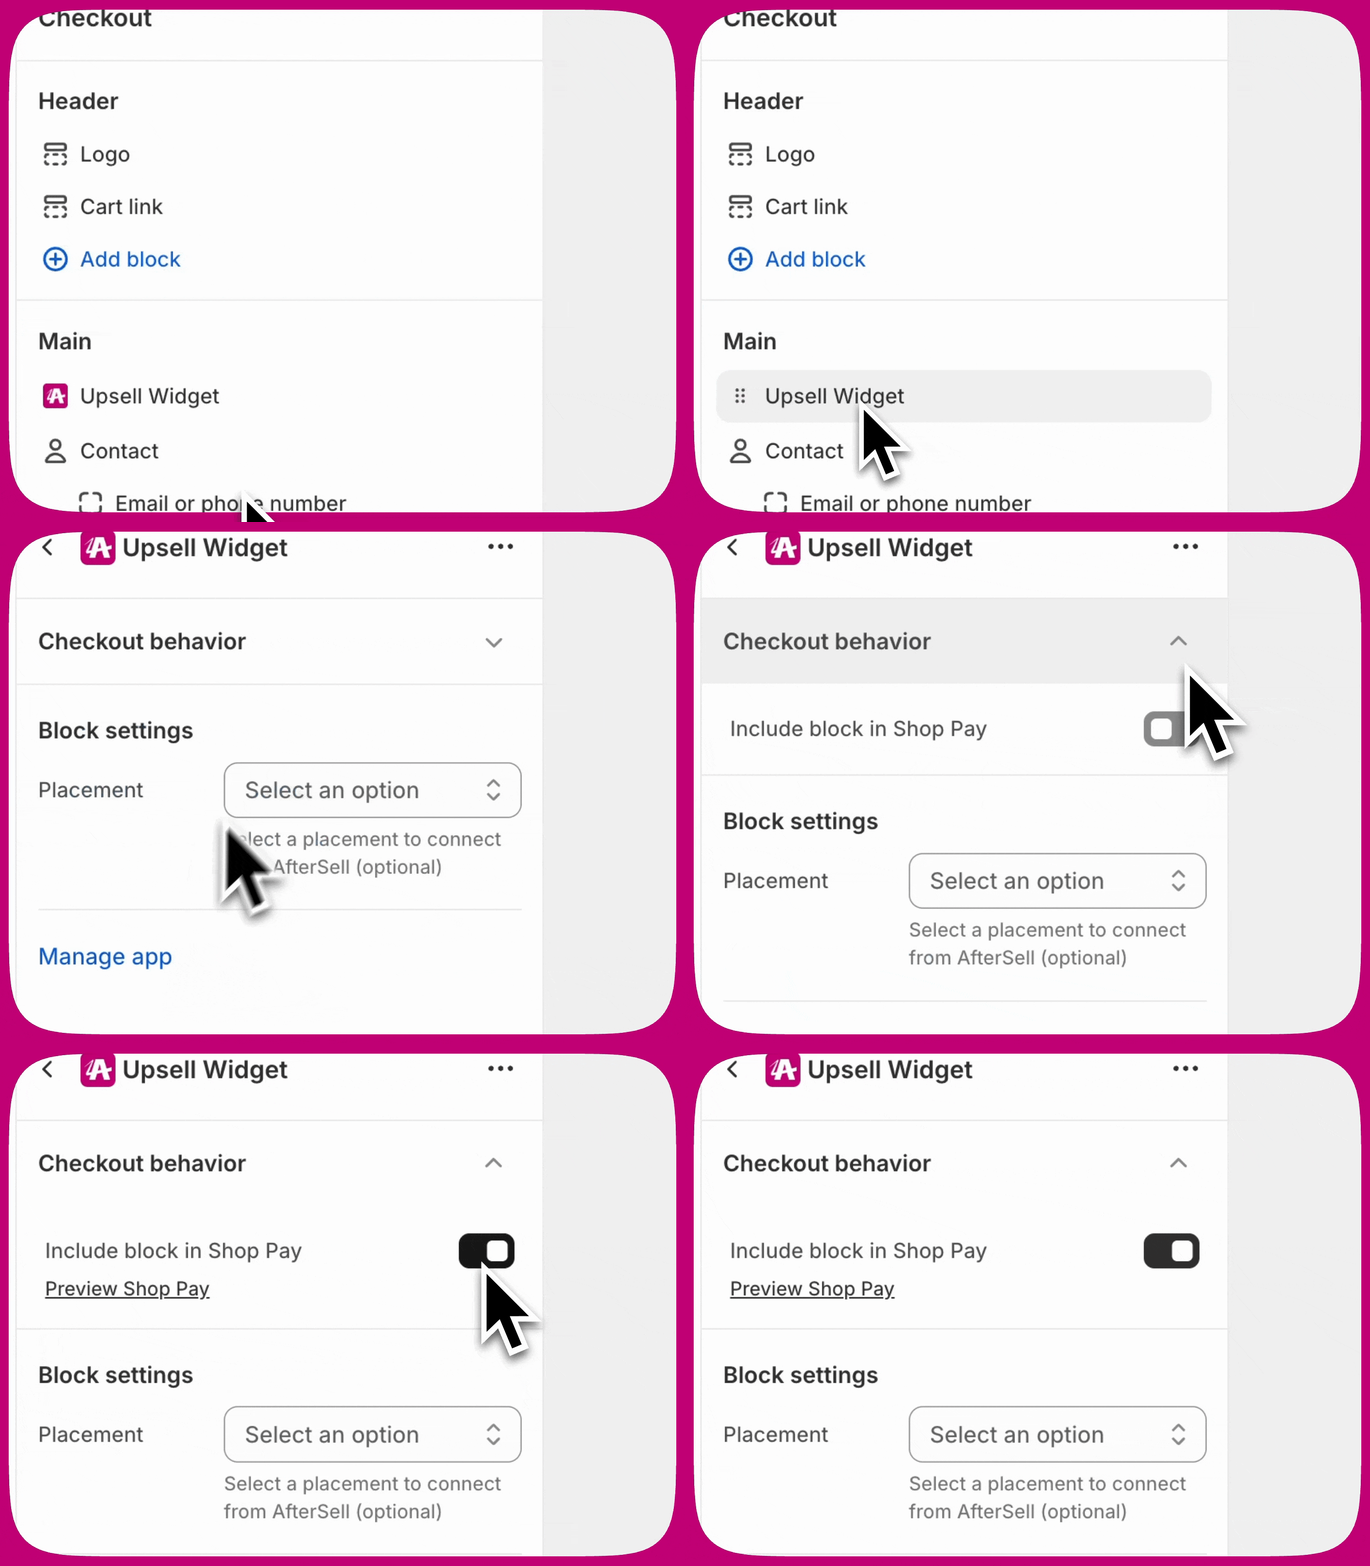
5. For Shop Pay: Verify "Include app block in Shop Pay" is checked
6. Clear browser cache or try incognito mode
7. Wait a few minutes for changes to propagate
### Shop Pay widgets not showing
To display widgets in Shop Pay checkout:
1. Open the widget in Shopify Checkout Editor
2. Check the **Include app block in Shop Pay** option under Checkout behaviour
3. Save your changes
***
### Upsells
Offer products to customers during checkout to increase your average order value (AOV).
**Configuration options:**
**Widget modes:**
* **Single Product Upsell:** Display one product with an Add to Cart button
* **Multi-Product Upsell:** Show multiple products in a stack or carousel layout, allowing customers to accept multiple offers
* **Checkmark Upsell:** Display a single product with a checkbox instead of an Add to Cart button (ideal for low-cost add-ons like shipping protection)
**Product selection methods:**
* **Specific Products:** Manually select individual products to upsell
* **Collection:** Select a collection and display up to 5 random products (products already in cart are automatically excluded)
* **AI Recommendations:** Automatically recommend products based on cart contents
* **Most Expensive Product:** Automatically upsell the most expensive product from the cart
* **Spend Threshold:** Recommend products that help customers reach reward thresholds (requires rewards bar)
**Additional features:**
* Add discounts directly within the widget
* Lock subscription plans to specific options
* Display product review stars (requires compatible review app)
* Set a maximum number of accepted offers per widget (Single and Multi upsell types only)
[Learn more about upsell widgets](/aftersell/checkout_widget_types#upsells)
***
### Cart Controls
Allow customers to modify their cart directly on the checkout page.
**Available controls:**
* **Variant selector:** Change to another in-stock variant
* **Quantity selector:** Adjust product quantities
* **Remove item:** Remove upsell products from cart
* **Subscription selector:** Change subscription frequency
* **Subscription upgrade:** Upgrade one-time purchases to subscriptions
* **Custom text:** Add custom text below line items
**Product targeting:**
* Apply to all products in cart
* Apply only to selected products
* Apply to all products except selected ones
**Additional features:**
* Display product review stars for in-cart products
[Learn more about cart controls](/aftersell/checkout_widget_types#cart-controls)
***
### Rewards
Display a progress bar showing customers how close they are to earning a reward.
**Configuration options:**
* Goal type: Order Value or Item Count
* Reward message and styling
* Progress bar colors and design
**Best practices:**
* Pair with upsell widgets to help customers reach reward thresholds
* Use spend threshold product type in upsells to automatically recommend products that close the gap
* Create rewards in Shopify using Automatic Discounts (for discount rewards) or Shipping Rules (for free shipping)
[Learn more about rewards](/aftersell/checkout_widget_types#rewards)
***
### Trust Badges
Build trust with custom icons and text to increase checkout conversion rates.
**Configuration options:**
* Badge layout: Vertical stack or horizontal display
* Custom icons and text for each badge
* Styling and spacing options
**Best practices:**
* Highlight security features (secure checkout, SSL encryption)
* Showcase guarantees (money-back guarantee, free returns)
* Display shipping benefits (free shipping, fast delivery)
[Learn more about trust badges](/aftersell/checkout_widget_types#trust-badges)
***
### Testimonials
Display customer reviews directly on checkout to build trust.
**Configuration options:**
* **Flex Testimonials (recommended):** Automatically pulls real reviews from your review app (Judge.me, Klaviyo, Okendo, or Yotpo)
* Selection mode: Manual (choose specific reviews) or Dynamic (automatically fetch reviews based on cart contents)
* Display type: Horizontal carousel or vertical stack
* Minimum rating filter
**Setup requirements:**
* Configure review app credentials in Settings > Product Reviews
* Reviews sync automatically within 24 hours, then weekly
[Learn more about testimonials](/aftersell/checkout_widget_types#testimonials)
***
### Notes
Allow customers to add notes to their order.
**Configuration options:**
* Manual notes: Free-text field for customer input
* Pre-written notes: Checkboxes for options like gift wrapping or eco-packaging
[Learn more about notes](/aftersell/checkout_widget_types#notes)
***
### Images
Upload and display custom images in your checkout.
**Configuration options:**
* Image upload
* Width adjustment slider
* No minimum size requirement
[Learn more about images](/aftersell/checkout_widget_types#images)
***
### Text
Insert a banner with custom text in your checkout.
**Configuration options:**
* Four banner styles:
* **Information:** Blue background with information icon
* **Success:** Green background with checkmark icon
* **Critical:** Red background with exclamation point icon
* **Warning:** Yellow background with warning triangle icon
* Header size, content size, and spacing adjustments
[Learn more about text](/aftersell/checkout_widget_types#text)
***
## Troubleshooting
### Widgets not displaying
If your widgets aren't showing after setup:
1. Verify widget is enabled in Aftersell admin
2. Check app block is added in Shopify Checkout Editor
3. Confirm app block is saved in Shopify Checkout Editor
4. Verify the correct placement is selected. When adding an app block in the Shopify Checkout Editor, you must choose the matching placement, such as Default placement, Additional placement 1, or Additional placement 2. If the wrong placement is selected, the widget may not appear or may display in the wrong location. Remove the app block and re-add it, ensuring the intended placement is selected.
5. For Shop Pay: Verify "Include app block in Shop Pay" is checked
6. Clear browser cache or try incognito mode
7. Wait a few minutes for changes to propagate
### Shop Pay widgets not showing
To display widgets in Shop Pay checkout:
1. Open the widget in Shopify Checkout Editor
2. Check the **Include app block in Shop Pay** option under Checkout behaviour
3. Save your changes
 [Learn more about Shop Pay Widgets](/aftersell/show_checkout_widgets_in_shop_pay)
***
## Next steps
* [Learn about checkout triggers](/aftersell/checkout_triggers) to show widgets conditionally
* [Set up checkout A/B testing](/aftersell/checkout_a_b_testing) to optimize placements
* [Configure checkout branding](/aftersell/checkout_branding_settings) to match your store design
* [Explore advanced upsell strategies](/aftersell/best_practices) to maximize AOV
[Learn more about Shop Pay Widgets](/aftersell/show_checkout_widgets_in_shop_pay)
***
## Next steps
* [Learn about checkout triggers](/aftersell/checkout_triggers) to show widgets conditionally
* [Set up checkout A/B testing](/aftersell/checkout_a_b_testing) to optimize placements
* [Configure checkout branding](/aftersell/checkout_branding_settings) to match your store design
* [Explore advanced upsell strategies](/aftersell/best_practices) to maximize AOV