> ## Documentation Index
> Fetch the complete documentation index at: https://docs.aftersell.com/llms.txt
> Use this file to discover all available pages before exploring further.
# How to configure thank-you page widgets
> Step-by-step guide to setting up and configuring Thank You Page widgets in Aftersell
Thank You Page (TYP) widgets in Aftersell are a powerful way to engage customers after a purchase and increase sales. This guide provides step-by-step instructions for configuring and enabling TYP widgets within your post-purchase funnels. TYP widgets work in conjunction with Post-Purchase offers, providing multiple opportunities to maximize customer conversions after checkout.
***
## What are Thank You Page widgets?
Thank You Page widgets allow you to display additional content and product recommendations to customers immediately after checkout. They are highly customizable and do not face the same [Shopify limitations](/aftersell/why_isnt_my_1_click_offer_displaying) as post-purchase upsells. Thank You Page widgets enable you to:
* Tailor offers to specific customer actions (funnel triggers)
* Showcase personalized product recommendations
* Engage customers in a non-intrusive way
* Add [FAQs](#configure-faq-widgets), [text content](#configure-text-widgets), [images](#configure-image-widgets) and [custom code](#using-custom-code-widgets) to your Thank You page
Each TYP widget is tied to a specific funnel, ensuring you retain flexibility and control for different customer journeys.
***
## Step-by-step setup guide
### Step 1: Create or select a funnel
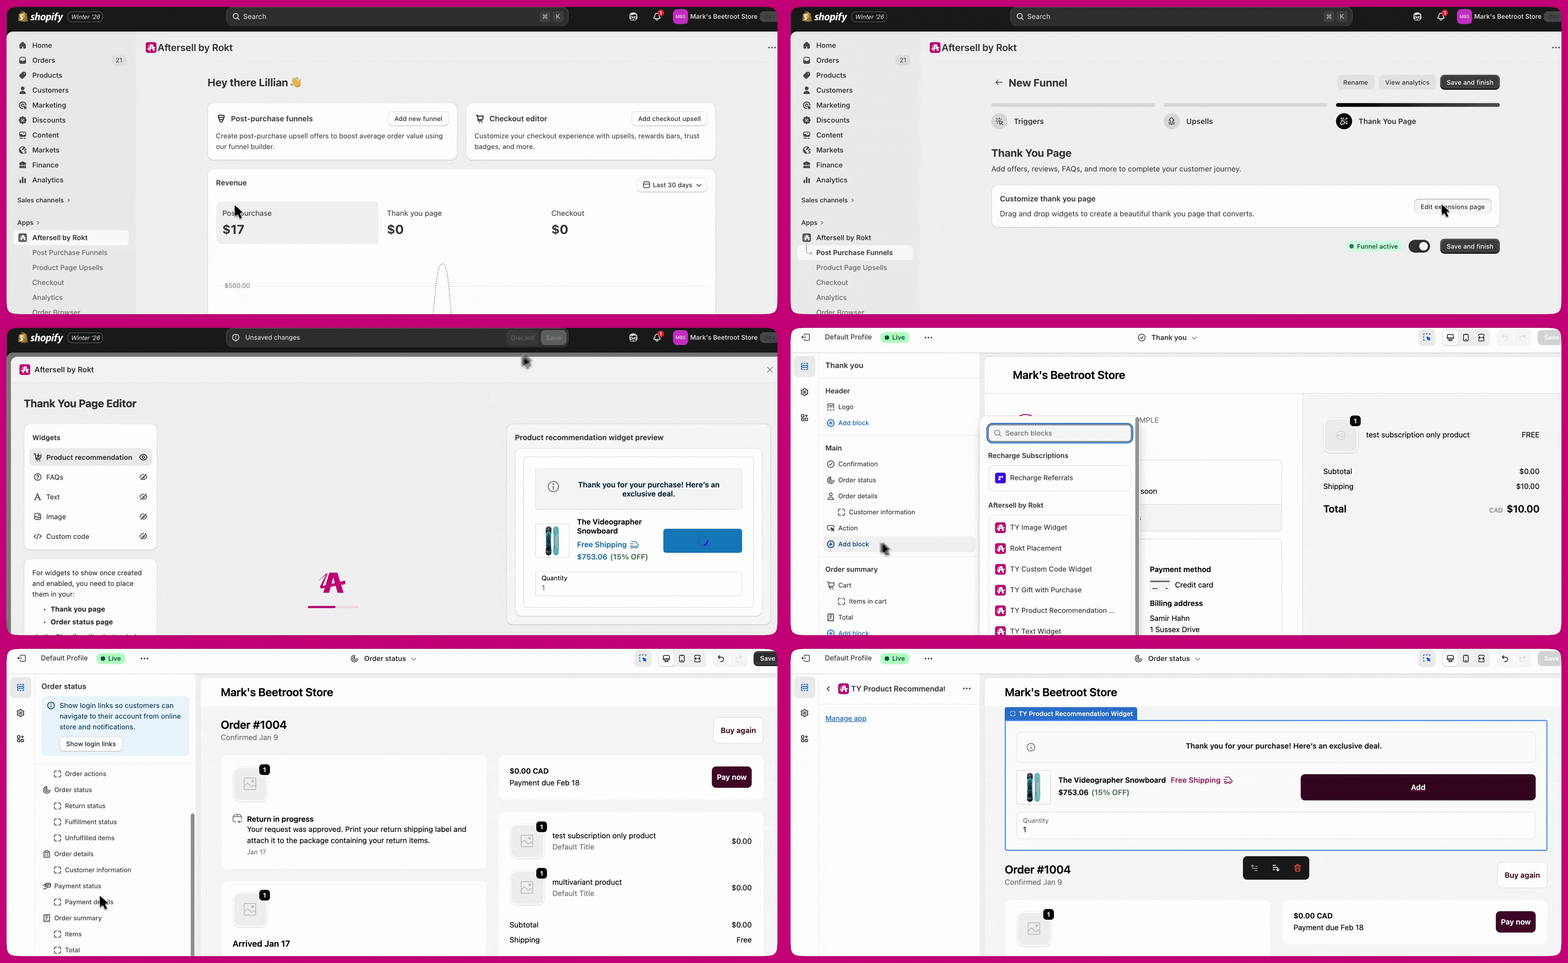
1. Navigate to **Post-purchase Funnels** in your Aftersell admin.
2. Click **Create New Funnel** or select an existing manual funnel.
3. Name your funnel (e.g., "Thank You Page Upsells - All Orders").
 ### Step 2: Configure funnel triggers
Define when your funnel should run. The triggers you set here apply to the entire funnel, including both Post-Purchase offers and Thank You Page widgets.
Thank You Page widgets do not have separate trigger settings. Whatever triggers are configured for the funnel will also determine when the corresponding Thank You Page widgets display.
1. In the funnel settings, click **Triggers**.
2. Select trigger conditions based on:
* Customer tags
* Product purchased
* Cart value
* Order count
* Collection
* Discount codes used
3. Click **Save Triggers**.
For step-by-step instructions on how to configure funnel triggers, including detailed targeting options and examples, refer to our [Funnel Triggers setup guide](/aftersell/how_to_configure_post_purchase_triggers).
***
### Step 3: Add TYP widgets to your funnel
1. Scroll to the **Thank You Page** section in your funnel.
2. Click **Add Widget**.
3. Choose from available widget types:
* [**Product Recommendation**](#configure-product-recommendation-widgets) - Display up to 10 upsell products
* [**FAQs**](#configure-faq-widgets) - Answer common customer questions
* [**Text**](#configure-text-widgets) - Share messages, discount codes, or brand stories
* [**Image**](#configure-image-widgets) - Display a custom image or banner
* [**Custom Code**](#using-custom-code-widgets) - Add custom React components (advanced)
***
### Configure product recommendation widgets
1. Choose your product selection method:
* **Specific Products** - Manually select products to display
* **Automatic Upsells** - Let Aftersell recommend products based on cart contents
* **Collections** - Display products from a specific collection
2. Set the **maximum number of products** to display (up to 10).
3. Enable **Hide purchased products** to avoid showing items already in the order.
4. Enable **Hide out-of-stock variants** to only show available products.
When browsing the **Products** tab in the product picker, you can check **Active products only** to hide Draft and Archived products from the list. This filter is off by default and only applies to the Products tab — Collections are not affected.
1. Choose **layout orientation** (horizontal or vertical).
2. Add **banner text** to introduce your offer (optional).
3. Configure **compare-at price** display settings.
4. Select **discount price color** from:
* Checkout branding colors (Accent, Decorative, Info, Subdued)
* Preset colors (Success, Warning, Critical)
5. Enable **quantity selector** if you want customers to choose quantities.
6. Set **minimum and maximum quantity limits** (optional).
1. Apply a discount (optional):
* Choose **percentage** or **fixed amount**
* Customize **discount text** and **discount color**
2. Select **order handling** method:
* **Modify original order** - Adds upsell to existing order (free shipping automatically applied)
* **Create new draft order** - Creates separate order for upsell
* These options have different trade-offs. See [Order Handling](/aftersell/thank_you_page_extensions_overview#order-handling) for guidance, especially if your upsell catalog overlaps with your top-sellers.
3. Enable **free shipping** on upsells (if using "Create new draft order").
4. Enable **"Free Shipping" badge** to highlight the benefit (optional).
***
### Configure FAQ widgets
1. Click **Add FAQ Item**.
2. Enter your **question** text.
3. Enter your **answer** text.
4. Repeat for additional FAQ items.
5. Reorder items by dragging and dropping.
6. Click **Save**.
***
### Configure text widgets
1. Enter your **heading** (optional).
2. Add your **text content** in the editor.
3. Format text using the toolbar (bold, italic, lists, links).
4. Click **Save**.
***
### Configure image widgets
1. Click the upload area to add your image.
2. Upload a JPG, PNG, or supported image file.
3. Adjust the **Image width** slider (50-500px) to control how large the image appears.
4. Click **Save**.
***
### Save your funnel configuration
1. Review all widget settings.
2. Click **Save Funnel** at the top of the page.
3. Set funnel status to **Active**.
***
## Enabling widgets in Shopify
### Step 1: Open Shopify editor
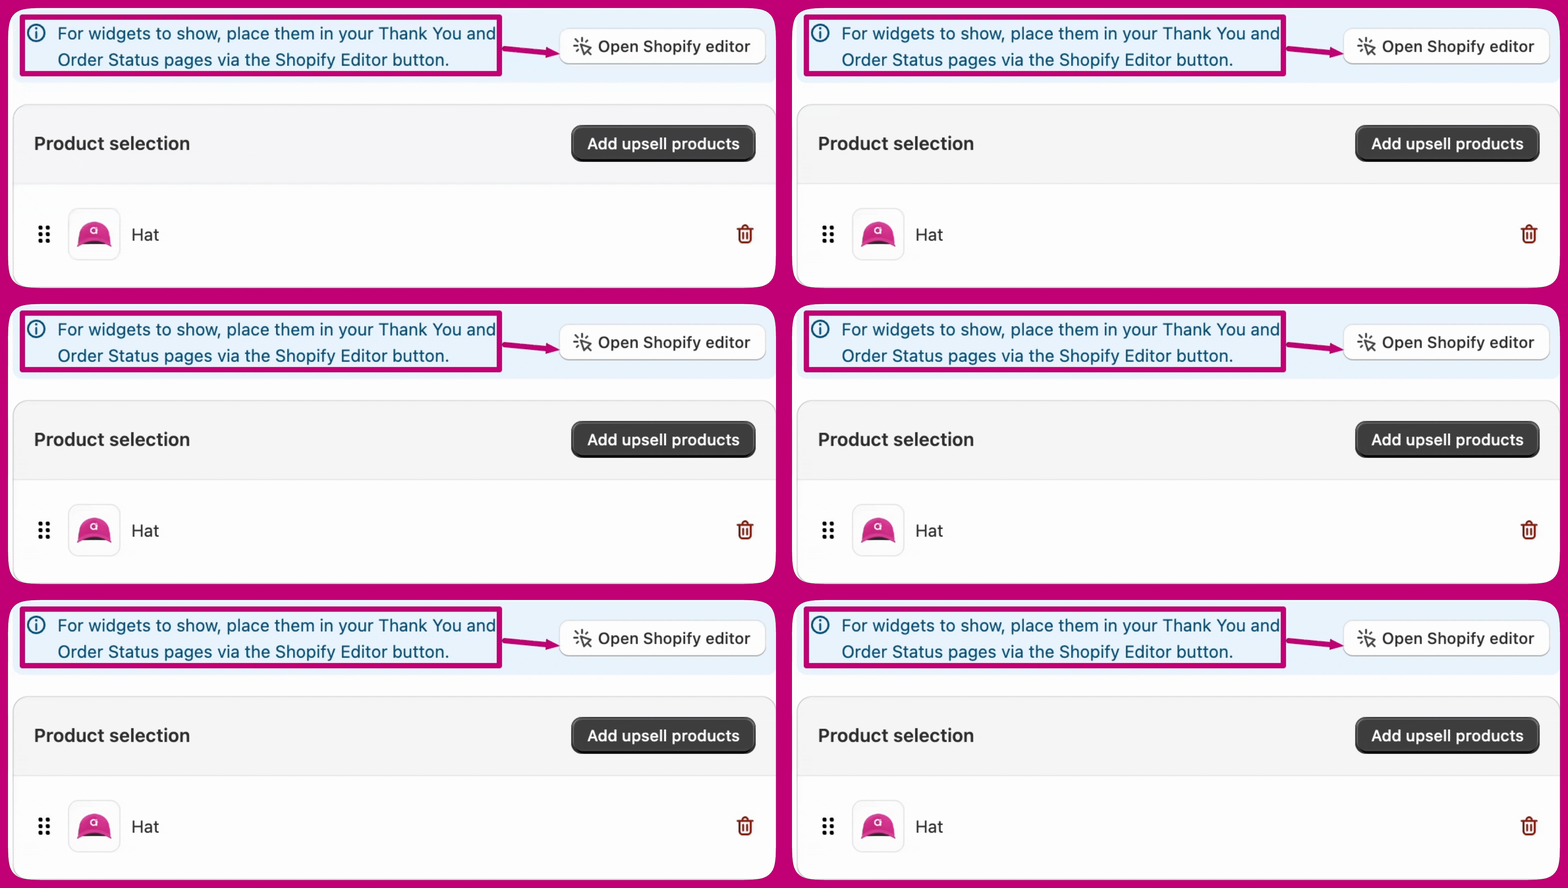
1. In your Aftersell admin, click **Open Shopify Editor**.
2. This opens the Shopify checkout customization editor.
### Step 2: Configure funnel triggers
Define when your funnel should run. The triggers you set here apply to the entire funnel, including both Post-Purchase offers and Thank You Page widgets.
Thank You Page widgets do not have separate trigger settings. Whatever triggers are configured for the funnel will also determine when the corresponding Thank You Page widgets display.
1. In the funnel settings, click **Triggers**.
2. Select trigger conditions based on:
* Customer tags
* Product purchased
* Cart value
* Order count
* Collection
* Discount codes used
3. Click **Save Triggers**.
For step-by-step instructions on how to configure funnel triggers, including detailed targeting options and examples, refer to our [Funnel Triggers setup guide](/aftersell/how_to_configure_post_purchase_triggers).
***
### Step 3: Add TYP widgets to your funnel
1. Scroll to the **Thank You Page** section in your funnel.
2. Click **Add Widget**.
3. Choose from available widget types:
* [**Product Recommendation**](#configure-product-recommendation-widgets) - Display up to 10 upsell products
* [**FAQs**](#configure-faq-widgets) - Answer common customer questions
* [**Text**](#configure-text-widgets) - Share messages, discount codes, or brand stories
* [**Image**](#configure-image-widgets) - Display a custom image or banner
* [**Custom Code**](#using-custom-code-widgets) - Add custom React components (advanced)
***
### Configure product recommendation widgets
1. Choose your product selection method:
* **Specific Products** - Manually select products to display
* **Automatic Upsells** - Let Aftersell recommend products based on cart contents
* **Collections** - Display products from a specific collection
2. Set the **maximum number of products** to display (up to 10).
3. Enable **Hide purchased products** to avoid showing items already in the order.
4. Enable **Hide out-of-stock variants** to only show available products.
When browsing the **Products** tab in the product picker, you can check **Active products only** to hide Draft and Archived products from the list. This filter is off by default and only applies to the Products tab — Collections are not affected.
1. Choose **layout orientation** (horizontal or vertical).
2. Add **banner text** to introduce your offer (optional).
3. Configure **compare-at price** display settings.
4. Select **discount price color** from:
* Checkout branding colors (Accent, Decorative, Info, Subdued)
* Preset colors (Success, Warning, Critical)
5. Enable **quantity selector** if you want customers to choose quantities.
6. Set **minimum and maximum quantity limits** (optional).
1. Apply a discount (optional):
* Choose **percentage** or **fixed amount**
* Customize **discount text** and **discount color**
2. Select **order handling** method:
* **Modify original order** - Adds upsell to existing order (free shipping automatically applied)
* **Create new draft order** - Creates separate order for upsell
* These options have different trade-offs. See [Order Handling](/aftersell/thank_you_page_extensions_overview#order-handling) for guidance, especially if your upsell catalog overlaps with your top-sellers.
3. Enable **free shipping** on upsells (if using "Create new draft order").
4. Enable **"Free Shipping" badge** to highlight the benefit (optional).
***
### Configure FAQ widgets
1. Click **Add FAQ Item**.
2. Enter your **question** text.
3. Enter your **answer** text.
4. Repeat for additional FAQ items.
5. Reorder items by dragging and dropping.
6. Click **Save**.
***
### Configure text widgets
1. Enter your **heading** (optional).
2. Add your **text content** in the editor.
3. Format text using the toolbar (bold, italic, lists, links).
4. Click **Save**.
***
### Configure image widgets
1. Click the upload area to add your image.
2. Upload a JPG, PNG, or supported image file.
3. Adjust the **Image width** slider (50-500px) to control how large the image appears.
4. Click **Save**.
***
### Save your funnel configuration
1. Review all widget settings.
2. Click **Save Funnel** at the top of the page.
3. Set funnel status to **Active**.
***
## Enabling widgets in Shopify
### Step 1: Open Shopify editor
1. In your Aftersell admin, click **Open Shopify Editor**.
2. This opens the Shopify checkout customization editor.
 ### Step 2: Add widgets to Thank You page
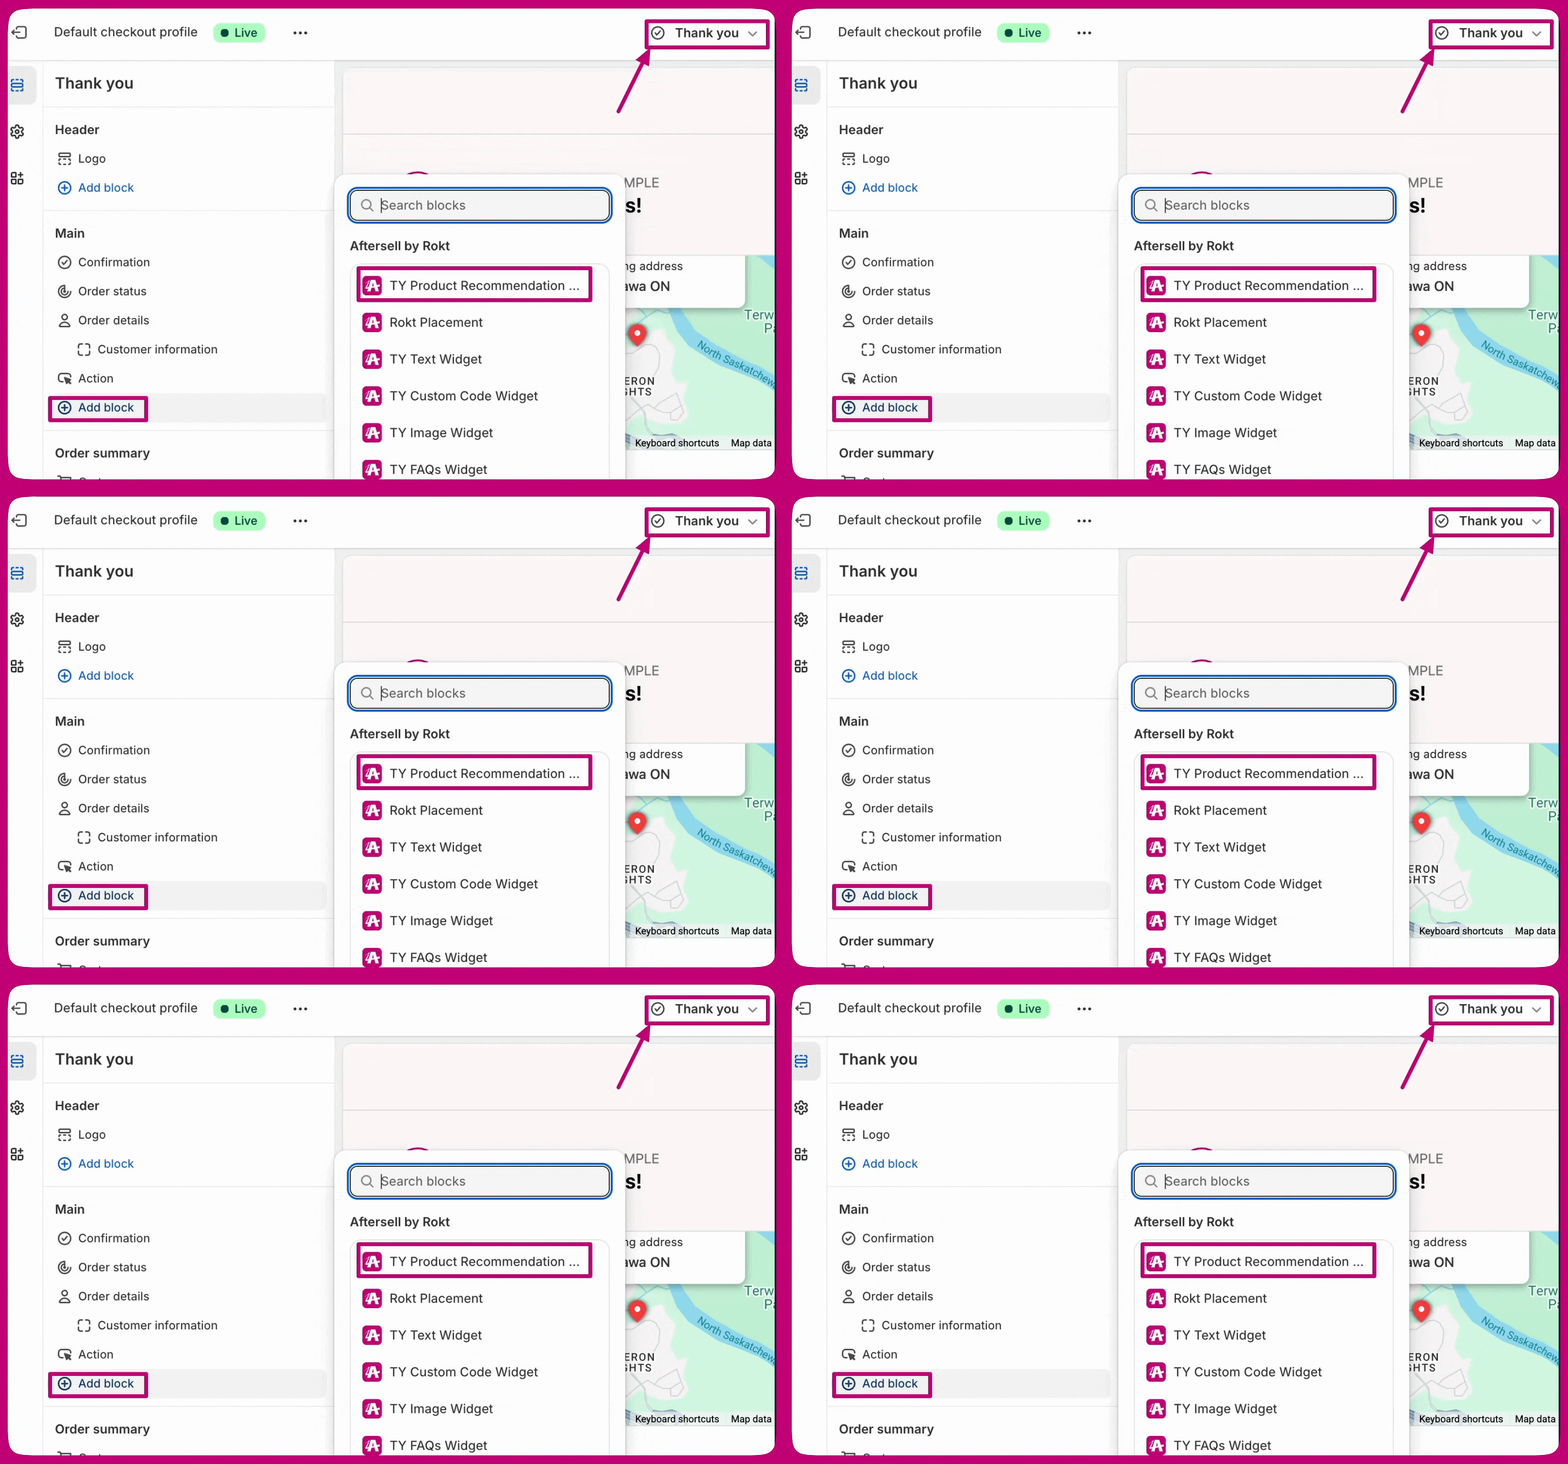
1. In the Shopify editor, navigate to **Thank You page**.
2. Click **Add app block** or **Add section**.
3. Select **Aftersell TY Widgets** from the list.
4. Position the widget block where you want it to appear.
5. Click **Save**.
Place your widget toward the top of the Thank You page for best visibility. Widgets positioned lower on the page may not be seen on all devices, particularly on mobile where customers are less likely to scroll.
### Step 2: Add widgets to Thank You page
1. In the Shopify editor, navigate to **Thank You page**.
2. Click **Add app block** or **Add section**.
3. Select **Aftersell TY Widgets** from the list.
4. Position the widget block where you want it to appear.
5. Click **Save**.
Place your widget toward the top of the Thank You page for best visibility. Widgets positioned lower on the page may not be seen on all devices, particularly on mobile where customers are less likely to scroll.
 ### Step 3: Publish your changes
1. Review the page in the preview.
2. Click **Publish** in the top-right corner.
3. Confirm the publication.
Your TYP widgets are now live and will display to customers based on your funnel triggers.
***
## Testing your widgets
Shopify's checkout preview may not always display widgets correctly. Follow these steps to test:
1. **Set triggers to "Show for all customers"** (temporarily) to see widgets in preview.
2. **Place a test order** using a real checkout flow:
* Use Shopify's test payment gateway
* Create a free product for testing
* Use a discount code to make the order \$0
3. **Verify widgets appear** on the Thank You page immediately after checkout.
4. **Test widget functionality:**
* Click product recommendations
* Verify checkout flow for upsells
* Confirm order handling works as configured
5. **Reset triggers** to your desired targeting rules after testing.
***
## Advanced configuration
### Combining with post-purchase upsells
For maximum conversion, combine TYP widgets with post-purchase offers:
1. Add **Post-purchase Offers** to your funnel (before Thank You page).
2. Configure **TYP widgets** as a second touchpoint.
3. Customers who decline post-purchase offers will still see TYP widgets.
4. This creates multiple conversion opportunities in the customer journey.
### Using custom code widgets
For advanced customization, you can create custom widgets using React:
1. Select **Custom Code** widget type.
2. Write your component using [Shopify's Checkout UI Extension library](https://shopify.dev/docs/api/checkout-ui-extensions/2023-10/components).
3. Ensure your code:
* Exports the component as `export default`
* Uses UI extension components (not DOM elements like `div`, `p`)
* Does not import external code
4. Test thoroughly before publishing.
Custom code widgets are recommended for advanced users only. Consider hiring a [Shopify Expert](https://www.shopify.com/partners/directory) if you need assistance.
***
## Troubleshooting
* Verify funnel status is set to **Active**.
* Check that funnel triggers match your test order conditions.
* Confirm widgets are enabled in the funnel configuration.
* Ensure the widget block is added to the Thank You page in the Shopify editor and positioned toward the top of the page.
* Customers sometimes skip the Thank You page if they close the browser immediately after purchase.
* Ensure Thank You page offers are correctly set up in the Shopify editor.
* Verify the widget block is positioned correctly on the page.
***
## Limitations
Countdown timers are not available on the Thank You page. This is a Shopify platform restriction and cannot be changed within Aftersell.
Each funnel's Thank You Page widgets must be customized individually. There is no option to standardize them across multiple funnels. This ensures all offers are specific to the triggers and customer behavior for each funnel.
***
**Want to go further?**
* [Post-Purchase Best Practices](/aftersell/best_practices) - tips to improve conversion across all your offers
* [How to Configure Post-Purchase Offers](/aftersell/how_to_configure_post_purchase_triggers) - set up your full post-purchase funnel
### Step 3: Publish your changes
1. Review the page in the preview.
2. Click **Publish** in the top-right corner.
3. Confirm the publication.
Your TYP widgets are now live and will display to customers based on your funnel triggers.
***
## Testing your widgets
Shopify's checkout preview may not always display widgets correctly. Follow these steps to test:
1. **Set triggers to "Show for all customers"** (temporarily) to see widgets in preview.
2. **Place a test order** using a real checkout flow:
* Use Shopify's test payment gateway
* Create a free product for testing
* Use a discount code to make the order \$0
3. **Verify widgets appear** on the Thank You page immediately after checkout.
4. **Test widget functionality:**
* Click product recommendations
* Verify checkout flow for upsells
* Confirm order handling works as configured
5. **Reset triggers** to your desired targeting rules after testing.
***
## Advanced configuration
### Combining with post-purchase upsells
For maximum conversion, combine TYP widgets with post-purchase offers:
1. Add **Post-purchase Offers** to your funnel (before Thank You page).
2. Configure **TYP widgets** as a second touchpoint.
3. Customers who decline post-purchase offers will still see TYP widgets.
4. This creates multiple conversion opportunities in the customer journey.
### Using custom code widgets
For advanced customization, you can create custom widgets using React:
1. Select **Custom Code** widget type.
2. Write your component using [Shopify's Checkout UI Extension library](https://shopify.dev/docs/api/checkout-ui-extensions/2023-10/components).
3. Ensure your code:
* Exports the component as `export default`
* Uses UI extension components (not DOM elements like `div`, `p`)
* Does not import external code
4. Test thoroughly before publishing.
Custom code widgets are recommended for advanced users only. Consider hiring a [Shopify Expert](https://www.shopify.com/partners/directory) if you need assistance.
***
## Troubleshooting
* Verify funnel status is set to **Active**.
* Check that funnel triggers match your test order conditions.
* Confirm widgets are enabled in the funnel configuration.
* Ensure the widget block is added to the Thank You page in the Shopify editor and positioned toward the top of the page.
* Customers sometimes skip the Thank You page if they close the browser immediately after purchase.
* Ensure Thank You page offers are correctly set up in the Shopify editor.
* Verify the widget block is positioned correctly on the page.
***
## Limitations
Countdown timers are not available on the Thank You page. This is a Shopify platform restriction and cannot be changed within Aftersell.
Each funnel's Thank You Page widgets must be customized individually. There is no option to standardize them across multiple funnels. This ensures all offers are specific to the triggers and customer behavior for each funnel.
***
**Want to go further?**
* [Post-Purchase Best Practices](/aftersell/best_practices) - tips to improve conversion across all your offers
* [How to Configure Post-Purchase Offers](/aftersell/how_to_configure_post_purchase_triggers) - set up your full post-purchase funnel