> ## Documentation Index
> Fetch the complete documentation index at: https://docs.aftersell.com/llms.txt
> Use this file to discover all available pages before exploring further.
# Checkout widget types
> This document covers various checkout widgets you can add with Aftersell to enhance your Shopify Plus checkout experience
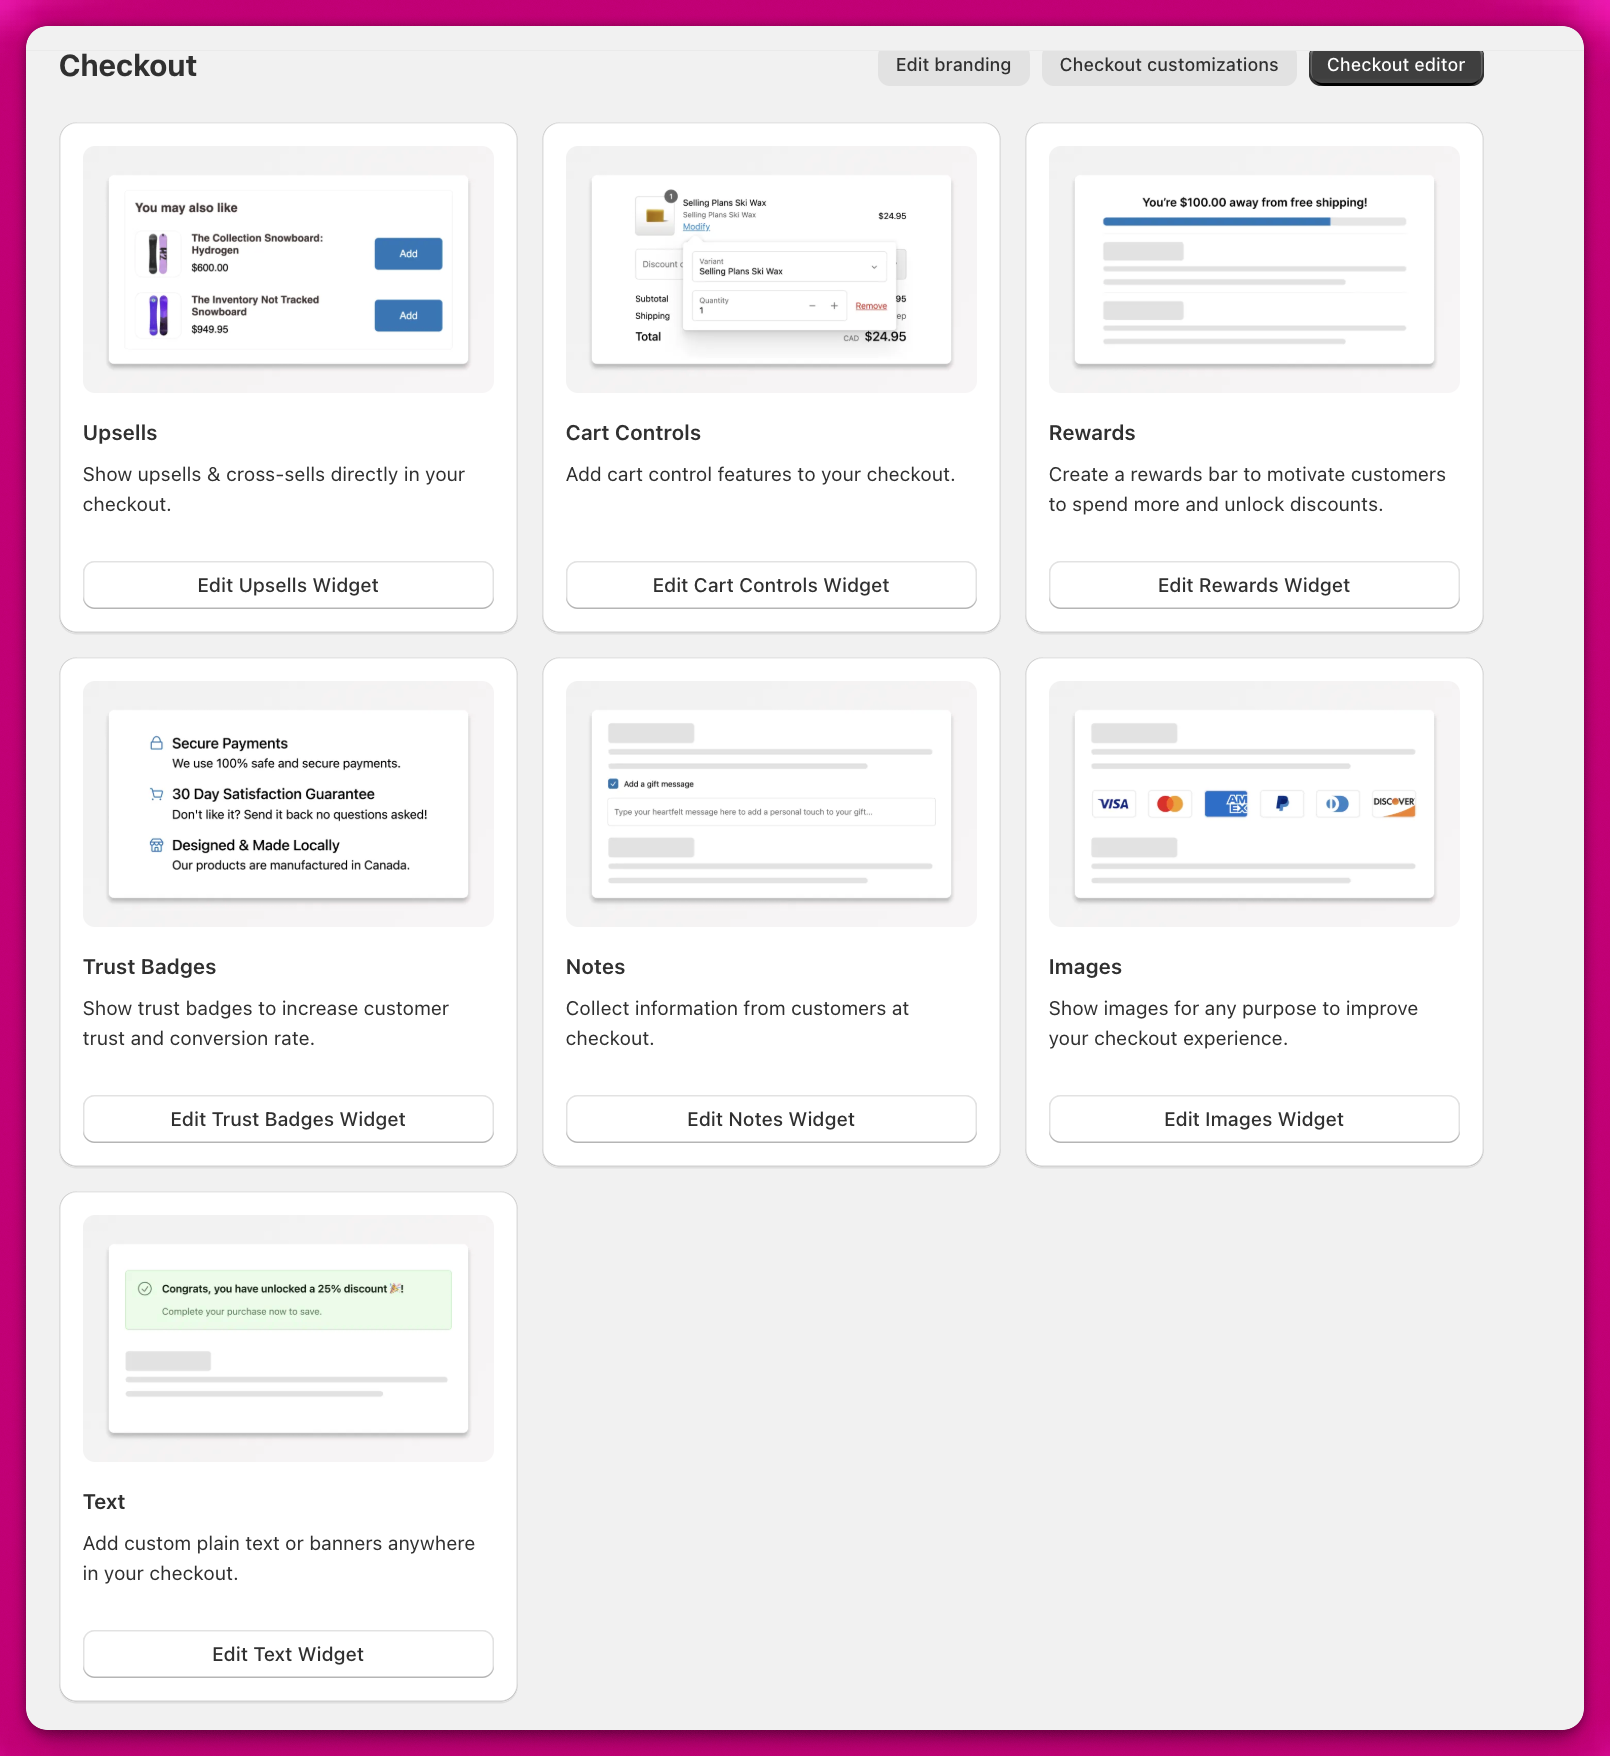
There are a variety of checkout widget options to select from. In this article, we will walk through the different widget options, what they do, and available customizations:
* [Upsells](#upsells)
* [Cart Controls](#cart-controls)
* [Rewards](#rewards)
* [Trust Badges](#trust-badges)
* [Testimonials](#testimonials)
* [Notes](#notes)
* [Images](#images)
* [Text](#text)
 ***
## Upsells
Offer products to your customers during checkout to **help increase your AOV.**
***
## Upsells
Offer products to your customers during checkout to **help increase your AOV.**
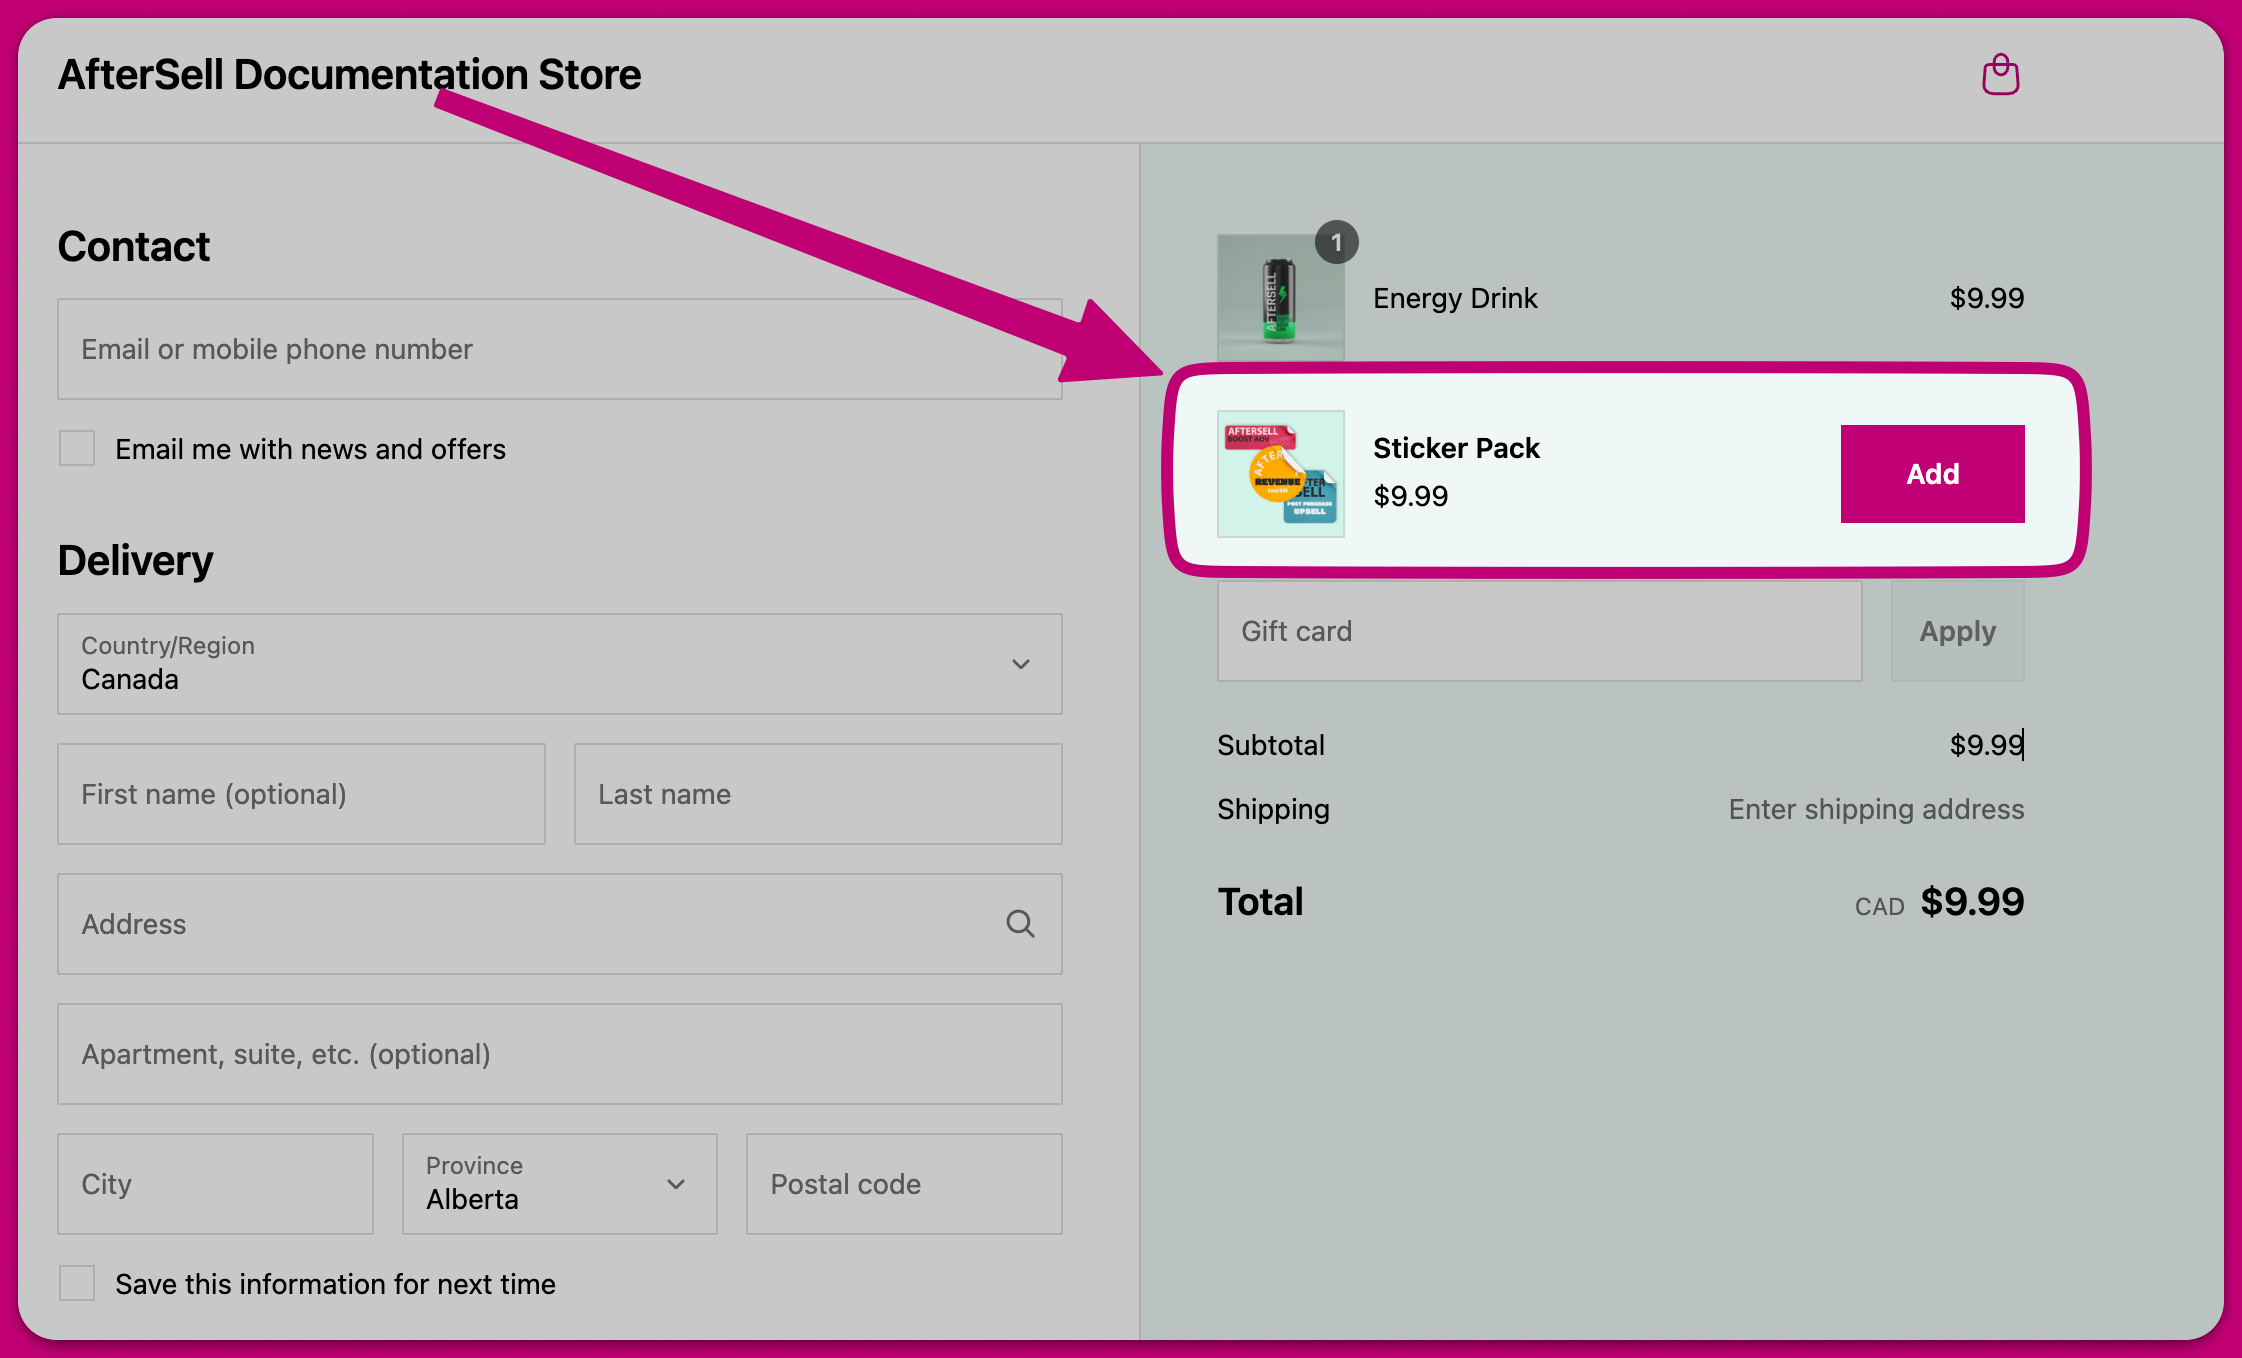 Upsell Widgets have a few different configurations to select from.
* **Single Product Upsell:** Offer one product to your customer.
* **Multi-Product Upsell:** Show multiple products in either a stack or carousel layout. Allow customers to accept multiple offers.
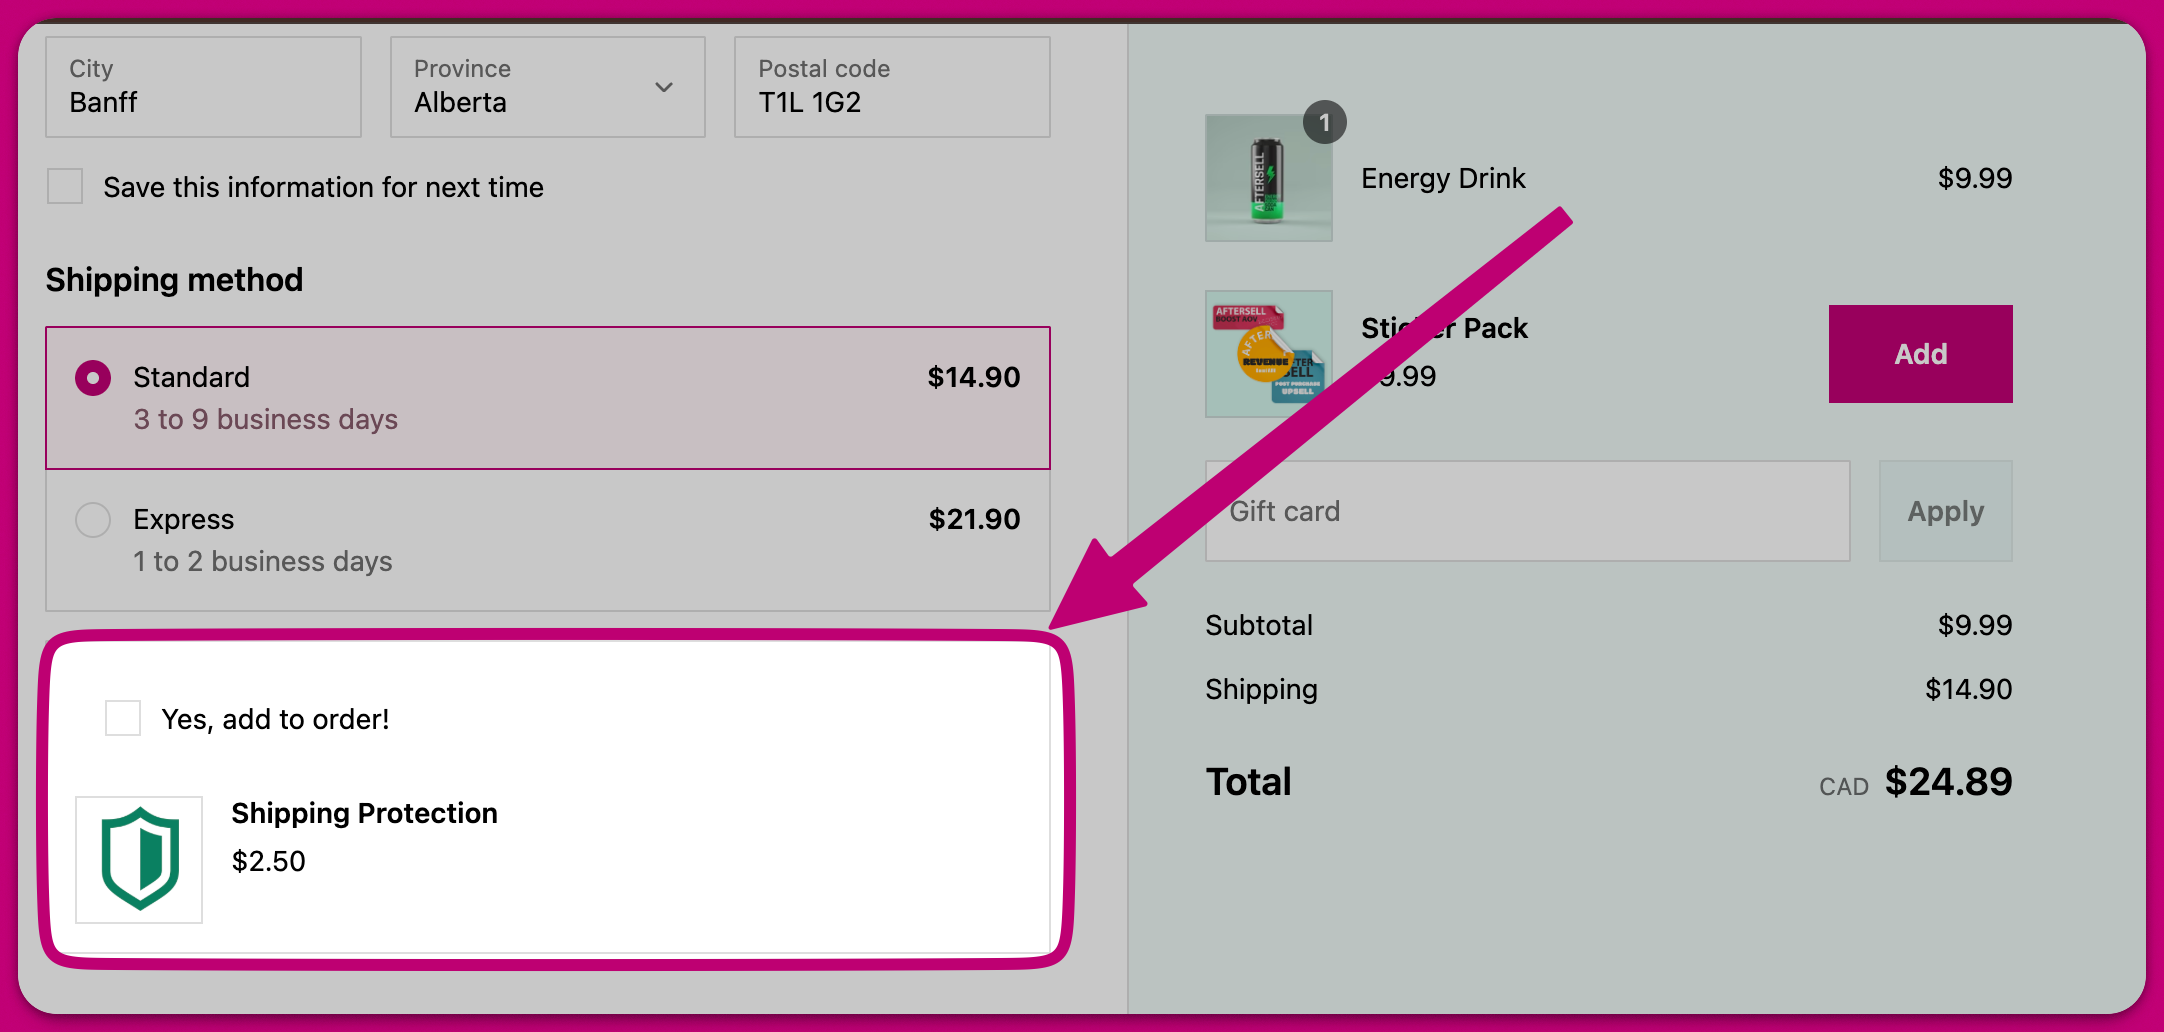
* **Checkmark Upsell:** Upsell a single product with a checkbox instead of an Add to Cart button. This is commonly used for cheaper add-ons such as shipping protection or first in line shipping.
### Product selection options
When creating upsell offers, you can choose how products are selected:
* **Specific Products:** Manually select individual products to upsell.
* **Collection:** Select a collection and choose up to 5 random products from that collection to display. Products already in the cart are automatically excluded.
* **AI Recommendations:** Let Aftersell automatically recommend products based on the customer's cart contents.
* **Most Expensive Product:** Automatically upsell the most expensive product from the customer's cart.
When browsing the **Products** tab in the product picker, you can check **Active products only** to hide Draft and Archived products from the list. This filter is off by default and only applies to the Products tab — Collections are not affected.
Upsell Widgets have a few different configurations to select from.
* **Single Product Upsell:** Offer one product to your customer.
* **Multi-Product Upsell:** Show multiple products in either a stack or carousel layout. Allow customers to accept multiple offers.
* **Checkmark Upsell:** Upsell a single product with a checkbox instead of an Add to Cart button. This is commonly used for cheaper add-ons such as shipping protection or first in line shipping.
### Product selection options
When creating upsell offers, you can choose how products are selected:
* **Specific Products:** Manually select individual products to upsell.
* **Collection:** Select a collection and choose up to 5 random products from that collection to display. Products already in the cart are automatically excluded.
* **AI Recommendations:** Let Aftersell automatically recommend products based on the customer's cart contents.
* **Most Expensive Product:** Automatically upsell the most expensive product from the customer's cart.
When browsing the **Products** tab in the product picker, you can check **Active products only** to hide Draft and Archived products from the list. This filter is off by default and only applies to the Products tab — Collections are not affected.
 ### Product types
When adding products to your upsell widget, you can choose from several product types:
* **Specific product** - Select a particular product from your store to display
* **Automatic upsell** - Uses Shopify's AI to recommend complementary products based on cart contents
* **Most expensive product** - Shows the most expensive item from the customer's cart
* **Spend threshold** - Intelligently recommends products to help customers reach reward thresholds (requires rewards bar to be enabled)
* **Collection** - Display products from a specific collection
The **spend threshold** product type works with your rewards bar to suggest products that help customers reach goals like free shipping or discounts. It automatically selects the most relevant product based on how close the customer is to the threshold.
### Variant name display
When a customer selects a variant for a checkout upsell product, the variant name appears as small subdued text below the product title. This helps customers confirm they are adding the correct variant to their order.
The variant name only appears when the product has multiple variants — it is hidden for single-variant products (those with only a "Default Title" variant).
### Subscription plan locking
* When you hide a variant option, customers won't see it in the checkout upsell.
* The default value you select is automatically applied to the product.
* Only variants matching your selected default values will be available to customers.
* If you hide multiple options, only variants matching all selected defaults will be shown. When creating upsells for subscription products, you can lock the upsell to a specific subscription plan. This prevents customers from changing the subscription plan at checkout, ensuring they receive the exact subscription option you've configured.
**How to configure subscription plan locking:**
1. Open your upsell widget in the Checkout editor.
2. Set the **Purchase option** to **Subscription**.
3. In the **Subscription plan** dropdown, select a specific plan instead of "Any plan (customer chooses)".
4. The plan is now locked - customers will see this plan at checkout but cannot change it.
**Customizing the locked plan display:**
* Hide the Color option and set the default to "Black"
* Keep the Size option visible
* Customers will only see size options for the black t-shirt
When a plan is locked, you can customize how it appears to customers at checkout:
* **Show subscription option on checkout** - Toggle whether the subscription option row (label + plan name) appears at checkout. Enabled by default.
* **Show variant on checkout** - Toggle whether the variant row (option name + variant name, e.g., "Size / Large") appears at checkout. Enabled by default.
* **Subscription option label** - Customize the label shown above the plan name (default: "Subscription"). For example, you might change this to "Subscribe", "Delivery", or another term that fits your brand.
* **Plan name** - Override the plan name displayed at checkout. By default, the plan name from Shopify is used.
**When plans are automatically locked:**
* **Product image corner radius** - Apply rounded corners to product images. Choose from:
* None - Square corners
* Base - Slightly rounded corners
* Large - More rounded corners (default)
* Fully Rounded - Maximum rounding
* **Product image size** - Control image dimensions:
* Default - Standard size (64px for vertical layouts)
* Small - Smaller images (48px for vertical, taller aspect ratio for horizontal)
* Medium - Medium images (72px for vertical, square aspect ratio for horizontal) (default)
* Large - Larger images (96px for vertical, shorter aspect ratio for horizontal)
* **Product image display** - Choose how images fill their container:
* Fill - Image stretches edge-to-edge (default)
* Bordered - Adds a visible border around the image
* **Card padding** - Set inner spacing between the card edge and content:
* None - No padding
* Tight - Minimal spacing
* Base - Standard spacing
* Loose - Maximum spacing (default)
* **Button width style** - Control how the add-to-cart button width is displayed across upsells. Choose from:
* Auto (default) - Button width varies based on whether variant selectors are present
* Compact (uniform small) - All buttons use compact width for consistent sizing
* Full width (uniform large) - All buttons use full width for consistent sizing Plans are automatically locked when:
* You select a specific subscription plan (as described above)
* The product has only one subscription plan available
In both cases, customers cannot change the subscription plan at checkout, and the customization options above apply.
### Upsell button text
For non-checkmark upsell widgets, you can customize the text displayed on the upsell buttons. These fields are available when the feature is enabled for your account — contact support to request access.
By default, the buttons show:
* **Add** for standard upsells
* **Upgrade • \$X savings** for replacement upsells where the customer saves money
* **Upgrade • \$X** for replacement upsells where the product costs more
#### Add button text
You can customize the text on the add button for standard and replacement upsells. When you enter custom text, the savings or cost suffix is still appended automatically for replacement offers (e.g. `Buy Now • $5 savings`).
#### Replacement button text
You can set a separate custom prefix for the button on replacement offers. This overrides both the default "Upgrade" prefix and any text entered in the **Add button text** field for replacement offers. The price suffix (e.g. `• $5.00 savings`) is always appended automatically.
For example, entering `Trade up` produces `Trade up • $5.00 savings` on a replacement offer where the customer saves \$5.
> 💡 **Tip:** The `{Amount}` placeholder is not substituted in the replacement button text field — it is treated as literal text. Use the **Add button text** field with `{Amount}` if you need full control over the label format.
#### Using the `{Amount}` placeholder
You can include `{Amount}` in the **Add button text** field to embed the price or savings amount directly in your label. When `{Amount}` is present, your text becomes the entire button label — the automatic suffix is not appended.
| Button text | Offer type | Result |
| ---------------------------- | ------------------------ | ---------------------- |
| `Save {Amount} by upgrading` | Replacement (savings) | `Save $5 by upgrading` |
| `Upgrade for {Amount} more` | Replacement (extra cost) | `Upgrade for $5 more` |
| `Get yours for {Amount}` | Standard upsell | `Get yours for $10` |
The placeholder is case-insensitive — `{Amount}`, `{amount}`, and `{AMOUNT}` all work.
> ⚠️ **Note:** If you use `{Amount}` in a standard (non-replacement) upsell, the product price is substituted. If there is no price to substitute (for example, a free product), the placeholder is removed from the label.
### Max accepted offers
For **Single Product Upsell** and **Multi-Product Upsell** widgets, you can set a limit on how many offers a customer can accept from a single widget during a checkout session.
Once a customer has accepted the configured number of offers, the widget stops showing additional offers for the remainder of that checkout session.
* **Leave blank** — No limit is applied. The widget continues to show offers regardless of how many the customer has accepted.
* **Set a positive number** — The widget stops displaying offers once the customer has accepted that many from this widget.
To configure this setting, open your upsell widget in the Checkout editor and enter a value in the **Max number of accepted offers** field.
> 💡 **Tip:** This setting is not available for Checkmark Upsell widgets.
***
### Discounts
Discounts can be **configured directly within the upsell widget**. This discount automatically gets applied when the customer selects to add the upsell product to their order.
#### Adding a discount to your upsell
When configuring an upsell widget, you can add a discount by clicking the **"Add discount"** button. You'll see two options:
* **Pick existing** - Select from discounts you've already created. You can search through your existing discounts to find the one you want to apply.
* **Create new** - Create a new discount directly in the editor by setting:
* **Title** - The discount code text shown to customers in checkout (e.g., "SAVE")
* **Amount** - Choose between a percentage discount or a fixed amount discount, then enter the value
Once a discount is applied to your upsell, it appears as a badge that you can click to change or remove.
You can manage all your checkout discounts in one place. See [Managing checkout discounts](/aftersell/managing_checkout_discounts) to learn how to view, edit, and delete discounts.
#### Hiding the discount amount text
When a discount is applied to your upsell, a savings suffix (e.g. "(20% OFF)" or "(\$6 OFF)") appears next to the product title by default. You can hide this suffix by enabling **Hide discount amount text** in the **Show additional settings** section of the upsell editor.
* When enabled, the savings suffix is hidden. The discounted price itself still displays normally.
* When disabled (default), the savings suffix appears next to the product title.
> 💡 **Tip:** This setting is per-widget. If you have multiple upsell widgets, you can configure each one independently.
#### Customizing the discount suffix label
The "OFF" text in the savings suffix (e.g. "20% OFF") can be customized in **Settings > Translations**. Look for the **Discount suffix** row and enter your preferred label (e.g. "saved", "off", or a translated equivalent). The default value is "OFF".
#### Showing the discounted price when the Aftersell discount is skipped
When **Skip discount if other discounts are already applied** is enabled, the widget hides the configured upsell discount from the preview price by default. If your cart-level discount already matches your upsell discount (so the customer pays the same discounted price regardless), you can enable **Show the discounted price in the widget even when the Aftersell discount is skipped** to keep the preview price in sync with what the customer will actually be charged.
> ⚠️ **Important:** This setting changes the displayed price in the widget for both preview and live customers, but does not apply an Aftersell discount. Only enable this if your cart-level discount matches your upsell discount exactly — otherwise customers may see an incorrect price.
This checkbox is only visible when **Skip discount if other discounts are already applied** is already turned on.
#### How discounts work
* Aftersell discounts follow the same rules as any other Shopify discount. For two discounts to combine, both must be explicitly set to combine in Shopify Admin. For example, if Aftersell creates a discount code and you also have a separate discount like "10% off", both need combination enabled. If either one is not set to combine, they will not combine. Shopify's standard discounting rules apply throughout:
* Shopify only allows one line-item discount per product at a time. If a product already has a discount applied, an additional upsell discount will not stack on the same line item
* Order-level and line-item discounts can combine if both are set to "combinable" in Shopify Admin For full details on Shopify's combination rules, refer to [Shopify's discount combination documentation](https://help.shopify.com/en/manual/discounts/combining-discounts/discount-combinations). **Important limitations** There are a few scenarios where discounts may fail to apply:
* **Multiple discounts on the same product:** If an Aftersell upsell discount is configured for a product that already has a discount applied, the Aftersell discount will not stack
* **Incorrect collection setup:** If discounts target collections, ensure all relevant products belong to the correct collection. Hidden collections can be used to include specific products without making them visible to customers
* **Third-party app conflicts:** Checkout discount functionality is not currently supported when another app is dynamically modifying your checkout. If you are running an app that does this, discounts added by Aftersell may not apply as expected.
For example, if an app adds pricing or add-ons at checkout and recalculates the order total, this can interfere with how Aftersell applies discounts.
***
## Upsell Review Stars
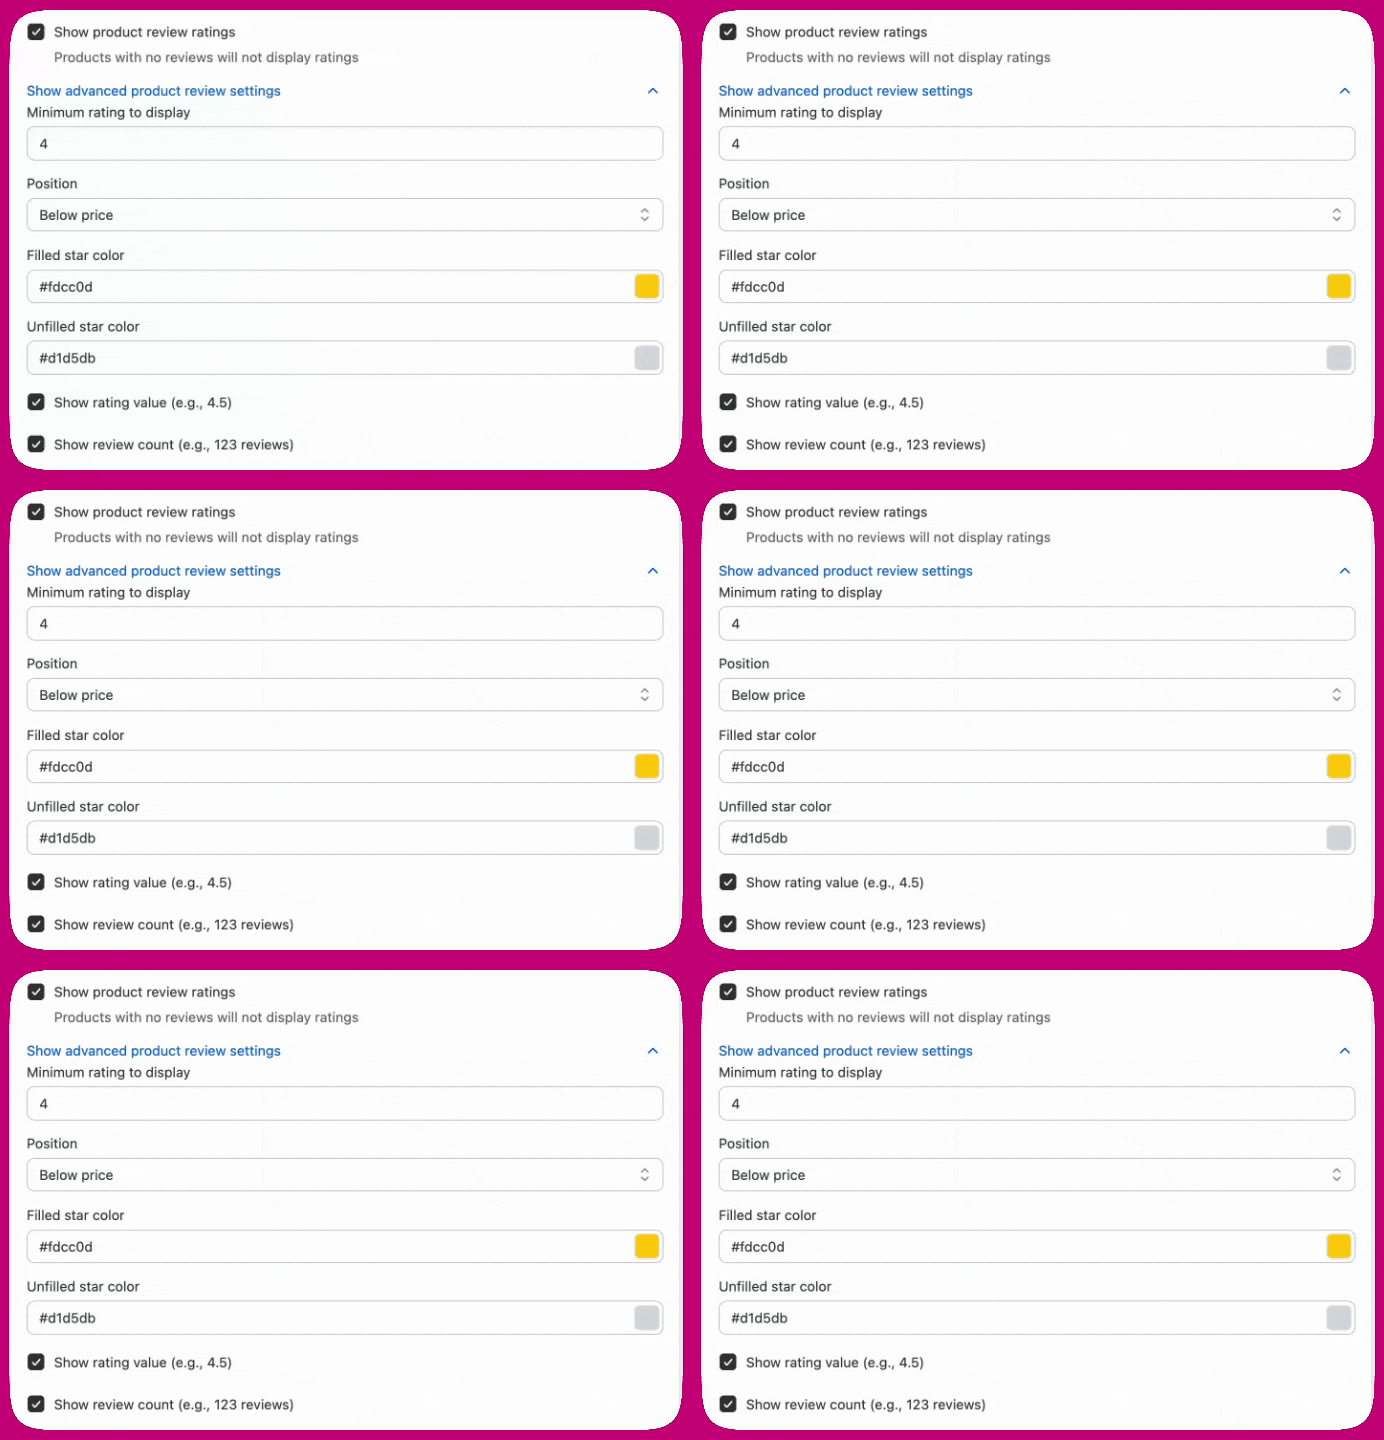
Checkout upsells can display star ratings on offer products to help increase conversions. Ratings are pulled from your product review app’s metafields and only appear when valid review data exists for the product.
* Please note that this is currently available on Aftersell's Checkout version 2 and not version 1, due to api limitations.
**How to enable**
* Open **Checkout** and edit the upsell.
* Enable **Show product review ratings**.
* *(Optional)* Open **Advanced product review settings** to customize the display.
**Advanced settings**
* Set a **minimum rating** to display (0-5, default 4.0).
* Choose where stars appear (**below title** or **below price**).
* Customize **filled and unfilled star colors**.
* Show or hide the **numeric rating** and **review count**.
### Product types
When adding products to your upsell widget, you can choose from several product types:
* **Specific product** - Select a particular product from your store to display
* **Automatic upsell** - Uses Shopify's AI to recommend complementary products based on cart contents
* **Most expensive product** - Shows the most expensive item from the customer's cart
* **Spend threshold** - Intelligently recommends products to help customers reach reward thresholds (requires rewards bar to be enabled)
* **Collection** - Display products from a specific collection
The **spend threshold** product type works with your rewards bar to suggest products that help customers reach goals like free shipping or discounts. It automatically selects the most relevant product based on how close the customer is to the threshold.
### Variant name display
When a customer selects a variant for a checkout upsell product, the variant name appears as small subdued text below the product title. This helps customers confirm they are adding the correct variant to their order.
The variant name only appears when the product has multiple variants — it is hidden for single-variant products (those with only a "Default Title" variant).
### Subscription plan locking
* When you hide a variant option, customers won't see it in the checkout upsell.
* The default value you select is automatically applied to the product.
* Only variants matching your selected default values will be available to customers.
* If you hide multiple options, only variants matching all selected defaults will be shown. When creating upsells for subscription products, you can lock the upsell to a specific subscription plan. This prevents customers from changing the subscription plan at checkout, ensuring they receive the exact subscription option you've configured.
**How to configure subscription plan locking:**
1. Open your upsell widget in the Checkout editor.
2. Set the **Purchase option** to **Subscription**.
3. In the **Subscription plan** dropdown, select a specific plan instead of "Any plan (customer chooses)".
4. The plan is now locked - customers will see this plan at checkout but cannot change it.
**Customizing the locked plan display:**
* Hide the Color option and set the default to "Black"
* Keep the Size option visible
* Customers will only see size options for the black t-shirt
When a plan is locked, you can customize how it appears to customers at checkout:
* **Show subscription option on checkout** - Toggle whether the subscription option row (label + plan name) appears at checkout. Enabled by default.
* **Show variant on checkout** - Toggle whether the variant row (option name + variant name, e.g., "Size / Large") appears at checkout. Enabled by default.
* **Subscription option label** - Customize the label shown above the plan name (default: "Subscription"). For example, you might change this to "Subscribe", "Delivery", or another term that fits your brand.
* **Plan name** - Override the plan name displayed at checkout. By default, the plan name from Shopify is used.
**When plans are automatically locked:**
* **Product image corner radius** - Apply rounded corners to product images. Choose from:
* None - Square corners
* Base - Slightly rounded corners
* Large - More rounded corners (default)
* Fully Rounded - Maximum rounding
* **Product image size** - Control image dimensions:
* Default - Standard size (64px for vertical layouts)
* Small - Smaller images (48px for vertical, taller aspect ratio for horizontal)
* Medium - Medium images (72px for vertical, square aspect ratio for horizontal) (default)
* Large - Larger images (96px for vertical, shorter aspect ratio for horizontal)
* **Product image display** - Choose how images fill their container:
* Fill - Image stretches edge-to-edge (default)
* Bordered - Adds a visible border around the image
* **Card padding** - Set inner spacing between the card edge and content:
* None - No padding
* Tight - Minimal spacing
* Base - Standard spacing
* Loose - Maximum spacing (default)
* **Button width style** - Control how the add-to-cart button width is displayed across upsells. Choose from:
* Auto (default) - Button width varies based on whether variant selectors are present
* Compact (uniform small) - All buttons use compact width for consistent sizing
* Full width (uniform large) - All buttons use full width for consistent sizing Plans are automatically locked when:
* You select a specific subscription plan (as described above)
* The product has only one subscription plan available
In both cases, customers cannot change the subscription plan at checkout, and the customization options above apply.
### Upsell button text
For non-checkmark upsell widgets, you can customize the text displayed on the upsell buttons. These fields are available when the feature is enabled for your account — contact support to request access.
By default, the buttons show:
* **Add** for standard upsells
* **Upgrade • \$X savings** for replacement upsells where the customer saves money
* **Upgrade • \$X** for replacement upsells where the product costs more
#### Add button text
You can customize the text on the add button for standard and replacement upsells. When you enter custom text, the savings or cost suffix is still appended automatically for replacement offers (e.g. `Buy Now • $5 savings`).
#### Replacement button text
You can set a separate custom prefix for the button on replacement offers. This overrides both the default "Upgrade" prefix and any text entered in the **Add button text** field for replacement offers. The price suffix (e.g. `• $5.00 savings`) is always appended automatically.
For example, entering `Trade up` produces `Trade up • $5.00 savings` on a replacement offer where the customer saves \$5.
> 💡 **Tip:** The `{Amount}` placeholder is not substituted in the replacement button text field — it is treated as literal text. Use the **Add button text** field with `{Amount}` if you need full control over the label format.
#### Using the `{Amount}` placeholder
You can include `{Amount}` in the **Add button text** field to embed the price or savings amount directly in your label. When `{Amount}` is present, your text becomes the entire button label — the automatic suffix is not appended.
| Button text | Offer type | Result |
| ---------------------------- | ------------------------ | ---------------------- |
| `Save {Amount} by upgrading` | Replacement (savings) | `Save $5 by upgrading` |
| `Upgrade for {Amount} more` | Replacement (extra cost) | `Upgrade for $5 more` |
| `Get yours for {Amount}` | Standard upsell | `Get yours for $10` |
The placeholder is case-insensitive — `{Amount}`, `{amount}`, and `{AMOUNT}` all work.
> ⚠️ **Note:** If you use `{Amount}` in a standard (non-replacement) upsell, the product price is substituted. If there is no price to substitute (for example, a free product), the placeholder is removed from the label.
### Max accepted offers
For **Single Product Upsell** and **Multi-Product Upsell** widgets, you can set a limit on how many offers a customer can accept from a single widget during a checkout session.
Once a customer has accepted the configured number of offers, the widget stops showing additional offers for the remainder of that checkout session.
* **Leave blank** — No limit is applied. The widget continues to show offers regardless of how many the customer has accepted.
* **Set a positive number** — The widget stops displaying offers once the customer has accepted that many from this widget.
To configure this setting, open your upsell widget in the Checkout editor and enter a value in the **Max number of accepted offers** field.
> 💡 **Tip:** This setting is not available for Checkmark Upsell widgets.
***
### Discounts
Discounts can be **configured directly within the upsell widget**. This discount automatically gets applied when the customer selects to add the upsell product to their order.
#### Adding a discount to your upsell
When configuring an upsell widget, you can add a discount by clicking the **"Add discount"** button. You'll see two options:
* **Pick existing** - Select from discounts you've already created. You can search through your existing discounts to find the one you want to apply.
* **Create new** - Create a new discount directly in the editor by setting:
* **Title** - The discount code text shown to customers in checkout (e.g., "SAVE")
* **Amount** - Choose between a percentage discount or a fixed amount discount, then enter the value
Once a discount is applied to your upsell, it appears as a badge that you can click to change or remove.
You can manage all your checkout discounts in one place. See [Managing checkout discounts](/aftersell/managing_checkout_discounts) to learn how to view, edit, and delete discounts.
#### Hiding the discount amount text
When a discount is applied to your upsell, a savings suffix (e.g. "(20% OFF)" or "(\$6 OFF)") appears next to the product title by default. You can hide this suffix by enabling **Hide discount amount text** in the **Show additional settings** section of the upsell editor.
* When enabled, the savings suffix is hidden. The discounted price itself still displays normally.
* When disabled (default), the savings suffix appears next to the product title.
> 💡 **Tip:** This setting is per-widget. If you have multiple upsell widgets, you can configure each one independently.
#### Customizing the discount suffix label
The "OFF" text in the savings suffix (e.g. "20% OFF") can be customized in **Settings > Translations**. Look for the **Discount suffix** row and enter your preferred label (e.g. "saved", "off", or a translated equivalent). The default value is "OFF".
#### Showing the discounted price when the Aftersell discount is skipped
When **Skip discount if other discounts are already applied** is enabled, the widget hides the configured upsell discount from the preview price by default. If your cart-level discount already matches your upsell discount (so the customer pays the same discounted price regardless), you can enable **Show the discounted price in the widget even when the Aftersell discount is skipped** to keep the preview price in sync with what the customer will actually be charged.
> ⚠️ **Important:** This setting changes the displayed price in the widget for both preview and live customers, but does not apply an Aftersell discount. Only enable this if your cart-level discount matches your upsell discount exactly — otherwise customers may see an incorrect price.
This checkbox is only visible when **Skip discount if other discounts are already applied** is already turned on.
#### How discounts work
* Aftersell discounts follow the same rules as any other Shopify discount. For two discounts to combine, both must be explicitly set to combine in Shopify Admin. For example, if Aftersell creates a discount code and you also have a separate discount like "10% off", both need combination enabled. If either one is not set to combine, they will not combine. Shopify's standard discounting rules apply throughout:
* Shopify only allows one line-item discount per product at a time. If a product already has a discount applied, an additional upsell discount will not stack on the same line item
* Order-level and line-item discounts can combine if both are set to "combinable" in Shopify Admin For full details on Shopify's combination rules, refer to [Shopify's discount combination documentation](https://help.shopify.com/en/manual/discounts/combining-discounts/discount-combinations). **Important limitations** There are a few scenarios where discounts may fail to apply:
* **Multiple discounts on the same product:** If an Aftersell upsell discount is configured for a product that already has a discount applied, the Aftersell discount will not stack
* **Incorrect collection setup:** If discounts target collections, ensure all relevant products belong to the correct collection. Hidden collections can be used to include specific products without making them visible to customers
* **Third-party app conflicts:** Checkout discount functionality is not currently supported when another app is dynamically modifying your checkout. If you are running an app that does this, discounts added by Aftersell may not apply as expected.
For example, if an app adds pricing or add-ons at checkout and recalculates the order total, this can interfere with how Aftersell applies discounts.
***
## Upsell Review Stars
Checkout upsells can display star ratings on offer products to help increase conversions. Ratings are pulled from your product review app’s metafields and only appear when valid review data exists for the product.
* Please note that this is currently available on Aftersell's Checkout version 2 and not version 1, due to api limitations.
**How to enable**
* Open **Checkout** and edit the upsell.
* Enable **Show product review ratings**.
* *(Optional)* Open **Advanced product review settings** to customize the display.
**Advanced settings**
* Set a **minimum rating** to display (0-5, default 4.0).
* Choose where stars appear (**below title** or **below price**).
* Customize **filled and unfilled star colors**.
* Show or hide the **numeric rating** and **review count**.
 **Supported review apps**\
We support review apps that store ratings in product metafields, including:
* Shopify Product Reviews
* Junip
* Okendo
* Growave
* Fera
* Stamped
* Loox
* REVIEWS.io
* Automizely Reviews
* Judge.me
* Ali Reviews
* Trustoo
* Rivo
* Rivyo
* Vitals
Ratings won’t display for products without review data. If multiple supported review apps are installed, the app with the highest review count is used. Yotpo isn’t supported for Checkout V2 upsell ratings because it requires a separate API.
***
## Cart Controls
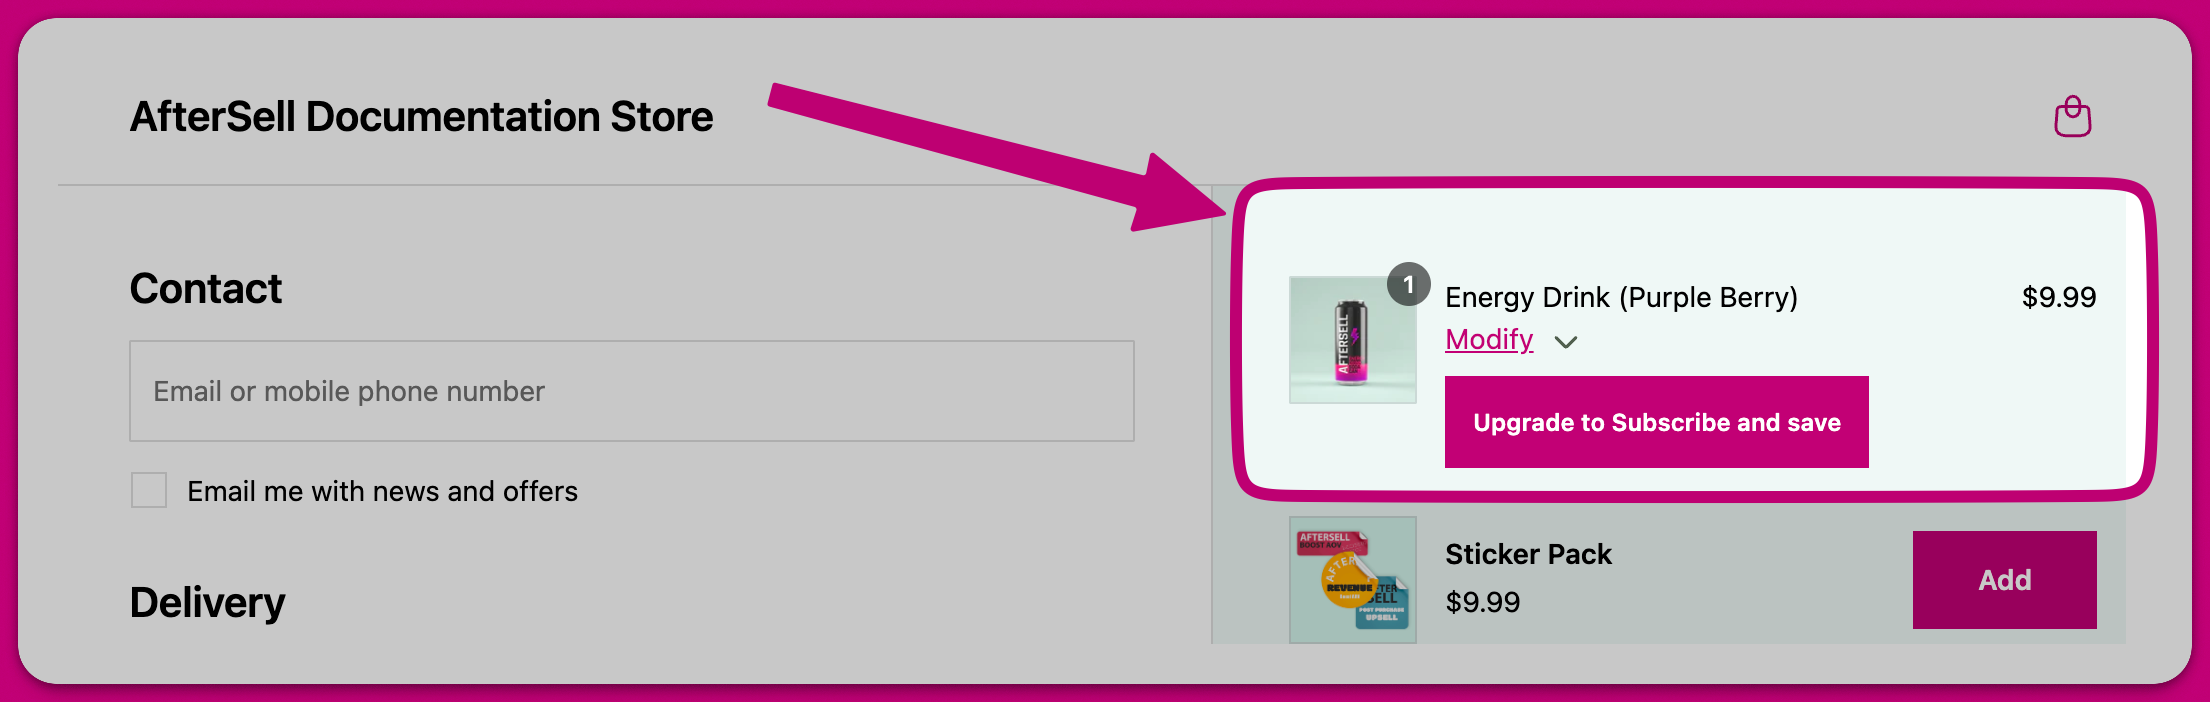
Surface a modify link below every product line item to allow editing directly on the checkout page.
The following functionality is supported for cart controls:
* Variant selector: Allow customers to change to another in-stock variant.
* Quantity selector: Allow customers to change the quantity of a product.
* Remove item: Allow customers to remove upsell products.
* Subscription selector: Allow customers to change the currently selected subscription option (e.g. from every 60 days to every 30 days).
* Subscription upgrade: Allow customers to upgrade a one time purchase to a subscription.
* Custom text: Add custom text below each line item.
**Supported review apps**\
We support review apps that store ratings in product metafields, including:
* Shopify Product Reviews
* Junip
* Okendo
* Growave
* Fera
* Stamped
* Loox
* REVIEWS.io
* Automizely Reviews
* Judge.me
* Ali Reviews
* Trustoo
* Rivo
* Rivyo
* Vitals
Ratings won’t display for products without review data. If multiple supported review apps are installed, the app with the highest review count is used. Yotpo isn’t supported for Checkout V2 upsell ratings because it requires a separate API.
***
## Cart Controls
Surface a modify link below every product line item to allow editing directly on the checkout page.
The following functionality is supported for cart controls:
* Variant selector: Allow customers to change to another in-stock variant.
* Quantity selector: Allow customers to change the quantity of a product.
* Remove item: Allow customers to remove upsell products.
* Subscription selector: Allow customers to change the currently selected subscription option (e.g. from every 60 days to every 30 days).
* Subscription upgrade: Allow customers to upgrade a one time purchase to a subscription.
* Custom text: Add custom text below each line item.
 ### Product review ratings
Cart controls can display star ratings for in-cart products to help build trust and increase conversions. Ratings are pulled from your product review app's metafields and only appear when valid review data exists for the product.
**How to enable**
1. Open **Checkout** and edit the cart controls widget.
2. Navigate to the **Product review ratings** section.
3. Enable **Show product review ratings**.
4. *(Optional)* Customize the display settings.
**Settings**
* Set a **minimum rating** to display (0-5, default 4.0). Products below this rating won't show stars.
* Choose where stars appear (**below product title** or **below cart controls**).
* Customize **filled star color** (default: #fdcc0d) and **unfilled star color** (default: #d1d5db).
* Show or hide the **rating value** (e.g., 4.5) and **review count** (e.g., 123 reviews).
**Supported review apps**\
We support review apps that store ratings in product metafields, including:
* Shopify Product Reviews
* Junip
* Okendo
* Growave
* Fera
* Stamped
* Loox
* REVIEWS.io
* Automizely Reviews
* Judge.me
* Ali Reviews
* Trustoo
* Rivo
* Rivyo
* Vitals
Ratings won't display for products without review data. If multiple supported review apps are installed, the app with the highest review count is used.
### Product targeting
You can control which products display cart controls using the **Visibility** settings in the cart controls widget editor:
* **All products in cart:** Cart controls appear for every product (default).
* **Only selected products:** Cart controls appear only for products you select. Click **Select products** to choose which products should display cart controls.
* **All products except selected:** Cart controls appear for all products except those you select. Click **Select products** to choose which products should not display cart controls.
This allows you to customize the checkout experience based on specific products. For example, you might want to enable subscription upgrades only for certain products, or prevent customers from removing specific items from their cart.
**How to configure product targeting:**
1. Open your cart controls widget in the Checkout editor.
2. Navigate to the **Visibility** section.
3. Select your preferred targeting mode from the **Apply cart controls to** dropdown.
4. If you selected **Only selected products** or **All products except selected**, click the **Select products** button to choose your products.
5. Save your changes.
***
## Rewards
Show a reward bar (spend X get Y) in your checkout to incentive adding more products. This goal can either be based on Order Value or Item Count.
**Rewards work well alongside the upsell widget.** Make it easy for a customer to add an extra product to their order to achieve the reward. You can use the **spend threshold** product type in your upsell widget to automatically recommend products that help customers reach the reward threshold.
### Product review ratings
Cart controls can display star ratings for in-cart products to help build trust and increase conversions. Ratings are pulled from your product review app's metafields and only appear when valid review data exists for the product.
**How to enable**
1. Open **Checkout** and edit the cart controls widget.
2. Navigate to the **Product review ratings** section.
3. Enable **Show product review ratings**.
4. *(Optional)* Customize the display settings.
**Settings**
* Set a **minimum rating** to display (0-5, default 4.0). Products below this rating won't show stars.
* Choose where stars appear (**below product title** or **below cart controls**).
* Customize **filled star color** (default: #fdcc0d) and **unfilled star color** (default: #d1d5db).
* Show or hide the **rating value** (e.g., 4.5) and **review count** (e.g., 123 reviews).
**Supported review apps**\
We support review apps that store ratings in product metafields, including:
* Shopify Product Reviews
* Junip
* Okendo
* Growave
* Fera
* Stamped
* Loox
* REVIEWS.io
* Automizely Reviews
* Judge.me
* Ali Reviews
* Trustoo
* Rivo
* Rivyo
* Vitals
Ratings won't display for products without review data. If multiple supported review apps are installed, the app with the highest review count is used.
### Product targeting
You can control which products display cart controls using the **Visibility** settings in the cart controls widget editor:
* **All products in cart:** Cart controls appear for every product (default).
* **Only selected products:** Cart controls appear only for products you select. Click **Select products** to choose which products should display cart controls.
* **All products except selected:** Cart controls appear for all products except those you select. Click **Select products** to choose which products should not display cart controls.
This allows you to customize the checkout experience based on specific products. For example, you might want to enable subscription upgrades only for certain products, or prevent customers from removing specific items from their cart.
**How to configure product targeting:**
1. Open your cart controls widget in the Checkout editor.
2. Navigate to the **Visibility** section.
3. Select your preferred targeting mode from the **Apply cart controls to** dropdown.
4. If you selected **Only selected products** or **All products except selected**, click the **Select products** button to choose your products.
5. Save your changes.
***
## Rewards
Show a reward bar (spend X get Y) in your checkout to incentive adding more products. This goal can either be based on Order Value or Item Count.
**Rewards work well alongside the upsell widget.** Make it easy for a customer to add an extra product to their order to achieve the reward. You can use the **spend threshold** product type in your upsell widget to automatically recommend products that help customers reach the reward threshold.
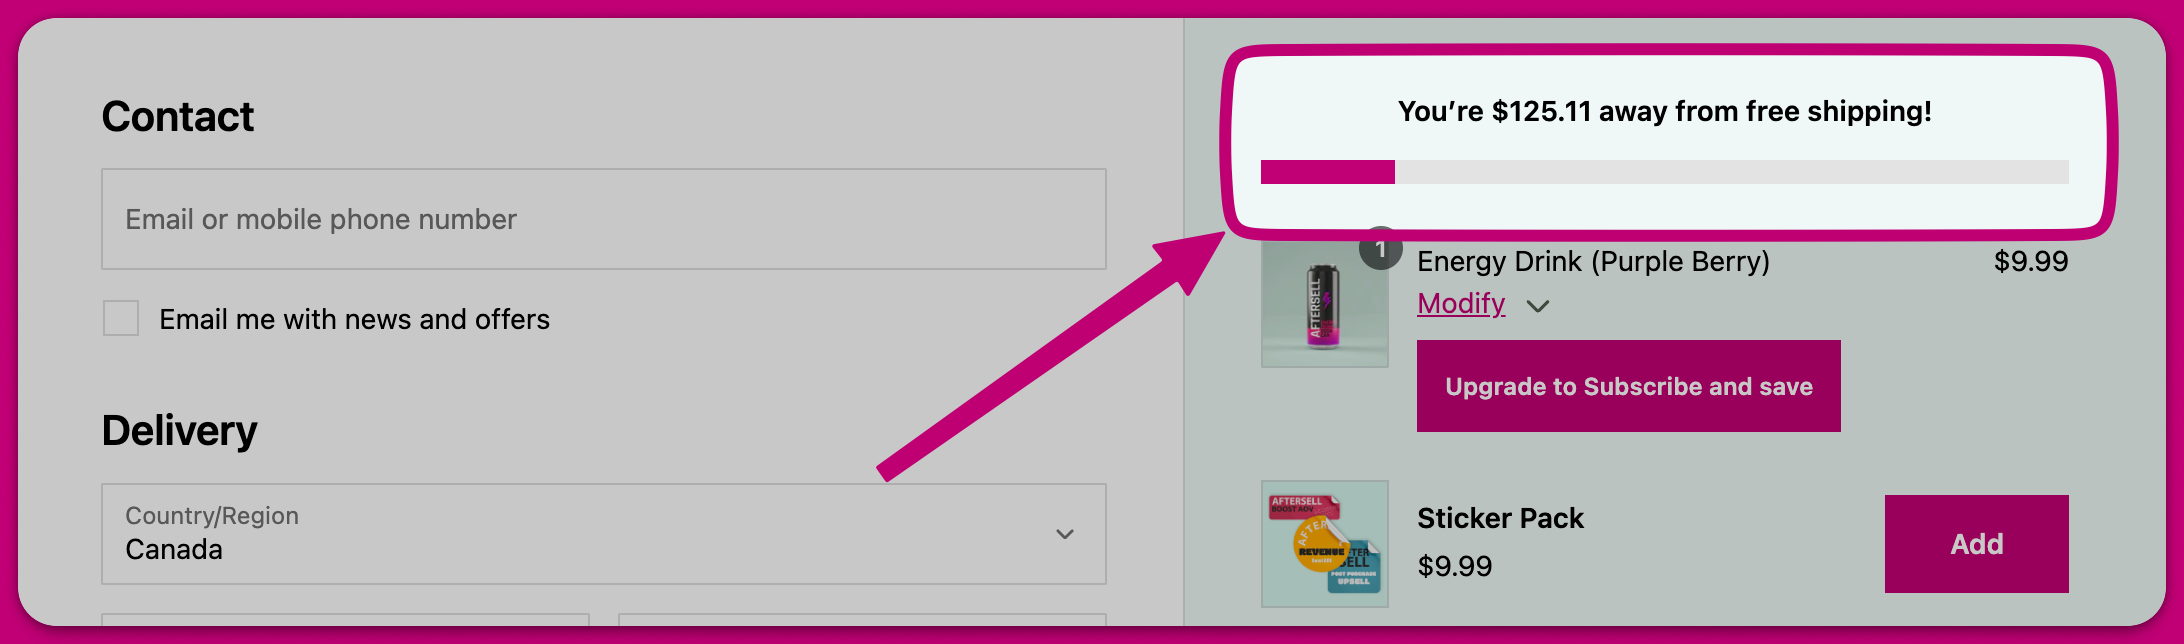 **Keep in mind**, any rewards you're offering will need to be created through Shopify. This can be done by creating Automatic Discounts if you are offering a discount, or by modifying your Shipping Rules if you are offering free shipping.
***
## Trust Badges
Build trust badges with custom icons and text in order to increase checkout conversion rate. The badges can be stacked vertically, or displayed horizontally.
**Keep in mind**, any rewards you're offering will need to be created through Shopify. This can be done by creating Automatic Discounts if you are offering a discount, or by modifying your Shipping Rules if you are offering free shipping.
***
## Trust Badges
Build trust badges with custom icons and text in order to increase checkout conversion rate. The badges can be stacked vertically, or displayed horizontally.
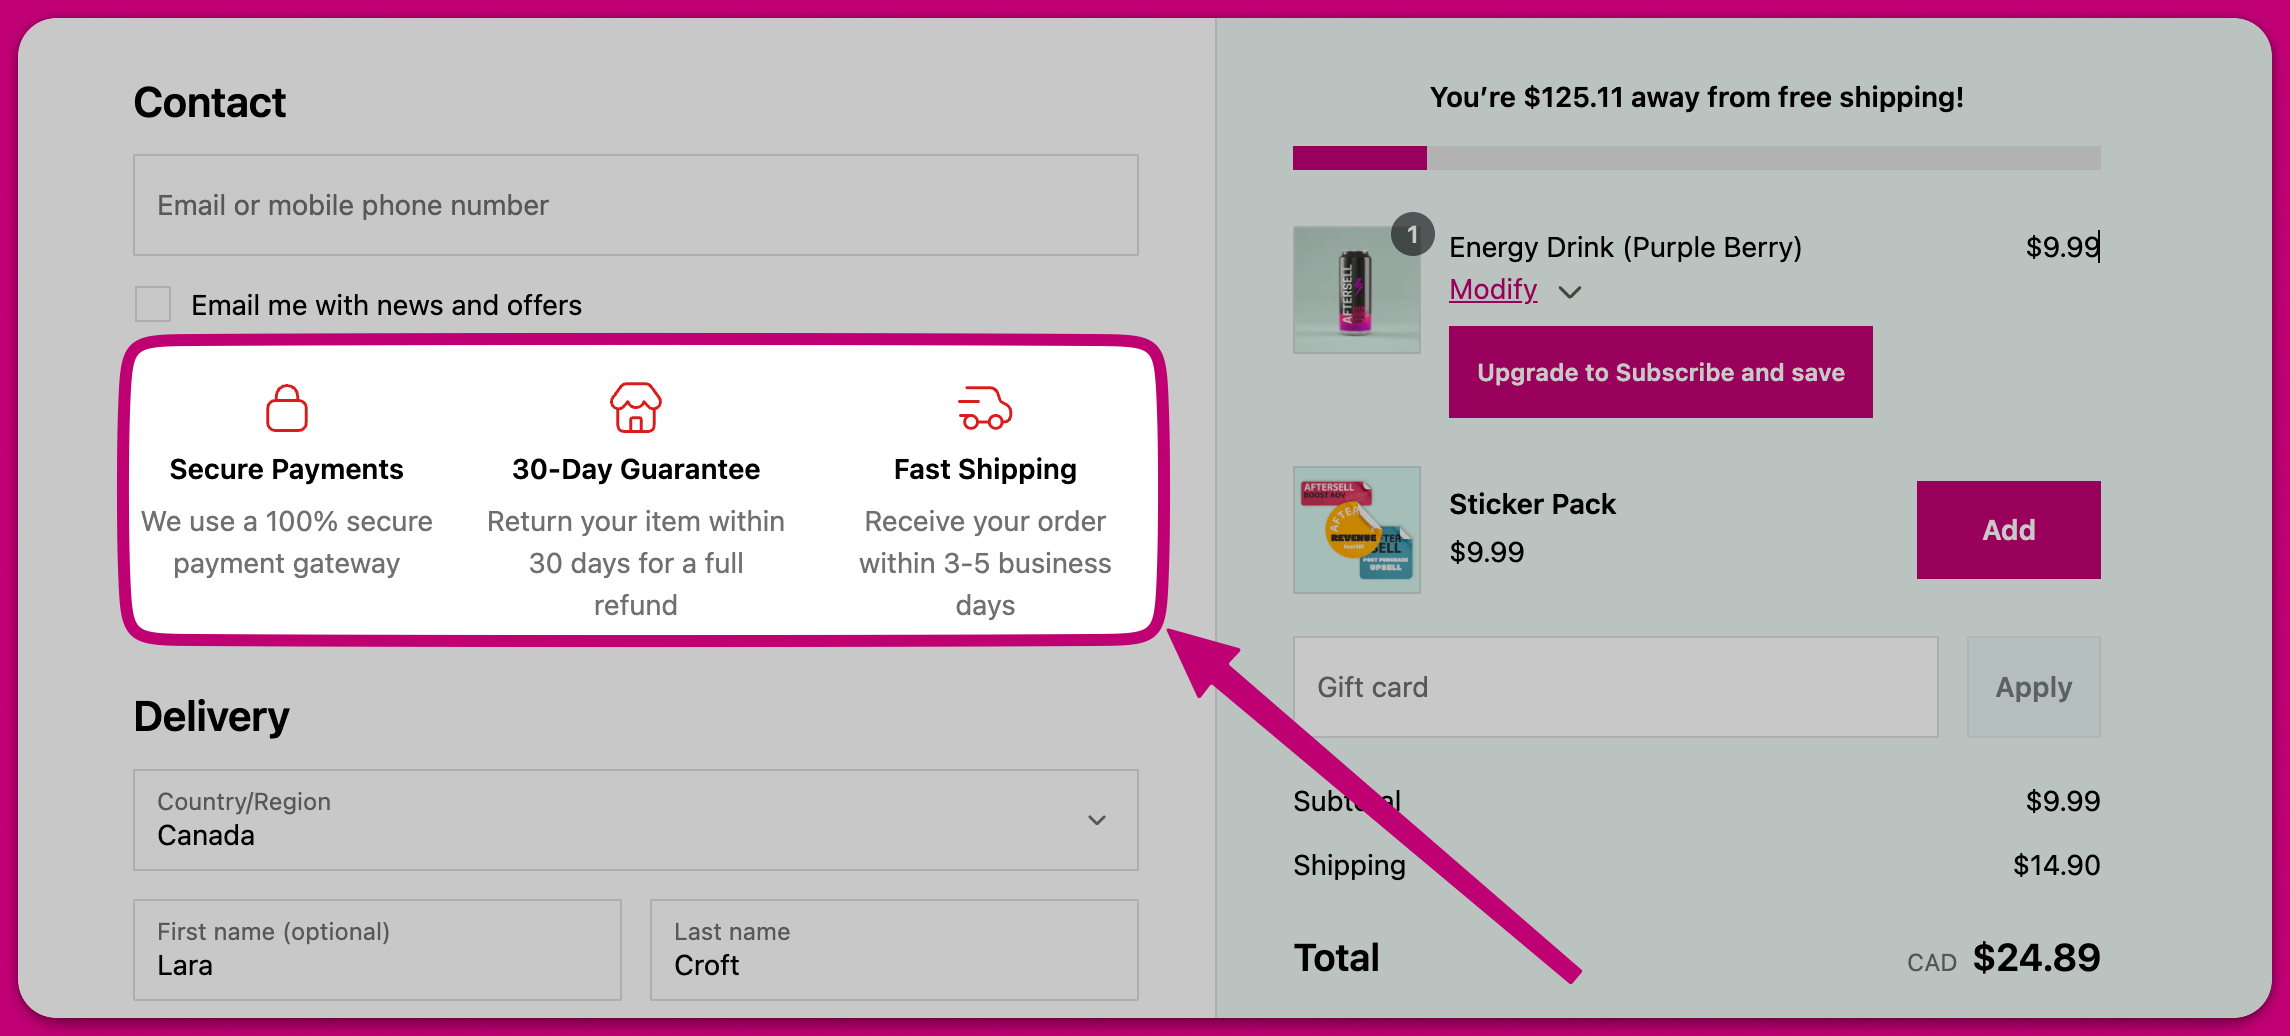 Trust badges are great for building a **sense of trust** with your brand and highlighting your value proposition, which can help **lower your abandoned checkout rate.**
***
## Testimonials
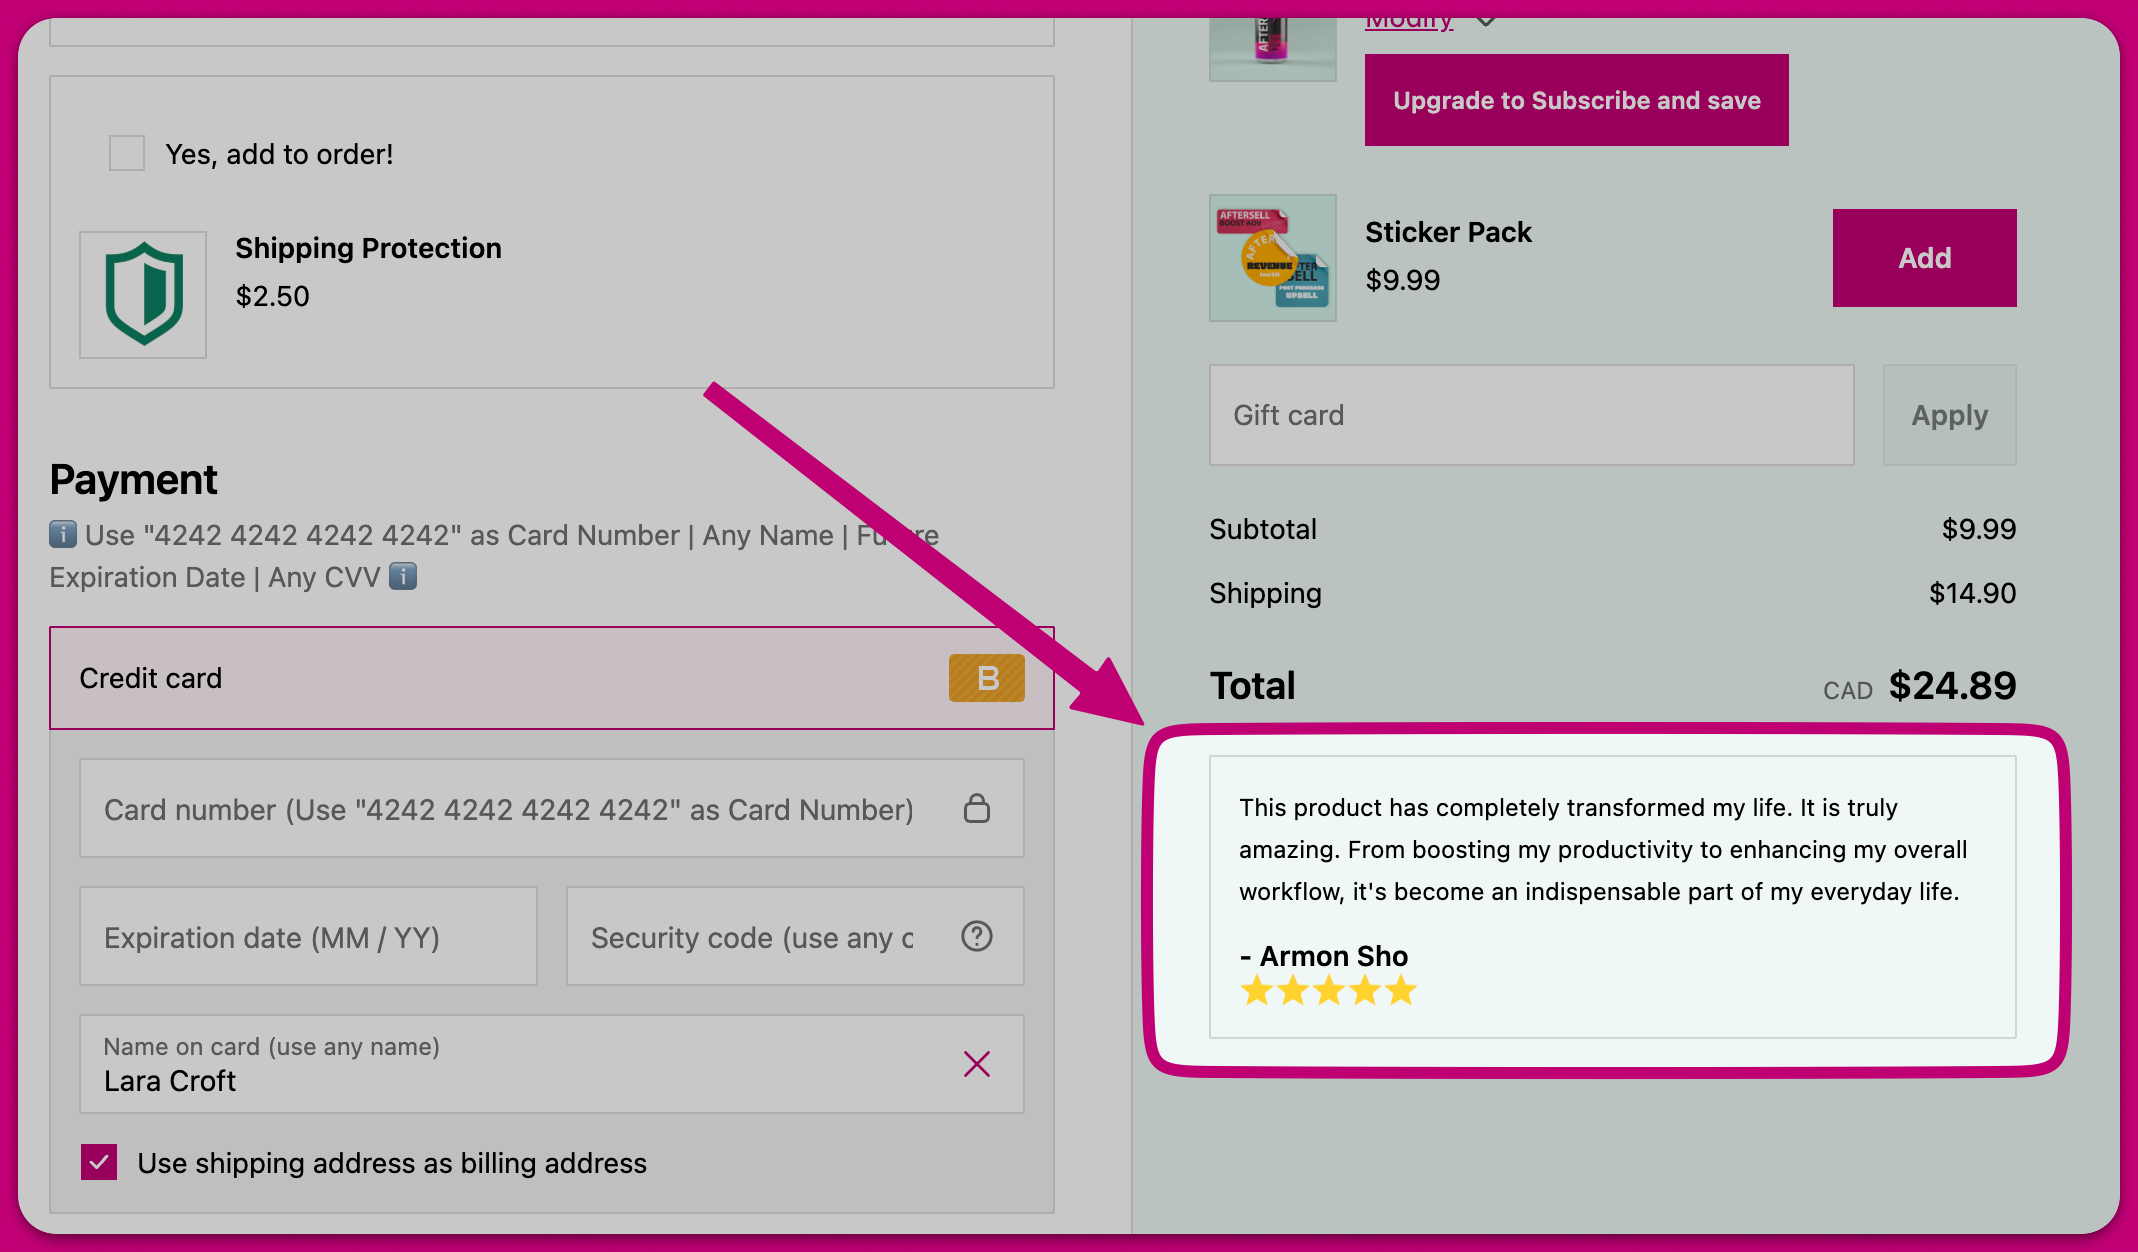
Display customer reviews directly on checkout to build trust and lower your abandoned checkout rate.
Trust badges are great for building a **sense of trust** with your brand and highlighting your value proposition, which can help **lower your abandoned checkout rate.**
***
## Testimonials
Display customer reviews directly on checkout to build trust and lower your abandoned checkout rate.
 ### Testimonials modes
Aftersell offers two types of testimonials widgets:
* **Classic Testimonials** - ⚠️ **Deprecated** - Classic testimonials are no longer available, If you're currently using Classic Testimonials, we recommend switching to Flex Testimonials.
* **Flex Testimonials** - Automatically pulls customer reviews from your review app (Judge.me, Klaviyo, Okendo, or Yotpo). This is the recommended option for all merchants.
### Switching from Classic to Flex Testimonials
If you're using Classic Testimonials, you should switch to Flex Testimonials to display reviews from your review app:
1. Open **Checkout** in Aftersell
2. Navigate to the **Classic Testimonials** widget tab
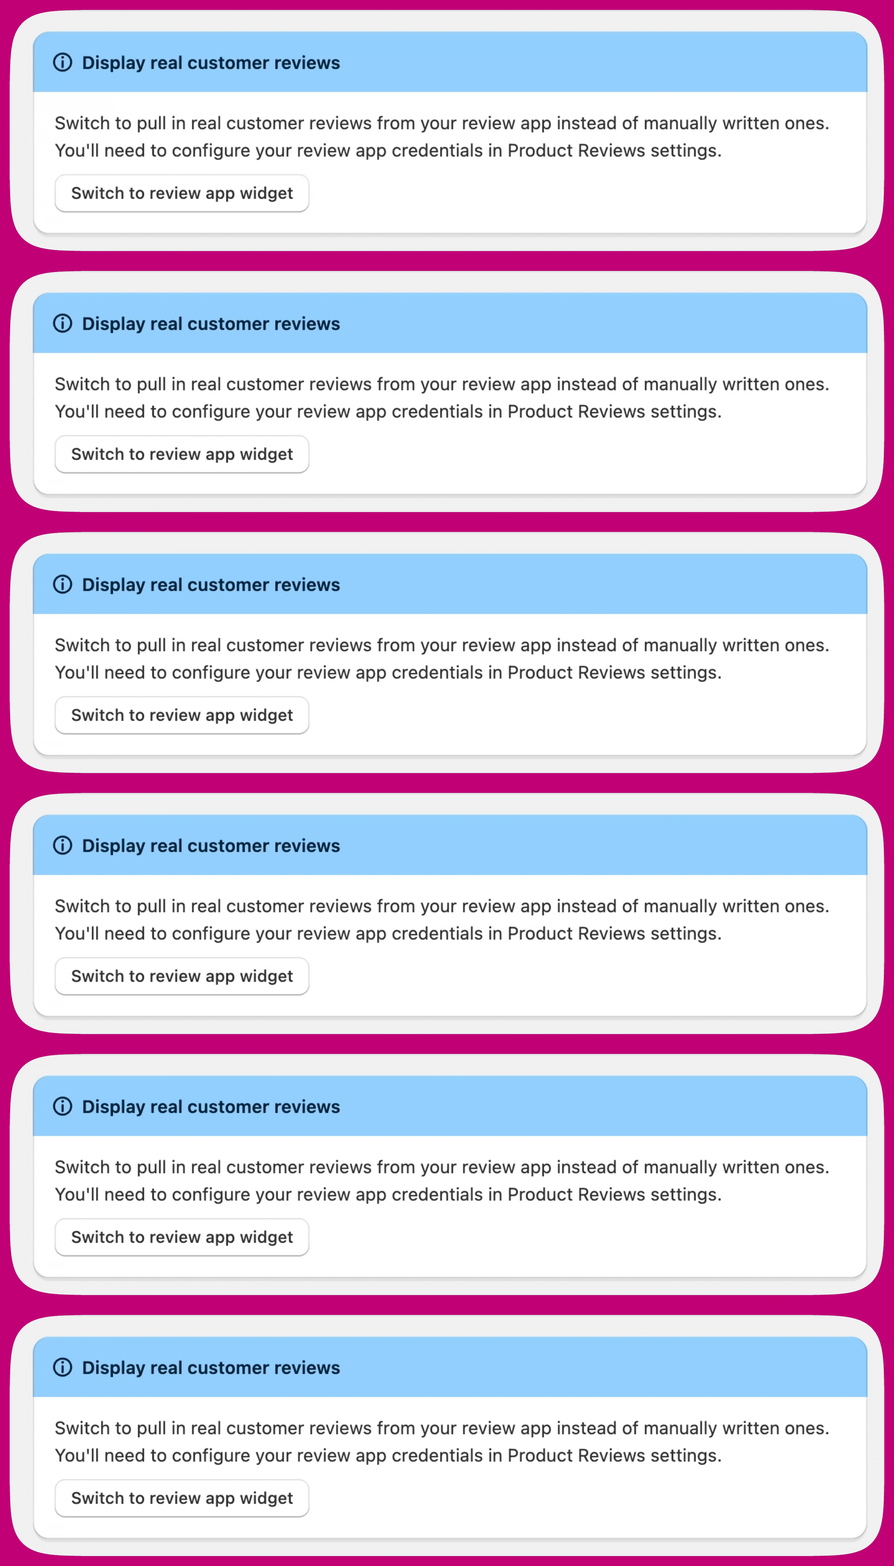
3. Click **Switch to review app widget** in the banner at the top
4. Configure your review app credentials in **Settings > Product Reviews** (see [Review app integrations](#review-app-integrations) below)
You can switch back to Classic Testimonials at any time by clicking **Switch back** in the Flex Testimonials tab. **Note:** Classic Testimonials is deprecated and no longer accessible, Once you switch to Flex Testimonials, you will not be able to switch back to Classic Testimonials.
### Testimonials modes
Aftersell offers two types of testimonials widgets:
* **Classic Testimonials** - ⚠️ **Deprecated** - Classic testimonials are no longer available, If you're currently using Classic Testimonials, we recommend switching to Flex Testimonials.
* **Flex Testimonials** - Automatically pulls customer reviews from your review app (Judge.me, Klaviyo, Okendo, or Yotpo). This is the recommended option for all merchants.
### Switching from Classic to Flex Testimonials
If you're using Classic Testimonials, you should switch to Flex Testimonials to display reviews from your review app:
1. Open **Checkout** in Aftersell
2. Navigate to the **Classic Testimonials** widget tab
3. Click **Switch to review app widget** in the banner at the top
4. Configure your review app credentials in **Settings > Product Reviews** (see [Review app integrations](#review-app-integrations) below)
You can switch back to Classic Testimonials at any time by clicking **Switch back** in the Flex Testimonials tab. **Note:** Classic Testimonials is deprecated and no longer accessible, Once you switch to Flex Testimonials, you will not be able to switch back to Classic Testimonials.
 ### Flex Testimonials configuration
Flex Testimonials offers two selection modes:
* **Manual selection** - Choose specific reviews to display in your testimonials widget
* **Dynamic** - Automatically fetch and display reviews based on products in the customer's cart
#### Dynamic mode
In dynamic mode, Aftersell imports reviews from your review app and stores them so they can be displayed in the checkout widget. The first import happens automatically within 24 hours, and then once a week after that.
To import reviews immediately, go to **Settings > Product Reviews** and click **Sync now** for your review app.
You can configure:
* **Maximum reviews to show** - Control how many reviews appear
* **Display type** - Choose between horizontal carousel or vertical stack layout
* **Minimum rating** - Set the minimum star rating for reviews to display
* **Truncate review text after (optional)** - Set a maximum character length for review text. When a review exceeds this limit, it's clipped with an ellipsis and a "Read more" button appears. Clicking "Read more" opens a popover with the full review. Leave blank for no limit (default).
### Review app integrations
To use Flex Testimonials, you need to configure your review app credentials in **Settings > Product Reviews**. Aftersell supports:
* **Judge.me** - Requires your Private API token
* **Klaviyo** - Requires your private API key
* **Okendo** - Requires your User ID
* **Yotpo** - Requires your App Key
See the following guides for setup instructions:
* [Judge.me integration](/aftersell/judgeme_reviews_integration)
* [Klaviyo integration](/aftersell/klaviyo_reviews_integration)
* [Okendo integration](/aftersell/okendo_reviews_integration)
* [Yotpo integration](/aftersell/aftersell_yotpo_reviews_integration)
***
## Notes
Allows your customer to add notes to their order. These notes can either be written manually by the customer, or be pre-written notes. Pre-written notes are excellent when your store offers gift wrapping or eco packaging, and you want to give your customers an easy way to opt-in.
***
## Images
Upload a custom image which can be inserted in the checkout.
***
## Text
Insert a banner in your checkout with the text of your choice.
Choose between **four different styles** for the text widget.
* **Information:** A blue background with a blue information icon.
* **Success:** A green background with a green checkmark icon.
* **Critical:** A red background with a red exclamation point icon.
* **Warning:** A yellow background with a yellow warning triangle icon.
### Flex Testimonials configuration
Flex Testimonials offers two selection modes:
* **Manual selection** - Choose specific reviews to display in your testimonials widget
* **Dynamic** - Automatically fetch and display reviews based on products in the customer's cart
#### Dynamic mode
In dynamic mode, Aftersell imports reviews from your review app and stores them so they can be displayed in the checkout widget. The first import happens automatically within 24 hours, and then once a week after that.
To import reviews immediately, go to **Settings > Product Reviews** and click **Sync now** for your review app.
You can configure:
* **Maximum reviews to show** - Control how many reviews appear
* **Display type** - Choose between horizontal carousel or vertical stack layout
* **Minimum rating** - Set the minimum star rating for reviews to display
* **Truncate review text after (optional)** - Set a maximum character length for review text. When a review exceeds this limit, it's clipped with an ellipsis and a "Read more" button appears. Clicking "Read more" opens a popover with the full review. Leave blank for no limit (default).
### Review app integrations
To use Flex Testimonials, you need to configure your review app credentials in **Settings > Product Reviews**. Aftersell supports:
* **Judge.me** - Requires your Private API token
* **Klaviyo** - Requires your private API key
* **Okendo** - Requires your User ID
* **Yotpo** - Requires your App Key
See the following guides for setup instructions:
* [Judge.me integration](/aftersell/judgeme_reviews_integration)
* [Klaviyo integration](/aftersell/klaviyo_reviews_integration)
* [Okendo integration](/aftersell/okendo_reviews_integration)
* [Yotpo integration](/aftersell/aftersell_yotpo_reviews_integration)
***
## Notes
Allows your customer to add notes to their order. These notes can either be written manually by the customer, or be pre-written notes. Pre-written notes are excellent when your store offers gift wrapping or eco packaging, and you want to give your customers an easy way to opt-in.
***
## Images
Upload a custom image which can be inserted in the checkout.
***
## Text
Insert a banner in your checkout with the text of your choice.
Choose between **four different styles** for the text widget.
* **Information:** A blue background with a blue information icon.
* **Success:** A green background with a green checkmark icon.
* **Critical:** A red background with a red exclamation point icon.
* **Warning:** A yellow background with a yellow warning triangle icon.